Showing posts with label side. Show all posts

Thursday, March 21, 2013

Soft Pretzel Bites {Baking with Sisters, Part 5}

One of the things my sisters and I love to do together is shop. We all have different shopping styles. Jewel and Janell tend to be zippy shoppers, casing the store in a matter of minutes and assessing the merchandise instantly, spending the rest of the time waiting on a bench outside sipping lattes. I take a little more time, not wanting to miss any item on a sale rack, touching all the pretty fabric I know I can't afford, and stockpiling "maybes"- leery of having to take more than one trip to the fitting room. Jessica is a champion browser, circling the store numerous times to be sure nothing has escaped her notice and deliberating over the question of "to buy or not to buy." Although our styles of shopping differ greatly, there is one thing we always agree on when we make trips to the mall.


Pretzels. There's nothing quite like the aroma of a soft, buttery pretzel after the "hard work" of shopping. Or sometimes it's just the fuel you need to get you in "the zone." Whether enjoyed before, after or during the shopping trip, a mall pretzel is a necessary addition to any girl's day out!

However, this time around, we didn't end up having the time to make the hour-long trek to Spokane for our shopping day, so we decided the pretzels would come to us- in the form of homemade soft pretzel bites!

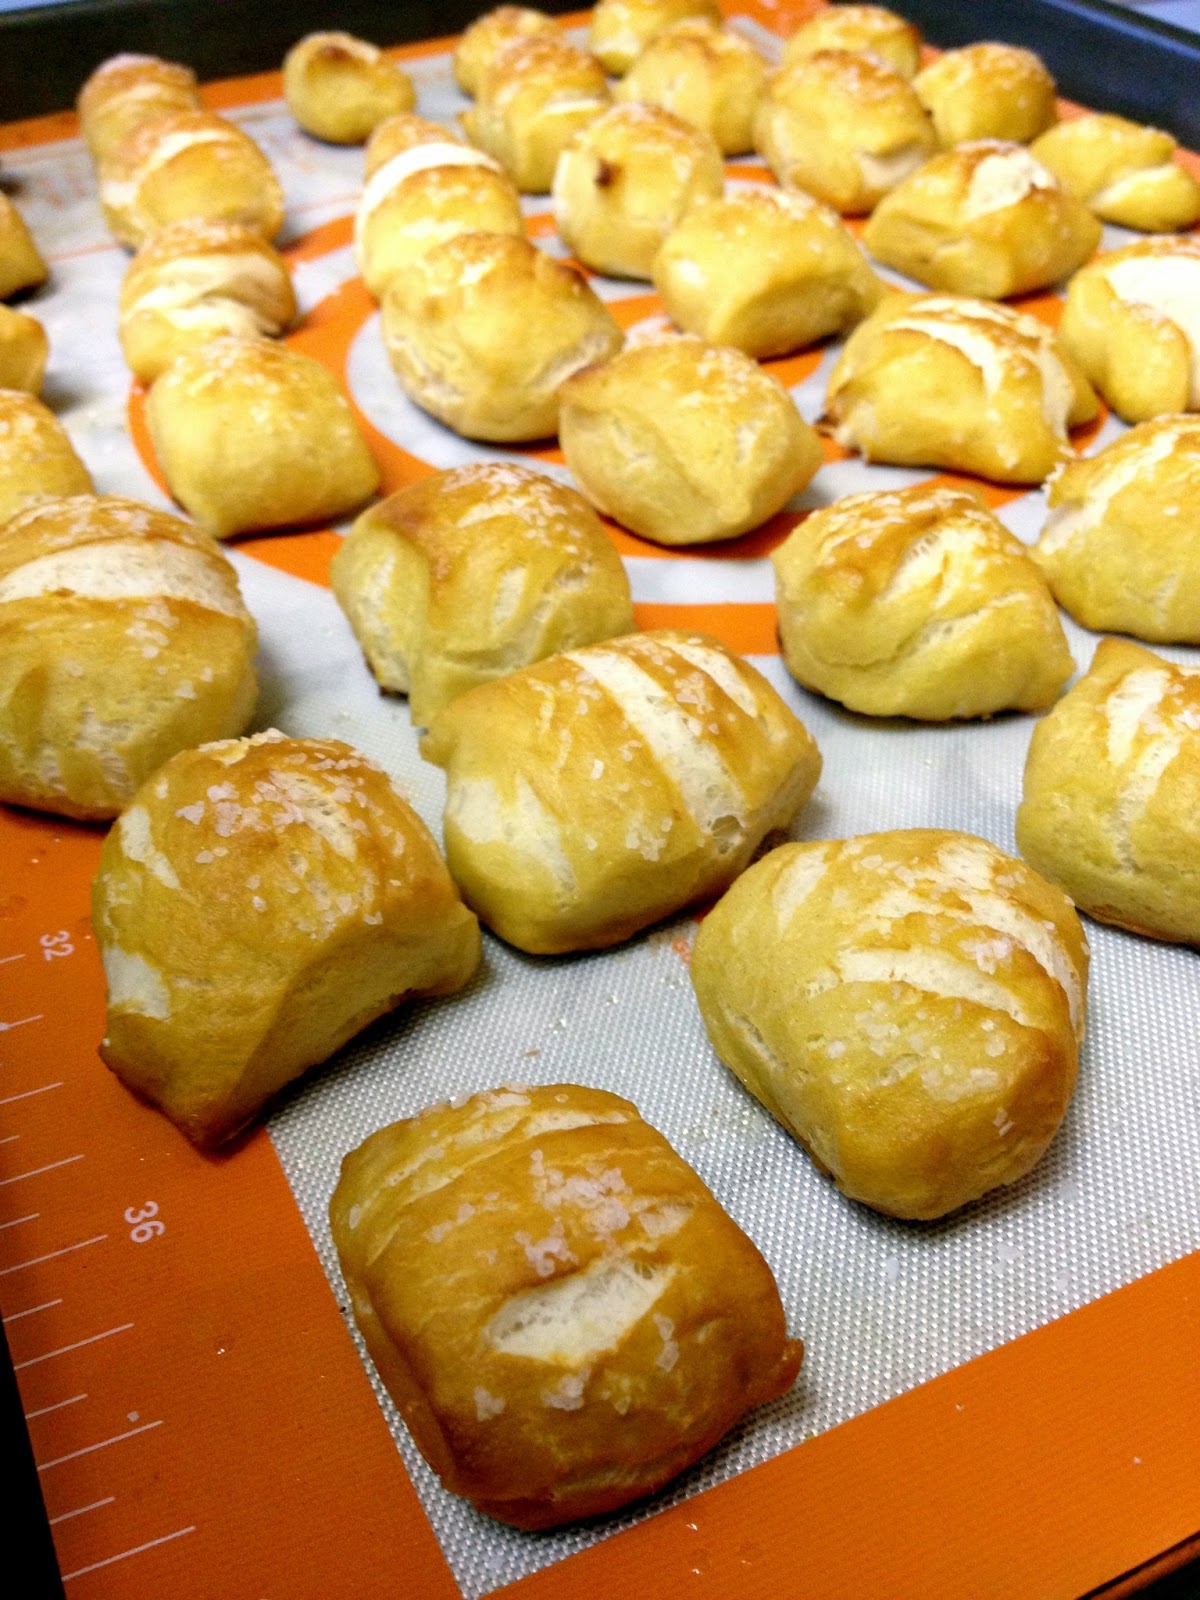
Teamwork made the task easy and fun and the end result was a delicious pile of warm, chewy, buttery, salty bites of pretzely goodness!

Once the dough was made, Jewel scooped spoonfuls of the bites into boiling baking soda water.


Janell slathered melted butter on the bathed bites and Jessica sprinkled them with Kosher salt.


Then into the oven they went! When they came out we slathered on a little more melted butter for good measure and popped them into our waiting mouths- so delicious! They were the perfect snack to go with an afternoon of Downton Abbey and a hair curling party!!


*Note: we tried dipping our bites in melted Velveeta, but it didn't work so well, so please follow the link to "Smells Like Home" to find a recipe for a homemade cheese dipping sauce!


Soft Pretzel Bites
(printable version)
makes a lot!

1 1/2 cups warm water (110-115 degrees)
1 TB sugar
2 tsp Kosher salt
2 1/4 tsp instant yeast
approx. 4 1/2 cups flour
1/4 cup butter, melted
oil
10 cups water (plus more)
2/3 cup baking soda (plus more)
2 TB butter, melted
more salt (for sprinkling)

In the bowl of a stand mixer fitted with the paddle attachment, mix water, sugar, salt and yeast on low speed for 10 seconds. Switch to the dough hook and add the butter and flour. Mix on low speed until well combined. Change to medium speed and knead until the dough is smooth and pulls away from the side of the bowl, 4 to 5 minutes. If necessary to prevent sticking, add more flour 1 TB at a time. Remove the dough from the mixer bowl and transfer to a well-oiled bowl. Turn dough to coat. Cover the bowl tightly with plastic wrap and set in a warm place for 50-55 minutes or until the dough has doubled in size.
Preheat oven to 425. Grease 2 large baking sheets or line with parchment paper. Set aside.
Bring the 10 cups of water and baking soda to a rolling boil in a wide saucepan.
In the meantime, turn the dough onto a lightly oiled surface and divide into 8 equal pieces. Roll each piece into a 24 in. rope. Slice each rope into 1 in. pieces. Place a slightly damp towel over pretzel pieces to prevent them from drying out while you cut the other pieces.
Using a slotted spoon, lower a handful of the pretzel pieces into the water and boil them for about 30 sec., flipping them around in the water with the spoon a couple of times. Remove the pieces from the water with the spoon and drain them on towels as best you can. Place them on the baking sheets. Repeat with remaining dough, adding more water and a pinch or so more of baking soda as needed (some of the water will boil away as you work).
Brush the top of each pretzel with melted butter and sprinkle with salt. Bake until dark golden brown, approx. 10-12 min. Brush with remaining butter before serving. Serve warm.

Thursday, March 14, 2013

Irish Soda Bread


Top o' the morning to you! Though I can really only lay claim to a wee drop of Irish blood on my mother's side, there's still a part of me that enjoys taking part in the St. Patty's Day celebration of all things Irish. I don't typically do much in the way of traditional Irish cooking, but I am intrigued by it.One recipe I knew I wanted to try was soda bread, which derives its name from the baking soda used as leavening.


I had never tried soda bread, but it is wonderful! A sturdy quick bread, slightly sweet with a hearty whole wheat flavor and studded with juicy raisins, it only took me a few minutes to pop it into the oven. I love the rustic looking craggy crust, the crunchy exterior and the soft and chewy inside. It is delicious warm with butter, and I'm sure it would be great toasted, cold, or as a fantastic accompaniment to some good ol' Irish stew!


Suggested Pairings:
Slow Cooker Sausage and Lentil Soup
Slow Cooker Chicken and Barley Soup
Crock-Pot Beefy Cabbage Soup
Hearty Beef and Cabbage Soup


Irish Soda Bread
makes one round loaf

2 cups white flour
2 cups whole wheat flour
2 TB sugar
1 tsp salt
1 tsp baking soda
4 TB butter
1 cup raisins (or dried cranberries, golden raisins, currants, etc)
1 egg, lightly beaten
1 1/2 cups buttermilk

Preheat oven to 425. Lightly grease cast iron skillet or baking pan.
In a large bowl, mix flours, sugar, salt and baking soda. Cut in butter with a pastry cutter or criss-crossed knives until mixture resembles coarse meal. Stir in raisins.
Make a well in the center of flour mixture. Pour in egg and buttermilk and mix with a wooden spoon until dough becomes too stiff to mix.
Coat hands with flour and knead dough in bowl just until it forms a rough ball.
Transfer dough to pan or skillet and shape into a round loaf. Using a serrated knife, make a deep "X" in the top of the loaf.
Bake 35-40 min. or until loaf is deeply browned and bottom sounds hollow when tapped with a knife.
Serve bread warm, at room temp., or toasted with butter or cream cheese.

Thursday, October 4, 2012

Crock-pot Pumpkin Applesauce

Hubby and I recently went fruit picking! We love a spot in Spokane called Greenbluff, which is home to over 40 small family owned farms- not only are the farms beautiful and often quaint, but you are treated to a lovely view of the valley from the top of the bluff! Last summer we picked strawberries, cherries, raspberries and pumpkins. This summer we picked strawberries and cherries. In early September we made our way to the bluff to score some end-of-the-season peaches as well as some early apples (Honeycrisp)! We ate many of the peaches fresh (they were so good!) and I froze enough to fill over a gal. freezer bag to put in our smoothies we enjoy every Sunday night. I used some of the apples for the delicious Caramel Apple Crumble Bars and then I made this amazing applesauce!


The particular flavor of the applesauce will of course depend on the type of apple you choose (I hear a variety is best!), but the addition of cinnamon and some smooth pureed pumpkin is sure to win the approval of your tastebuds no matter what you use! I found that the Honeycrisp apples provided a perfect pairing of sweet and tart.


I also got to use a fantastic gadget that was a Christmas present from my in-laws- an apple peeler! If you don't own one of these, I highly recommend them! This particular one has the ability to peel, core and slice at the same time- truly a time saver! If peeling apples keeps you from baking pies, making applesauce, etc, consider this a good investment (only about $20). It will change your life. :)


Crock Pot Pumpkin Applesauce
adapted from Stockpiling Moms
makes...a lot. :)

8 apples, peeled, cored and sliced
2 tsp lemon juice
5 tsp brown sugar
2 cinnamon sticks
approx. 1 cup pumpkin puree (canned or fresh)

Combine all ingredients in crock pot. Cook on low about 6 hours, stirring occasionally. Remove cinnamon sticks and blend using stick blender to reach desired consistency. Store refrigerated, up to two weeks, or freeze.

Monday, August 20, 2012

Spiraled Squash and Potato Bake

Don't you just love yummy beautiful food? Some foods taste delicious and look awful, and sometimes foods don't live up to their looks in the taste department. This pretty dish, however, is a winner on both counts. It looks lovely, veggies curled in a lovely spiral, and tastes fabulous as well.

The idea for this side dish has been floating around Pinterest for awhile, and I think it's actually called a "tian" or something like that, and includes tomatoes. I used golden potatoes, zucchini, and yellow crook neck squash in my version, but I have a feeling experiments involving summer squash, sweet potatoes, red potatoes and/or tomatoes, would be awesome!


Spiraled Squash and Potato Bake
serves about 4 as a side

2 cloves garlic, minced
1/2 of a med. yellow onion, diced
about 2 golden potatoes, sliced thin
about 1 med. zucchini, sliced
about 1 yellow squash, sliced
shredded Parmesan cheese
olive oil
thyme

Preheat oven to 375.
Heat olive oil in a frying pan over med. heat. Add onions and garlic and saute until fragrant and transparent, a few minutes.
Lightly grease a pie pan or other round dish. Spread onion and garlic mixture on bottom of pan.
Arrange vegetables in pan, layering in a fairly tight spiral, alternating potatoes and squash. Drizzle with olive oil, sprinkle with thyme, and cover with foil. Bake about 35 min.
Remove foil and sprinkle with Parmesan. Return to oven and bake another 25-30 min. or until browned and potatoes are tender.

Friday, August 10, 2012

Cheesy Zucchini Rice

Is your garden overflowing with summer squash yet? We didn't plant any this year, but I have bought some zucchini at the store and find myself wishing we had! Zucchini is such a wonderful vegetable and can be used in a variety of ways- it soaks up flavor so well! The latest way I tried zucchini was to put in rice!


Grated into thin strips, the squash practically melts into the rice, and combined with cheese and flavored with broth, this perfect summer side bears a strong resemblance to creamy risotto. It is also an eye-pleaser, being a delightfully bright green!


Cheesy Zucchini Rice
adapted slightly from Buns in My Oven
serves about 4

1/2 TB olive oil
1/2 cup white rice
1 cup chicken broth
1 TB butter
1 med. zucchini, grated
1/2 cup cheddar cheese, grated
1/4 tsp garlic powder
salt and pepper to taste
splash of milk, if desired

Heat olive oil in a saucepan over med. heat. Add rice and stir to coat. Toast the rice, stirring often, until it just begins to turn golden.
Pour in chicken broth, bring to a boil and reduce heat to low. Simmer 15-20 min or until most of the liquid is absorbed.
Remove from heat and add butter, zucchini, cheese, garlic powder and salt and pepper. Stir well to combine. Cover and let sit 5 min.
Stir again and add milk if desired.

Saturday, July 28, 2012

Hasselback Potatoes

When I first saw Hasselback potatoes on Pinterest, I was intrigued! They are a beautiful, flavor-filled version of the baked potato (and I guess the name originated in Sweden).

The method of slicing the potato almost all the way through and then baking produces a texture that is crispy toward the top (almost like chips) and soft nearer to the bottom of the potato. Drizzle a little olive oil on top and stuff some garlic in the cracks...mmmm...

What a great new way to serve potatoes!


Hasselback Potatoes
adapted slightly from Seasaltwithfood
makes as many as you want!

potatoes (I used golden), 1 per person
1 clove garlic per potato, peeled and thinly sliced
olive oil
butter
sea salt
pepper

Preheat oven to 425.
Wash each potato and thinly slice almost, but not all the way, through. 


Stuff slices of garlic in the crevices.


 Place potatoes on a baking sheet and top each one with little bits of butter. Drizzle with a small amount of olive oil and sprinkle with salt and pepper.


Bake about 40 min. or until skin is crispy and flesh is soft.


Friday, July 13, 2012

Cowboy Beans

When Hubby and I were married, three years ago, we got some very cool wedding gifts. One very unique gift we received was from my Aunt Marion. My aunt and uncle live in Malawi, Africa, with their family, serving as missionaries with African Bible Colleges. Unfortunately, because it wasn't a furlough year for them, they were unable to attend our wedding. However, they sent a very special present with my grandparents (also missionaries in Malawi).


It is a beautiful, African-made beanpot. Before I received the pot, along with instructions from my aunt (and a recipe- which I will share with you!), I had never heard of a beanpot. It is ceramic or stoneware (I'm not sure which) with a lid. I think it works much like a crock pot, designed to cook slow and low. If you don't have a beanpot, you may be able to try this recipe in your crock pot instead (although I haven't tested it!).

The recipe my aunt included with the special pot is SO good. I made it for our church's fourth of July barbecue last week and people couldn't stop raving about it! When so many wonderful ingredients are combined, how can you go wrong?


Cowboy Beans
makes approx. 8-10 side-dish servings

1/4 lb. bacon
1/4. lb. hamburger
1 onion, chopped
1 28 oz. can pork and beans
1 16 oz. can kidney beans, drained
1 16 oz. can butter beans, drained
1/2 cup brown sugar
1/3 cup white sugar
1/4 cup barbecue sauce
1/4 cup ketchup
1 TB mustard
2 TB molasses
a few drops of liquid smoke (optional)

Preheat oven to 250.
Fry and crumble the bacon. Brown hamburger and onions in bacon grease.
Combine all ingredients in beanpot and bake 4-5 hrs.
(If you don't have a beanpot, try using the crockpot on low for 4-6 hrs)

Thursday, June 28, 2012

Easy Italian Bread

Ah, there's nothing quite like the smell of fresh baked bread.


And there's nothing quite like how easy this fantastic bread is!

These soft, sturdy, mouth-watering loaves are perfect as a compliment to almost any dinner and would also be a great option for bruschetta or french toast and yet- here's the best part- from start to finish they only take about an hour and half. How great is that? Only six ingredients and two gorgeous loaves of bread in no time flat.


What are you waiting for?


Easy Italian Bread
makes 2 large loaves (approx. 15"x6")

2 pkg. fast rising dry yeast (or 4 1/2 tsp)
2 TB sugar
2 1/2 tsp salt
4 1/4-4 3/4 cups flour, divided
1 3/4 cups warm water (about 130 degrees F)
2 TB vegetable oil

In the large bowl of a mixer, place yeast, sugar, salt and two cups of flour. Mix with regular beater to blend and add the water and oil. Mix on medium speed for 3 minutes. 


Insert dough hook and beat for another 6.5 min., adding flour as needed to keep dough from being sticky.
Place dough on a floured surface, cover with a cloth, and let rest for 10 min.


Punch down dough and form into two long, narrow loaves. 


Place loaves on greased pan, cover and let rise in a warm place for 30 min.
Preheat oven to 375.
Before placing the loaves in the oven, moisten your fingers and gently spread water over the top of the loaves. Cut three slashes in the top of each loaf with a serrated knife.


Place loaves in oven and bake for approx. 25 min. or until risen and golden brown.


Sunday, June 24, 2012

Roasted Brussels Sprouts with Pancetta & Garlic

I have recently discovered I have a thing for brussels sprouts. They are such a unique vegetable- I don't even know how to describe the flavor and texture. They resemble tiny cabbages and are a delicious complement to many dishes. My favorite way to prepare them is roasting. It keeps them tender on the inside while resulting in a crispy, slightly charred exterior. My very first introduction to brussels sprouts was a recipe much like this one- roasted with bacon.


In this recipe, I use pancetta, but you can easily substitute bacon, since I know pancetta isn't something everyone has on hand. I happened to have some in the freezer, leftover from the delicious Creamy Tuscan White Bean Pasta...

So- yum! If you haven't already, give brussels sprouts a chance. If you have, try them again. I bet this recipe will make you a believer. After all, who can resist bacon and garlic? It makes everything marvelous.


Roasted Brussels Sprouts with Pancetta and Garlic
makes about 4 servings

1 lb. brussels sprouts, trimmed and halved (to trim a sprout, slice off the very end and remove the tiny outer leaves)
2 oz. pancetta, visible fat removed and pancetta minced (or you can substitute bacon)
1 garlic clove, minced
1/2 TB olive oil
1/4 cup water

Preheat oven to 450.
Toss together all ingredients except water. Season with salt and pepper if desired. Spread in one layer in an 11x7 baking pan.
Roast in upper third of oven, stirring once halfway through roasting, until sprouts are brown on edges and tender, about 25 min. total. Stir in water, scraping up browned bits. Serve immediately.

Wednesday, May 2, 2012

Chicken with Brussels Sprouts and Mustard Sauce

There are so many flavor elements to this tasty chicken entree´, it's hard to know where to start!

The tender, juicy chicken breast? Seared quickly in a hot pan, then baked at a high temperature to seal in the moisture.

The buttery brussels sprouts? Sautéed quickly in butter then simmered in chicken broth, they are a perfect compliment to the chicken.

The tangy mustard sauce? The tie that binds- a marvelous marriage of flavors to enhance the rest of the dish.

When blended together, these components make for such a fabulous meal that it will have you sopping up every last drop of the delectable sauce!


Note: The original recipe calls for using an oven safe skillet for easy transfer of the chicken from stove to oven- I adapted this recipe for those of us without oven safe skillets, but please see the original recipe if you do!

Chicken with Brussels Sprouts and Mustard Sauce
adapted from Cooking Light
serves 4

2 TB olive oil, divided
4 skinless, boneless chicken breast halves
salt and pepper
3/4 cup fat free, low sodium chicken broth, divided
1/4 cup apple cider
2 TB dijon mustard
2 TB butter, divided
1 TB chopped fresh flat-leaf parsley
1/2 tsp cornstarch, mixed with a little cold water until smooth
12 oz. brussels sprouts, trimmed and halved (frozen or fresh- if frozen, thaw slightly to halve)

Preheat oven to 450.
Heat a large skillet over hight heat. Add 1 TB of the oil. Sprinkle chicken with salt and pepper and add to pan. Cook 3 min. or until browned. Turn and transfer to greased glass baking pan. Bake 9 min. or until done (my chicken breasts were a little on the thick side so they took about 15 min.). Keep warm.
Meanwhile, using same pan used to cook chicken, heat over med-high. Add 1/2 cup chicken broth and cider. Bring to a boil, scraping pan to loosen browned bits. Reduce heat to med-low and simmer 4 min or until slightly thickened. Whisk in mustard, 1 TB butter, parsley and cornstarch mixture. Pour sauce into container to keep warm and prepare sprouts in same pan.
Heat remaining TBs of oil and butter in pan over med-high heat. Add sprouts; saute 2 min. or until lightly browned. Add a pinch of salt and remaining chicken broth. Cover and cook 4 min. or until crisp-tender. Serve sprouts with chicken and sauce.

I highly recommend serving this dish alongside easy and delicious Rosemary Potatoes, aslo found on Cooking Light.

Monday, April 30, 2012

Best Ever Potato Salad

So. Potato salad...it seems like one of those foods where everyone has one that they claim is the best. Grandma's perhaps. Or Aunt So-and-So's. Or your best friend's mother's. Whoever it is that makes the quintessential salad, we're always sure they've got the corner on the market. For me it is a lady in our church- her traditional potato salad is heavenly (and mind you, these comments are coming from a girl who is a very recent potato salad convert!) and I, unfortunately, have never secured the recipe.
However, having given a shout-out to my favorite traditional rendering, I have to tell you about the salad that blew my traditional socks off. I bumped into it on the internet one day while searching for the perfect recipe to co-star with a grilled cheese sandwich (tune-in May 7 to read all about that delicious episode!). I had potato salad on the brain and was on the hunt for the perfect recipe (I think I'd only made it once before and not very well). When I came across this "Best Ever Potato Salad" it had two things in particular going for it:
1) Challenge was calling my name with the "Best Ever" title tacked on there.
2) It came from the Brown Eyed Baker, who has won my respect through one delicious recipe after another.


The main problem confronting me was the fact that it called for red potatoes, which I was sure I had none. After berating myself for not buying some on my last shopping trip and searching a bit more, unsuccessfully trying to rid the "Best Ever" salad from my mind, I decided to take a culinary leap of faith and make the salad using regular old russets. To my great delight and surprise, upon entering the pantry I found not only a stack of russets, but a bag of reds as well- it seems I had not failed myself at the grocery store after all.
After this, the fact that I had no celery or green pepper seemed inconsequential. I boldly chose instead another green item- a pickle. Pickles are often used in potato salad, I thought, so why not? It worked perfectly, in fact, I think I'm going to keep it that way in my version.
The absolute best part of this salad is the inclusion of, yes, you guessed it...BACON. And, even better, the dressing is mixed in the pan with the bacon drippings!!


 I can testify, this step gives the salad a whole new dimension- this bold, bacony flavor pervading all. This recipe truly would not be worthy of the "Best Ever" category without the bacon. On second thought, what recipe would?
So, be brave and skip Mom's (or Grandma's...or whoever's) salad, just for tonight (but be forewarned- it's addicting!). And don't be surprised if your bold and delicious potato salad doesn't go down in the books as the new "Best Ever Potato Salad" on the block.


Best Ever Potato Salad
adapted from Brown Eyed Baker
makes 6-8 servings

4 cups cubed red potatoes
1 TB olive oil
10 slices turkey bacon (if using pork bacon, reserve 2 TB drippings in the pan and omit olive oil)
3/4 cup mayonnaise
1 TB dijon mustard
2 tsp sugar
1 tsp salt
4 hard-boiled eggs, chopped
2 baby dill pickles, chopped

In sauce pan, cover potatoes with water and boil until fork tender, 8 to 10 min.
Fry bacon in olive oil until crisp. Remove and blot with paper towels. Crumble or chop.
Add mayonnaise, mustard, sugar and salt to bacon drippings and oil in pan. Stir until smooth, scraping pan to include bacon bits.
In a large bowl, combine potatoes, eggs, pickles and dressing. Stir to coat. Stir in bacon.
Cover and refrigerate at least 3 hours before serving.

Saturday, April 21, 2012

Baked French Fries

I know the trend of "baked, not fried"potatoes (not to mention other vegetables, chicken and donuts!) has been going on for quite some time now, but just in case you're like me and have valiantly given it your all and still struggle with the crispiness factor, this french fry recipe is for you. It packs all the natural deliciousness of a potato without the added fat and mess of frying in oil BUT...here's the great part! The fries are actually crispy! I was fortunate enough to stumble upon a blog called Lukas Volger's Veggie Madness that made the claim that these are the "perfect" baked french fries. He goes on to share his secrets to crispiness, and after trying it, I can attest to the fact- this is what my baked fries have been lacking!


The first tip is to soak the fries (potato sticks, at this point) in water prior to cooking. Supposedly this washes off some of the potato's natural starch, resulting in a crispier outside.

Ready to be soaked!

Coated with oil

The second tip is to preheat the baking sheet before loading it with fries- thus the fries instantly begin to cook when they hit the hot sheet.
With these tips duly followed, my result was delicious, crisp, crunchy french fries! I am so pleased to have a great go-to recipe for fries that tastes great and doesn't involve hot oil!!


Perfect Baked French Fries

4 medium russet potatoes, scrubbed
3 TB oil (canola, vegetable or peanut recommended for best results)
salt

Preheat oven to 450.
Meanwhile, cut potatoes into 1/4 in. matchsticks. Place the cut fries into a bowl and cover with cold water. Let stand 15 minutes as the oven preheats.
Drain the potatoes, then cover with water once more and drain thoroughly. Spread potatoes on a tea towel or paper towels and pat dry, soaking up as much water as possible.
Dry out the mixing bowl the fries had been in and return them to it. Toss with oil and salt.
Place the baking sheet in the oven for about 5 minutes to preheat it.
With an oven mitt, remove baking sheet and splash with oil, tilting to coat. Add the fries (watch out! It will sizzle!) and quickly arrange in a single layer.
Bake about 40 min. until browned, checking every 15 min. or so to toss with a spatula. When done, sprinkle with more salt and serve with favorite dipping sauce.

Monday, March 26, 2012

Creamy Avocado Pasta

I know, I know. Don't tell me. I'm a week late to be making green pasta. Seems like it would be a clever thing to whip up for St. Patty's Day, right? Well, that's taking for granted that you plan ahead. And remember holidays. Which I didn't. So...here's some yummy green pasta...a week(+) late!
This pasta combines flavor from some of the yummiest green foods there are: avocado, lime, jalapeño, spinach and basil. Add garlic and pasta to that lineup and you know you're going to encounter some serious deliciousness.

While the making of the sauce did have me wishing I owned a snazzy food processor (or even a not-so-snazzy one!), my blender accomplished the task eventually. I think it prefers smoothies though.
Though coupling the rather exotic and south-of-the-border flavors with spaghetti seemed a bit unusual, it was a delicious new twist on pasta for me. The flavors blended fabulously and the bright green color was fun! I served it alongside chicken breast which I also pan fried in lime juice- a zesty compliment to the filling and creamy pasta.


Creamy Avocado Pasta
serves 4

1 ripe avocado, pitted
1/2 lime
2 garlic cloves
1/4 jalapeno
1/4 cup packed fresh basil
2 cups spinach, divided
1 tsp salt
pepper
2 TB olive oil
1/4 cup Parmesan
1 lb. whole wheat spaghetti (I did not use this much- only about 1/2 a box)

Cook noodles according to package directions. When you drain the noodles, reserve 1 cup of the cooking water. Put one cup of the spinach in the bottom of a serving bowl; top with drained spaghetti and toss for a few minutes to wilt spinach.
While pasta is cooking, prepare sauce. Combine in food processor: flesh from avocado, zest of lime as well as juice, garlic, jalapeno, basil, remaining cup of spinach, salt, pepper to taste, and oil. Blend until smooth.
Pour sauce over pasta and toss to coat evenly, adding some reserved cooking water as needed to loosen pasta. Top with Parmesan and more basil for garnish.

Wednesday, February 22, 2012

Risotto {a little taste of heaven}

Here's a riddle for you...
What is creamy, flavorful, surprisingly easy and practically melts in your mouth?

If you guessed "risotto" you are absolutely correct! :) I recently discovered this fantastic side dish and I am in heaven...it is the perfect way to dress up a meal and eat your helping of rice in a whole new and improved way!


The first time I made risotto, I needed to use up some butternut squash, so I googled a recipe for it - and it was out of this world! Unfortunately, it did not make it's way into pictures...but I knew I would try it again. This time, I made "plain" risotto (although plain is hardly a word I would use to describe this heavenly concoction...) from a recipe off of a site I knew I could trust- Olive Garden. Another love of mine is the Olive Garden restaurant, so I was sure that even though I have never had risotto there, it would be fantastic! And once again, Olive Garden did not let me down. The risotto was creamy and bursting with flavor. The thing I love about risotto is that unlike the regular rice cooking method, you boil the rice in liquid uncovered, so that the majority of it that is not absorbed by the rice evaporates, leaving only the concentrated flavor.


I served the delectable risotto alongside one of my favorite chicken dishes, chicken breasts simmered in a balsamic vinegar and garlic sauce, and they were a perfect match.


Risotto
serves 4 (can be easily halved for 2)

1/4 cup olive oil
1/2 cup onion, chopped
1 1/2 cups Arborio rice (you can also use medium grain rice, although it may require longer cooking time)
1/2 cup white wine
5 cups chicken or vegetable broth
2 TB butter
1/2 cup Parmesan cheese
salt & pepper to taste
fresh parsley to taste (I didn't have any on hand, so dried parsley works too!)

Heat oil, add onion and cook for 3 minutes or until soft.
Keep broth warm in separate pot.
Add rice to onions and cook for 2 minutes, stirring frequently. 
Add white wine and let evaporate. Add the broth 1 cup at a time, stirring frequently. Wait until each addition is almost completely absorbed by the rice before adding the next cup. Continue to add broth until rice is creamy and cooked to al dente (slightly firm). Turn off heat.
Add butter and cheese and stir to combine. 
Garnish with parsley.


Monday, November 7, 2011

Crazy Cooking Challenge: Cream Cheese Mashed Potatoes

I'm so excited! This is my first post with the Crazy Cooking Challenge! November's theme is mashed potatoes, so I scoured the blogosphere for a new and tasty recipe. I adore mashed potatoes. I have recently discovered that I love mashed red potatoes. With the skins on?


And lots of yummy stuff added?


Mmm. I thought it sounded delicious to add cream cheese to the already delightful potatoes, so I searched for a recipe containing that, as well as one limited to the ingredients I possessed (we aren't close to a grocery store and I didn't find my recipe before our shopping trip...). Finally I found a yummy looking recipe on a blog called La Phemme Phoodie. Unfortunately, the recipe called for chive and onion cream cheese (which I'm sure is delicious, but which I did not have!), so I tweaked it just a bit. Since the chive and onion flavor would be missing, I added a couple of cloves of garlic to the boiling potatoes to compensate.


These potatoes are delicious and rich, including milk, butter, sour cream and cream cheese! They are smooth and creamy, and the addition of the cream cheese adds a delightful tang. I cannot accurately call them "Chive & Onion Mashed Potatoes" as she does, but they were delicious nonetheless!! They were a perfect compliment to our cider pork roast and green beans, and they would be more than welcome at our Thanksgiving table in just a few weeks!


Cream Cheese Mashed Potatoes
(printable version)

2 lb. small red potatoes, quartered
1/2 c. butter
1/2 c. milk
1/4 c. sour cream
1 tub (8 oz.) cream cheese
2-3 garlic cloves, halved
1 bay leaf
salt and pepper to taste

Bring a pot of lightly salted water to a boil. Add potatoes, garlic and bay leaf. Cook until potatoes are tender, but still firm, about 10 min. Drain and place in a large bowl (or simply return to pan- not over heat)- remove bay leaf.
Combine potatoes with butter, milk, sour cream, cream cheese, salt and pepper. Mash together until smooth and creamy (or desired consistency).
Serves 8 (I halved it for the two of us and we had about a cup leftover)


Photobucket

Friday, November 4, 2011

Copycat Cornbread: {Famous Dave's Sweet Corn Muffins}

Sometimes on chilly afternoons when I've pulled a leftover soup out of the freezer and put it in the crock pot, I feel a bit more adventurous about tackling a side dish. We have soup once a week (Wednesdays) and for a side we usually rotate between cornbread or muffins, rolls, and biscuits. This past Wednesday, we were having chicken tortilla soup (which I will share with you soon!), so corn muffins sounded like just the ticket.


 But, I've been a little bored lately with my standard corn muffin recipe. So, as usual when I'm looking for inspiration, I scoured the internet. I came across one blogger whose corn muffin recipe instantly got my attention. If you've ever been the the barbecue restaurant Famous Dave's, that should give you a clue. If you've never been to one, it is a chain featuring all things barbecue- and it's delicious! The atmosphere is what you would expect of a barbecue place, all about the meat and the hearty sides. One of those hearty sides is their famous corn muffins, slathered in honey butter. They are the perfect mix of sweet and savory, with a bit of corn crunch on the outside, while being absolutely moist inside. There is also just the faintest hint of a trademark "bite" in the aftertaste, owing to the dash of cayenne pepper.


As I looked down the list of ingredients, however, I was surprise by several unusual additions...cake mix? Mayonnaise?


 It intrigued me, so I had to try them. I was a little afraid the muffins would turn out like cupcakes with all that cake mix, but I needn't have worried. They were corn muffins through and through.

See? Very much a corn muffin. :)
And they were delicious (though I suspect, not low in calories...but that's beside the point)! And true to the original. Although I haven't been to Famous Dave's for awhile, I can testify that the flavor and texture stuck with me, and these make for a delicious home version when you're craving that legendary barbecue goodness.


I doubled the recipe (which ended up making about 32 muffins- perfect for freezing convenience!) because it called for a 9 oz. package of cake mix. I do not think such a size exists, the standard size being 18 oz. So, instead of leaving myself with half a box of cake mix to figure out what to do with, I simply doubled all the other ingredients as well.
Adding whole kernel corn to the mix (like Pennies on a Platter suggests) is not necessary- I don't believe they are found in the original, and I did not add it to mine (though I was in indecision about it, as you see the bag of corn in my picture!), but if you like whole corn in your cornbread, by all means, throw some in! I'm sure Famous Dave won't mind...much.

Can you resist me?
Sweet Corn Bread Muffins
(printable version)
adapted from Pennies on a Platter
makes about 32

4 cups yellow corn meal (finely ground- stone ground could result in very crunchy muffins)
1 package yellow cake mix (I used white)
4 tsp. baking powder
2 tsp. salt
1/4 tsp. cayenne pepper
1 cup milk
1 cup buttermilk
1/2 cup vegetable oil
4 eggs, beaten
4 TB brown sugar
4 TB honey
2 TB of Miracle Whip (I hate the stuff, so I just used mayo)
1 can of drained whole kernel corn, if desired

Whisk together first 5 ingredients, set aside. Combine next 6 ingredients in another bowl and mix well. Add to the cornmeal mixture and stir gently- there should be no lumps, but do not over mix. Fold in mayo and corn (if using).
Let rest, covered, in fridge 30 min. or overnight.
Preheat oven to 400. Fill greased muffin cups 2/3 full. Bake 15-20 min (mine were done at 15) or until tops are golden. Let cool in pan a few minutes; remove to wire rack. Serve with butter and honey if desired.
Source: Pennies on a Platter
Related Posts Plugin for WordPress, Blogger...