Showing posts with label fruit. Show all posts

Friday, August 9, 2013

Lemon Belgian Waffles {with Blueberry Syrup}


It's almost officially the weekend! And weekends mean brunch. Or breakfast for dinner. Pancakes. Eggs. Sausage. Bacon. Waffles.

WAFFLES.

I used to think that waffles were just pancakes all dressed up. With little holes to catch the syrup. Wonderful little holes!

Or to prevent you from spreading butter smoothly across the surface. Evil little holes!

But then my parents gave us a Belgian waffle maker for our anniversary. YUM. Not only does the waffle iron make waffle making fun (it flips over like those ones you always see at hotel continental breakfasts), but the waffles themselves are delicious! They are crispy and light, just perfect for toppings of fresh fruit and whipped cream.


This particular recipe just pops with fresh lemon flavor and gets an extra dose of indulgence from  freshly make blueberry syrup. I tell you, even though the waffles are first rate, the real star of this show is the syrup. It is a gorgeous purple color and a perfect balance of sweet and just slightly tart.

When you've polished off all your waffles, you just might have some of this syrup leftover, so let me clue you in on what to do with the remaining deliciousness (besides just eating it by the spoonful). Last week we served they syrup atop vanilla ice cream at our church potluck- oh, heaven! This week, I have been stirring a tablespoon into my plain Greek yogurt every morning in lieu of my usual honey- oh, double heaven (is that a thing?)! I'm going to miss it when it's gone. Oh, well...guess I'll just have to make some more...


Lemon Belgian Waffles with Blueberry Syrup
makes about 6 waffles

Waffles:
2 cups all purpose flour
1/2 tsp baking soda
1/2 tsp salt
1 1/4 cups buttermilk
1/2 cup milk
2 TB vegetable oil
2 TB applesauce
2 large eggs, separated
2 TB white sugar
1 1/2 TB lemon zest
2 TB fresh lemon juice

Preheat a Belgian waffle iron and grease lightly.
In a mixing bowl, whisk together flour, baking soda, and salt. In a separate large mixing bowl, whisk together buttermilk, milk, vegetable oil, applesauce, 2 egg yolks, sugar, zest and lemon juice. In a small bow with an electric hand mixer (or in the bowl of a stand mixer), beat 2 egg whites until soft peaks form.
Slowly add flour mixture to butter mixture, whisking as you do so, just until combined (don't overmix- batter should be slightly lumpy). Using a rubber spatula, gently fold in egg whites until combined. 
Spoon about 3/4 cup batter onto hot waffle iron and cook according to manufacturer's directions, until golden (cooking time will vary). Slowly lift lid when finished and carefully remove waffle. Repeat with remaining waffles and serve warm with blueberry syrup if desired.

Blueberry Syrup:
1 cup white sugar
2 TB cornstarch
1 cup cold water
2 cups fresh or frozen blueberries
1 1/2 TB fresh lemon juice

Whisk together sugar and cornstarch in a medium saucepan. Stir in water, add blueberries and lemon juice. Cook mixture over medium high heat, stirring frequently until mixture reaches a boil.
Reduce heat to medium low and boil gently for 1 minute, stirring constantly.
Pour syrup into a blender, cover and blend on low speed about 1 minute or until well pureed. 
Serve over waffles, ice cream, yogurt, etc.

Friday, July 26, 2013

Raspberry & Grilled Chicken Salad {with Roasted Raspberry Balsamic Vinaigrette}


Hubby and I absolutely love our summers here in the northwest! One of our favorite things about it is picking fresh fruit from the local farms around our area, and berry season is an extra-special treat.

Unfortunately, due to vacation, company, and a generally busy schedule, we discovered that we had completely missed strawberry season! I am really disappointed because I like to freeze 10 lb. or so to have on hand for our Sunday night smoothies!

We were also sad to find out when we arrived on the bluff that a poorly timed hail storm had ruined many of the season's cherries! We managed to find some good ones amidst the splitting and small fruit, but I'm sure it's a blow to the farmers!

However, even in the bad news, there was a bright spot- raspberries!


We spent an hour or so in 90+ degree weather to glean these beauties, but they were worth it! I think I had forgotten how much I enjoy a good raspberry.

So, inspired by our bountiful supply of sweet and tangy berries, I decided to adapt Closet Cooking's recipe for a bright strawberry salad into a raspberry salad! It did not disappoint! The rich combination of goat cheese, pecans and bacon topped with succulent grilled chicken was perfectly complimented by the acidic bite of the beautifully pink roasted raspberry balsamic vinaigrette.


Tip: If you're tempted to skip making your own dressing in favor of a pre-made balsamic vinaigrette- don't! It only takes a few extra minutes, and it's well worth your time!


Raspberry & Grilled Chicken Salad
inspired by Closet Cooking
serves 4

For Salad:
1 lb. chicken breasts
1 cup roasted raspberry vinaigrette, divided (recipe follows)
5 cups fresh baby spinach
2 cups fresh raspberries
4 strips bacon, cooked crisp and crumbled
4 oz. goat cheese, crumbled
1/4 cup pecans

Place the chicken and 1/2 cup of the dressing in a large ziploc bag and marinate at least 30 minutes or up to overnight.
Heat the grill to medium heat and brush lightly with oil. Grill chicken until internal temperature reaches 170 degrees (7-8 min. per side).
Meanwhile, prepare salad. Toss spinach with raspberries, bacon, goat cheese, and pecans. Dress salad now, or serve dressing on the side if you prefer. When chicken is done, slice thinly and place on top of individual servings.

For dressing (makes 1 cup):
1 cup raspberries
1/4 cup balsamic vinegar
1/4 cup olive oil
1 TB dijon mustard
1 tsp honey
1 large clove garlic, minced
1/4 tsp salt
1/4 tsp pepper

Preheat oven to 425. Place raspberries in a single layer on a baking sheet lined with foil and lightly greased with cooking spray. Roast about 10 min., watching carefully so as not to burn berries. Allow to cool slightly.
Puree all ingredients, including roasted raspberries, in a food processor or blender until smooth, adding more oil or vinegar as needed if dressing is too thick. Store in the refrigerator.

Saturday, November 3, 2012

Whole Wheat Apple Cinnamon Pancakes {with Cinnamon Syrup}

It's Saturday, y'all! You know what that means in our house...breakfast for dinner!

Last weekend I made a batch of these whole wheat apple cinnamon pancakes from Two Peas and Their Pod and man, were they yummy! But let me tell you straight up: the syrup is the best part.


Oh wow. Really. It's like, so amazing. You'll want to put it on everything (after you send your pancakes drifting out to sea on it, that is). Like more apples. Or maybe some peaches. Toast or oatmeal, anyone? Leftover apple cider waffles? Grab anything you can find (including your own fingers of course) and dunk it in this syrup, because yeah, it's that good.

But back to the pancakes. Hearty wheat taste, bursts of fresh apple chunks, hints of spice...I'm pretty much convinced that the "whole wheat" and "apple" parts of the title are just to trick us into thinking we're being all healthy while simultaneously pouring on copious amounts of spicy, sugary syrup that is basically like liquid gold .


The edible kind.

But there I go about the syrup again. Gee. Anyways. Do yourself a favor this weekend and make a batch of syrup. Er. Pancakes.Whatever.

Whole Wheat Apple Cinnamon Pancakes with Cinnamon Syrup
serves 3-4

For pancakes:
1 cup whole wheat flour
2 1/2 TB brown sugar
1 tsp baking powder
1/4 tsp baking soda
1/2 tsp salt
1 tsp cinnamon
1/4 tsp allspice
1 cup buttermilk, plus 2 TB
1 TB canola oil
1 lg. egg
1 tsp vanilla
1 cup diced, peeled apple

For syrup:
1/2 cup white sugar
1/2 cup brown sugar
2 TB flour
1/2 tsp cinnamon
1 tsp vanilla
1 cup water

In a med. bowl, whisk together flour, sugar, baking powder, baking soda, salt and spices. Set aside.
In a small bowl, whisk together buttermilk, oil, egg and vanilla. Pour wet ingredients over dry ingredients and whisk until combined. Do not overmix. Gently fold in apples.
Heat griddle or non-stick skillet over med. heat. Spray with cooking spray. Pour about 1/4 cup of batter onto the hot griddle pan, spacing out pancakes a few inches from each other. When the pancakes start to bubble up, flip and cook until lightly browned.
While the pancakes are cooking, make the syrup. Stir together dry ingredients in a small saucepan. Then add water and vanilla. Bring to a rolling boil, stirring often. Continue boiling and stir until mixture thickens to syrup consistency, about 5-8 min. Remove from heat and let stand a few minutes before serving.
Serve the pancakes with warm syrup. Enjoy!

Wednesday, October 31, 2012

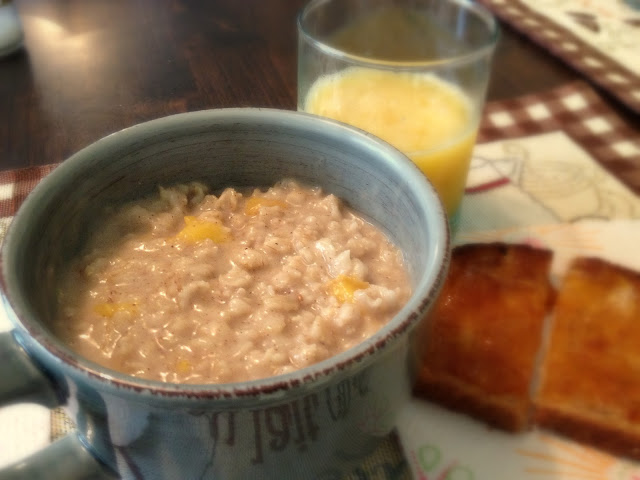
Peaches & Cream Oatmeal


I don't know about you, but I have fantastic childhood memories revolving around those itty bitty packets of Quaker Oats instant oatmeal. We LOVED those as kids. In fact, I still love them.

For our family, those were usually a special treat reserved for our annual camping trip (other special treats included Spam, Svenhard's Danish pastries, sugary cold cereal from those fun little boxes, Dinty Moore stew, etc.). They were also a staple breakfast item at my great-grandma's house. She kept strictly to the Apples & Cinnamon flavor. I've loved just about every flavor I've tried, especially the "& Cream" varieties (with perhaps the exception of "Bananas & Cream").

Recently when Hubby and I took our own camping trip, I couldn't help but snag a box of the "& Cream" instant oatmeal packets. They were of course fantastic (I avoided the banana). One day when I was enjoying the "Peaches & Cream" variety, I stirred in a few chopped ripe peaches (a great idea, by the way) and that got my wheels turning.

So back at home, I created my own homemade version of "Peaches & Cream" oatmeal. It isn't instant, mind you, but it is delicious. No powdered "cream" or dehydrated peaches here- this is the real stuff. And boy, is it good. I used peaches that I had previously peeled, sliced and frozen (no thawing necessary), but I think it will work equally as well with fresh or canned peaches. Another bonus to making your own is that you can adjust the portion size! This recipe makes a pretty hearty 2 person meal and is perfect for these chilly fall mornings!


Homemade Peaches & Cream Oatmeal
by Jenn
makes 2 hearty servings

3 cups water
dash salt
1 1/2 cups old-fashioned oatmeal
1 cup chopped peaches
1/2 tsp cinnamon
1/4 tsp nutmeg
3 TB brown sugar
2 TB heavy cream or half and half

Bring water and salt to boiling in a small saucepan. Stir in oats and peaches and reduce to medium heat. 
Cook 5-8 min., stirring occasionally, or until most of the liquid is absorbed (or until it reaches desired consistency- remember the oatmeal will thicken somewhat as it cools). 
Remove from heat and stir in spices and brown sugar. Stir in cream.

Thursday, October 4, 2012

Crock-pot Pumpkin Applesauce

Hubby and I recently went fruit picking! We love a spot in Spokane called Greenbluff, which is home to over 40 small family owned farms- not only are the farms beautiful and often quaint, but you are treated to a lovely view of the valley from the top of the bluff! Last summer we picked strawberries, cherries, raspberries and pumpkins. This summer we picked strawberries and cherries. In early September we made our way to the bluff to score some end-of-the-season peaches as well as some early apples (Honeycrisp)! We ate many of the peaches fresh (they were so good!) and I froze enough to fill over a gal. freezer bag to put in our smoothies we enjoy every Sunday night. I used some of the apples for the delicious Caramel Apple Crumble Bars and then I made this amazing applesauce!


The particular flavor of the applesauce will of course depend on the type of apple you choose (I hear a variety is best!), but the addition of cinnamon and some smooth pureed pumpkin is sure to win the approval of your tastebuds no matter what you use! I found that the Honeycrisp apples provided a perfect pairing of sweet and tart.


I also got to use a fantastic gadget that was a Christmas present from my in-laws- an apple peeler! If you don't own one of these, I highly recommend them! This particular one has the ability to peel, core and slice at the same time- truly a time saver! If peeling apples keeps you from baking pies, making applesauce, etc, consider this a good investment (only about $20). It will change your life. :)


Crock Pot Pumpkin Applesauce
adapted from Stockpiling Moms
makes...a lot. :)

8 apples, peeled, cored and sliced
2 tsp lemon juice
5 tsp brown sugar
2 cinnamon sticks
approx. 1 cup pumpkin puree (canned or fresh)

Combine all ingredients in crock pot. Cook on low about 6 hours, stirring occasionally. Remove cinnamon sticks and blend using stick blender to reach desired consistency. Store refrigerated, up to two weeks, or freeze.

Thursday, September 20, 2012

Caramel Apple Crumble Bars

Are there two things that say "Fall is coming!!" more than apples and caramel? Together? I think not.


Every year I struggle with the fact that summer is waning and fall is moving in.

Even now, as I write about a delectable fall treat, the war wages! It doesn't help that it's still about 80 degrees outside.

And hey people! Fall isn't officially here until Saturday!


Maybe you're welcoming fall with arms wide open, already stirring the soup kettle, scouting out the pumpkin patches, lighting up your apple scented candles and drizzling caramel and/or shaking cinnamon on everything imaginable.

But, if you're like me and you need something to get you in the mood for crisp cool nights, boots, pumpkin lattes and spiced cider, here's a surefire recipe. Watch out! It'll be here before we know it.


Caramel Apple Crumble Bars
adapted from Annie's Eats
makes about 16 bars

Filling:
2 TB unsalted butter
4 large (or 5 med.) apples, peeled and sliced
3 TB sugar
3/4 tsp cinnamon
dash of nutmeg
9 oz. caramel candies, unwrapped
2 TB heavy cream

Dough:
1 1/2 cups flour
1 cup old fashioned oats
1/3 cup sugar
1/3 cup brown sugar, lightly packed
3/4 tsp baking powder
1/2 tsp salt
1/4 tsp cinnamon
12 TB cold butter, cut into small pieces
1 lg. egg yolk
1 tsp vanilla extract

Preheat oven to 375. Line a 9x9 in. baking pan with foil or parchment paper. Grease.

To make the filling, melt the butter in a large skillet over medium heat. Stir in the apple slices, sugar, cinnamon and nutmeg. Cook, stirring occasionally, until the apples are golden brown and caramelized, about 15 min. Remove from heat.

Meanwhile, prepare the dough. In a medium mixing bowl combine flour, oats, sugars, baking powder, salt and cinnamon and stir to blend. Add in the butter and cut into the dry ingredients using a pastry blender until the mixture resembles a coarse meal. Add in the egg yolk and vanilla and stir with a fork just until a crumbly dough begins to form. Transfer about two thirds of the dough to the foil lined pan and press down into an even layer. Bake until light golden, about 12-14 min.

While the base is baking, combine the caramels and cream in a saucepan set over medium heat. Melt the caramels, stirring occasionally, until the mixture is totally smooth. Remove from heat. Once the base layer is baked, pour the caramel over the top. Layer with the cooked apple slices. Crumble the remaining dough over the apple slices.

Bake 22-25 min. or until the top is golden brown. Transfer the pan to a wire rack to cool.  Let cool completely before slicing and serving.

Wednesday, July 11, 2012

Strawberry Shortcake Skewers

I have been away too long! I apologize for leaving you recipe-less for over a week, but Hubby and I had a rather unexpectedly full and emotionally tiring week. I cooked {for us} only a handful of times the whole week (4 potlucks were involved in the craziness) and every time I had time I tried to squeeze in a load of laundry or do something totally mindless.


For the fourth, I did manage to make these skewers and a pot of phenomenal baked beans which I will share with you very soon, I promise! Hint: they got rave reviews at our church barbecue!

But back to the skewers.

These adorable little creations are, of course, Pinterest inspired. I was intrigued by Lady Behind the Curtain's idea to put strawberry shortcake on a stick! Genius! Everything is more fun on a stick. In her recipe, she used Grand's refrigerated biscuits, strawberries and Cool Whip. I decided to go a step or two further and use my favorite biscuit recipe and make my own homemade whipped cream (the perfect use for that carton of whipping cream leftover from the strawberry icebox cake!).

So, in the first attempt, I made a double batch of biscuits and, in the spirit of patriotism, cut them out with a cute little star shaped cookie cutter.


These I stacked with thick slices of strawberries and a dollop of whipped cream. For the red-white-and-blue effect, I topped the whole thing off with a blueberry. They were delicious, and very cute, but I'm sorry, I have no pictures. However, there were several problems with these...

1) Whipped cream is very difficult to "skewer"- I imagine Cool Whip would be the same.

2) Due to the whipped cream, the skewers are almost impossible to stack, which makes presentation and preparation difficult.

3) Not enough strawberry.

Going to a potluck the next day, I still had leftover star biscuits, so I decided to try revising the process. I simply skewered a biscuit, topped it with a whole hulled strawberry (end also removed), followed by another biscuit, another strawberry, and finally, another biscuit. They were stackable, transportable, and I served them with the whipped cream on the side for dipping or smearing or what have you. Definitely easier to handle (and better for preparing in advance!). And- more strawberry!! :) Problem(s) solved.


So, try it either way, but do try it! These little gems are so fun for summer get-togethers- my friends couldn't stop talking about them! They are cute and tasty and so unique!

Strawberry Shortcake Skewers
makes about 3 dozen skewers (cut in half if desired)

wooden skewers
doubled recipe for biscuits (or use you own favorite recipe)
sugar for sprinkling
enough strawberries to allow 2 per skewer
blueberries, if desired
whipped cream or Cool Whip for dipping

Make biscuit dough as directed. Roll out to 1/2 in. thickness. Cut out using a 1 1/2 in. cookie cutter in whatever shaped desired. Place on baking sheet. Sprinkle biscuits with sugar. Bake slightly less than directed (since biscuits are small). Cool completely.
Wash and hull strawberries.
To assemble: Skewer a biscuit and slide it down the stick, leaving room for a "handle". Follow this with a strawberry and repeat once, then end with another biscuit. Top with a blueberry if desired.
Repeat for each skewer.
Serve with whipped cream or Cool Whip for dipping.

Tuesday, June 26, 2012

{No-Bake} Strawberry Icebox Cake

I am so excited about strawberry season!! While we wait for them to ripen in our own little garden, or even in the u-pick fields of Spokane's foothills, I am eagerly embracing the advent of store-bought California berries.


My husband happens to be a strawberry dessert fanatic (I think I could bribe him for just about anything with strawberry shortcake). While I normally make a beeline toward anything containing chocolate, hubby heads straight for anything with fruit. 

Especially berries. 

Especially strawberries. 

When it comes to this mile-high dessert, we agree: it's amazing. 

And, it has the best of both worlds- chock full of bright red berries and topped off with a drizzle of dark chocolate ganache. Who can resist such a combination? 


But, we haven't even come to the best part! 

Sandwiched between layers of graham crackers and strawberries are heavenly heaps of whipped cream- homemade whipped cream- oh so lightly sweetened with powdered sugar and vanilla.

Are you picturing this in your head now? 

Stacks upon stacks of honey graham crackers, fluffy whipped cream, bright sweet strawberries- all drizzled topped off with a drizzle of decadent dark chocolate. 

While this concoction may tower in your imagination and on your plate, it is as light and airy as summer itself! 

Just a hint of sweetness. 

Just a smidge of richness. 

And no need to turn on your oven.


No-Bake Strawberry Icebox Cake
(printable version)
adapted from the Kitchn
serves 8 to 12

2 lbs. fresh strawberries, washed and hulled (save a few for garnish!)
3 1/4 cups whipping cream, divided
1/3 cup confectioners sugar
1 tsp vanilla
3-4 sleeves of graham crackers (20-24 whole crackers)
2 oz. dark chocolate, finely chopped

Slice berries into thin slices and set aside.
With a hand mixer or in the bowl of a stand mixer (bowl and beaters chilled), whip 3 cups of the cream until it just holds stiff peaks. Add the confectioners sugar and vanilla and whip to combine.
Spread a small spoonful of whipped cream on the bottom of a 9x13 baking pan (or platter of similar size). Lay down a layer of graham crackers (I used 5). Lightly cover the crackers with whipped cream, followed by a single layer of strawberries. 
Repeat 3 times until you have 4 layers of graham crackers. Spread the last of the whipped cream over the top and swirl lightly with a spoon. Add a few more strawberries.
To make the ganache, heat the remaining cream until bubbles form around the edges, then pour over the chopped chocolate. Let it stand a few minutes, then whisk until thick and glossy. Drizzle this over layered dessert with a spoon.
Refrigerate at least 4 hours, or until crackers have softened completely. Garnish with additional berries.

Monday, June 18, 2012

Roasted Tilapia with Black Bean & Mango Salsa

I have been off the blogging kick lately- for several reasons. I have had a cough for 3 weeks now (already did the antibiotics...it just might be starting to go away) and even though I made some yummy food, I just didn't feel like writing. I was also gone a good part of last week to a mini-reunion in Seattle with my Ecola housemates! We had a great time catching up and enjoying lots of girl silliness. But now I'm back and I am determined to make an effort to share with you some of the yummy foods that we've enjoyed the last couple of weeks.

To start us off, I bring you a delectable fish entree! The mild, white tilapia is oven-roasted to perfection, but the real star of the show is the salsa. If you've ever been leery about using fruit in a savory dish (such as salsa), now is your chance to branch out! The mango, black beans, lime and cilantro meld beautifully (both in taste and in visuals!) and the salsa pairs perfectly with the mild fish. Not only does the mango add a pop of color, it pops with flavor as well! I was pleasantly surprised to find that fruit salsa can be absolutely delicious!


Oh, and if you're wondering what the green stuff is in the picture, it's an avocado cream sauce- perfect for dipping and great on rice. Simply mash 1 avocado and mix with 1/3 cup greek yogurt and 2 TB sour cream!


Roasted Tilapia with Mango & Black Bean Salsa
adapted from Kalyn's Kitchen
serves 4

4 tilapia filets, room temperature
1 can black beans, drained and rinsed
1 mango, peeled and diced
1/2 cup chopped cilantro
2-3 TB lime juice
2-3 TB olive oil
1/2 tsp cumin

Preheat oven to 400.
Lightly spray glass baking dish with cooking spray. Place tilapia in pan, drizzle lightly with olive oil. Roast 25-35 min. or until fish flakes easily with a fork.
Prepare salsa: if beans are wet, blot dry with a paper towel. Mix beans, mango, cilantro, 2 TB lime juice, 2 TB olive oil and cumin in bowl. Add more lime juice and oil to taste.
Spoon salsa over hot roasted tilapia.

Thursday, June 7, 2012

Mango-Pineapple-Orange Smoothie {a Crazy Cooking Challenge}

It's Crazy Cooking Challenge time again!

Photobucket

 I was so excited to hear that this month's challenge is fruit smoothies! Hubby and I LOVE smoothies. 5+ years ago, my brother went through a smoothie "kick" and he sold me on it. I even went so far as to spend a lot of my hard earned bucks on a new quality machine. I think the bucks paid off, because the blender still stands (although, thanks to another brother, the stopper on the lid has been broken for about 3 years...still holding on with some massive amounts of masking tape)! And more importantly, it still blends. Delicious concoctions- with smoothies, the sky is the limit!

Strawberry banana is a reigning favorite, as well as mixed berry (usually strawberries, raspberries and blueberries) and peach-strawberry. I have also sampled the green variety, throwing handfuls of fresh spinach into the mix (which, amazingly, you can't even taste!). Also on the sampled list are oatmeal smoothies and ones with flax seed included (didn't really care for the flavor or texture on that one). We generally like our smoothies creamy, so in addition to the fruit (always frozen so we don't have to water it down with ice!), and fruit juice we usually toss in some milk and/or yogurt.


This particular smoothie was chosen as a candidate because of it's use of mango. I love mango, and as Providence would decree, Travis brought me home a whole box of mangos from our Food Bank's surplus yesterday! I knew then and there it would be mango. So chopped and froze some that were ripening fast and today I tried this promising recipe from The Fusion Chronicles. Her recipe is a sort of copycat for the McDonald's mango pineapple smoothie and it is spot on! If you've ever had one from McDonald's, I can promise you, this is better! It is creamy, sweet and tangy and the consistency is perfect. The flavor of a mango is hard to describe, but I always come up with "bright" (if bright is a flavor!).


Mango-Pineapple-Orange Smoothie
(printable version)
makes one (about 12 oz?)
adapted from The Fusion Chronicles

1 cup chopped frozen mango (if using fresh mango, add a few ice cubes)
1/4 cup pineapple juice
1/4 cup orange juice
1 container (6 oz) fruit flavored yogurt (pina colada recommended- I used vanilla)
2 TB sweetened condensed milk

Put all ingredients in blender and blend until smooth. Enjoy!


Friday, February 24, 2012

Lemon Blueberry Bars

These delicious and colorful treats jumped out of a magazine at me just in time for spring!


Am I being too optimistic? Is it not spring yet? Oh, fine. So it's still February. It's almost March, right? I'll take it.

Anyway, as spring approaches...I've found you the perfect way to welcome it- with a fruity and beautiful bar, loaded with creamy lemon and topped with sweet blueberries.


It doesn't get much easier, either. This tasty recipe consists of a simple crumbly, buttery crust, topped by a creamy mixture of canned lemon pie filling and sweetened condensed milk, followed by a can of sweet and pretty blueberry pie filling to top it off.


Lemon Blueberry Bars
(printable version)
serves 24

3/4 cup butter or margarine, melted
1/2 cup powdered sugar
2 tsp vanilla
1/4 tsp salt
2 1/4 cups flour
1 can lemon pie filling (any size)
1/2 cup sweetened condensed milk (not evaporated milk)
1 (21 oz) can blueberry pie filling

Preheat oven to 350. Line 13x9 in. pan with foil.
Combine butter, powdered sugar, vanilla, and salt. Add flour gradually until well blended.
Press dough evenly into bottom of prepared pan. Bake 20 min. or until edges are lightly browned.
In separate bowl, combine lemon filling and milk until well blended.
Spread lemon mixture over baked crust.
Spoon blueberry filling gently over lemon mixture. Return to oven and bake 15 min. or until set.
Cool in pan on wire rack. Cut into squares.

Source: PieFilling.com (originally found in AllYou Magazine)

Saturday, January 28, 2012

Autumn Chopped Salad {and Homemade Balsamic Vinaigrette}


I know, I know. It's winter. It's not autumn. And it's not salad weather. Well, maybe it's "salad weather" where you are, but here in the Inland Northwest we have piles of snow and icy slush everywhere. However, despite the cold (or perhaps because of it...) I decided a salad sounded quite tasty. Most of my winter cooking consists of soups, casseroles and other hearty, soul-warming food, but today was a salad day. Something about a crisp, green salad piled high with beautiful looking veggies (or fruits, in this case) takes the edge off those winter blues.
This is a fantastic salad. Come summer time, I am sure it will become a staple! I tweaked it from the original version, which I discovered on Pinterest (making a lot of good discoveries there these days!), and boy, was it tasty! It is a beautiful and filling main dish salad, or you could leave the chicken out and serve it as a lovely side to some tasty barbecue.
If you're having a "winter blues" kind of day, or if you just need to shake up the same ol', same ol' routine, whip up this salad and you've got the cure!


Autumn Chopped Salad
(printable version)
serves 4 as a main dish

7 to 8 cups chopped romaine lettuce
2 chicken breasts, cooked to your preference (I pan-fried mine in olive oil and butter, drizzled with a little balsamic vinegar!) and cubed
1 pear, chopped
1 apple, chopped
1/2 cup dried sweetened cranberries
1/4 cup chopped walnuts
7 slices bacon (I used turkey bacon), crisp cooked and chopped or crumbled
1/4 cup feta cheese, crumbled
Poppy seed salad dressing (I used approx. 1/2 cup)
Balsamic Vinaigrette (I used approx. 1/4 cup- recipe for homemade follows)

Combine all ingredients except dressings in large salad bowl. 
Drizzle generously with poppy seed dressing. Follow with a drizzle of balsamic vinaigrette. Add more if necessary.

Homemade Balsamic Vinaigrette
(from back of Pompeian vinegar bottle)
1/4 cup balsamic vinegar
3/4 cup olive oil (or, since olive oil is expensive, I use part olive oil, part other oil)
1/2 tsp garlic powder or 1 TB fresh garlic, minced (I like the powder since it dissolves)
1/2 tsp salt
1/2 tsp freshly ground black pepper

Put all ingredients in bottle or jar with a tight fitting lid and shake vigorously to combine. Store in the refrigerator.

Source for Salad: Espresso and Cream Recipes

Sunday, October 16, 2011

Mini Apple Crisp


My list of things to love about autumn is getting so long! All the beautiful colors, falling leaves, pumpkins, soup, spices, scented candles, cuddling under warm blankets, the first frost, foggy mornings, crisp sunshine, and...apples. The smell of apples- fresh apples, cooked apples, overripe wild apples dropping to the ground to be harvested by hungry winter-wary animals. The look of apples, not-quite-round and shiny, coming in just as many shades as the leaves that are already dropping from the trees along the river. The taste of apples- crisp and fresh, varying as much in texture and flavor as they do in autumnal hues, ranging from sweet and mellow to tangy and downright sour.
Several days ago, in a quandary over what to make for National Dessert Day (thank you to whomever began this  wonderful excuse to whip up something sweet!), I decided I must use my newly purchased little ramekins. I debated over the ideas of custards and souffles and creme brulees, but my mind kept wandering back to the thought of an adorable and simple little apple crisp. Perfect! I was also sick with a cold, so minimal effort and homey comfort was especially appealing.
The crisps were delightfully cute- and a delicious taste of fall in every bite!

Aren't they cute? :)


Miniature Apple Crisp
(printable version)
makes 4 individual servings (I think my ramekins are 4 oz. If you have larger ones, this will probably only serve 2)
a KitchenJoy original recipe

1-1/2 Granny Smith apples, peeled and cut into small cubes
2-3 TB half and half cream
2-3 TB sugar
cinnamon
nutmeg

Topping:
2 TB oats
2 TB brown sugar
2 TB flour
2 TB butter, softened
cinnamon
nutmeg

Preheat oven to 375. Lightly grease ramekins. Mix apples, cream, sugar and spices (to taste). Divide apple mixture evenly among ramekins. Mix oats, brown sugar, flour and spices (to taste) together; cut in butter. Sprinkle mixture evenly over apples. Place ramekins on a baking sheet and bake for 25-35 min., or until topping is browned and apples are tender and bubbly. Enjoy!

Sunday, August 14, 2011

Peach Hand Pies

I have stumbled onto a beautiful culinary discovery! Hand pies! Of course, you have probably had one from McDonald's, or those kind you can get at the supermarket wrapped in a waxy paper. But if you've never had a homemade hand pie, allow me to introduce you...


A hand pie is, in it's simplest form, a circle of golden pie crust folded over a delectable filling. The result is an adorable, scrumptious, hand-held, infinitely variable pastry! Under a flash of inspiration yesterday afternoon, I searched "mini pies" online and happened upon this idea. Putting other recipes aside, I chose the starting point of my mom's own pie crust (which you can find here), and improvised from there. To up the flavor a bit, I swapped out half the shortening for butter, which was delicious. It's so simple! Just roll the pastry out, cut into 5 inch circles (or whatever size you like), put filling on half, and pinch to close!


I used peach for the filling, but now I am itching to try other fruits (Apples, anyone? And my freezer is loaded with strawberries, cherries and huckleberries!), as well as something savory (Maybe a pizza pocket? Maybe something Greek style?)- the possibilities now seem endless! Beware, though, it's hard to stop eating these cute, flaky, little pies!
Bake some up to take on your next picnic or surprise your guests with a darling treat after a summer barbecue- kids and adults alike will find them appealing and delicious!


Peach (or any other filling) Hand Pies
(printable version)
a KitchenJoy original recipe
makes about 7-8 pies

1 recipe Mom's single pie crust (swap half the shortening with butter for flavor)
1-2 ripe peaches (approx.), diced (you can leave skin on or peel)
1-2 TB brown sugar
1-2 TB flour
1/4 tsp cinnamon
1/4 tsp nutmeg

Mix diced peaches, sugar, flour and spice together. Set aside.
Make pie crust dough. Roll out on floured surface to desired thickness. Cut into 5 inch circles. Place circles on cookie sheet.
Spoon 1-2 TB of filling on one side of each circle; fold other half of dough over filling. Pinch to close.
Crimp edges to seal or press lightly with fork tines. Poke holes or make slits in tops of pies.
Sprinkle with granulated sugar if desired.
Chill at least one hour.
Bake in preheated 450 oven 15-20 min (mine were done at 18) or until golden brown and filling is bubbly.
Serve warm or cold.

Tip: if you don't have time to make a homemade pie crust dough, use store-bought!

Saturday, August 6, 2011

Berry-Spinach Salad with Grilled Chicken

It is difficult to know what to name this beautiful salad. Balsamic Chicken Strawberry Blueberry Spinach Salad is just a wee bit long...so I shortened it. Maybe when this post is up, you all can let me know what you think it should be named. I can't quite be credited with creating it, but I couldn't find its exact match readily available on the internet either so... Anyhow, one fateful day as I was running out of the gym on my way to something else at about lunch time, I stopped at the gym's deli and grabbed an interesting looking salad. It was spinach and strawberries, blueberries and feta cheese, with some sliced almonds and grilled chicken lying on top. I have always been a bit wary of fruit in salads, but boy, I can tell you, this salad has won me over permanently.


At the deli, the salad did not come with it's own dressing suggestion, so I chose my own, randomly picking the balsamic vinaigrette (which surely must have been destiny and not random), thinking somewhere in the back of my mind I had heard balsamic vinegar paired well with strawberries.
It was love at first bite. If you are something of a foodie, you know that there are some moments that live in your memory, when you take that first bite of something wonderful and delicious and heretofore unknown and your taste buds simply stand up and sing and you swear you can hear the hallelujah chorus as everything else fades away and all you know is that taste and the feeling that you've just made an life-altering discovery. Maybe I'm being a bit dramatic (maybe I've been reading too much Anne of Green Gables), but I know it was all I thought about on my way home. At every stop sign I took another marvelous bite. I began to think to myself, I must recreate this!


So, on our next shopping trip, I wrote down everything that I remembered from the salad and found a great balsamic vinaigrette recipe to make from scratch. The first time I recreated the salad, we had it alongside steak, so I omitted the chicken and it was fabulous by itself. But the next time I made a meal out of it, and took it up a notch by marinating the chicken in a bit of the dressing before grilling. Oh, yeah.


You have to try this- it's a fantastic easy salad that is perfect for a hot summer day when you don't feel like cooking! And it's versatile too, so put in whatever nuts you like (I used walnuts the second time) and your favorite cheese (although how can you go wrong with feta??) and change it up!
When we made this last night, I also had hubby grill some fresh peaches as a side/dessert.


They were so good! Sprinkled with just a bit of balsamic vinegar and liberally powdered with brown sugar and grilled until tender (a few minutes per side, depending on how ripe they are), the peaches were smoky and sweet, with a lightly charred, crispy sugar topping.


Berry-Spinach Salad with Grilled Chicken
(printable version)
a KitchenJoy copycat recipe
serves about 4 (main dish servings)

About 1 bag (10 oz.) fresh spinach
1 cup (or more) fresh sliced strawberries
1 cup fresh blueberries
1/4 cup (or however much you like) crumbled feta cheese
1/4 cup (or just a handful) sliced almonds or other chopped nuts
enough chicken to go around (we used 2 breast halves for the 2 of us and there was some leftover), marinated in the fridge at least an hour in about 1/2 cup of the dressing, then grilled.

Toss spinach, berries and cheese. Top with nuts and grilled chicken. Coat lightly with dressing on individual plates. Enjoy! Good served with rolls and grilled peaches if desired.

Friday, July 22, 2011

White Chip Fruit Tart

Monday, Travis and I went to a local farming area around Spokane called Green Bluff. There are 43 small family owned farms and orchards, filled with u-pick and picked fruits and vegetables. Aside from the beauty of the farmland, this area is perched on a high bluff overlooking the city of Spokane and the valley. We enjoyed a gorgeous sunny day, picking raspberries and strawberries till our fingers were stained red, and having a fantastic lunch at an adorable farm store outside next to an orchard filled with almost-ripe pie cherries.


It was sort of a magical day, and as we drove home with the smell of ripe berries filling the car, I began to think of what to do with all this beautiful fruit. Tuesday, however, I realized that many of the berries, being quite ripe, were going to go bad soon if I didn't use them or freeze them. So I froze them, knowing Travis and I would never eat 9 pounds of strawberries in a matter of days! But ever since then, I've had fruit on the brain!
We were having company last night, so I racked my brain for something new to try besides the delicious- but done-before- strawberry shortcake or a fresh strawberry pie. I had almost decided to do the pie when I lit on the idea of a tart instead. I have never made a tart, so it would be fun to try. As I looked at recipes, however, they all called for a "tart pan with a removable bottom"- which I do not have (note to self: buy tart pan with removable bottom). Then I found a recipe which appealed to my practical self- in my Hershey's cookbook, a "White Chip Fruit Tart" which assumed nothing about my owning a tart pan, but simply stated, "press dough onto bottom and up side of 12-inch round pizza pan". Yay! I have one of those!


BUT. But, I did not have white chips or whipping cream. Or cream cheese. Easily remedied. IF. If one of our two convenience stores carried white chips, of which I was not entirely convinced. But, I said a quick prayer and headed to the store in faith. One store is about a 1/2 mile or so from our house, the other is about 2 mi. I went to the closer one first and no such luck. Semi-sweet chips and milk-chocolate chips. Nothing white. On to the next store! I crept into the baking aisle, hardly daring to look and there, to my great delight sat ONE dusty, perfectly sized bag of white chips. On to the dairy case and there, among the taller containers of different grades of milk sat ONE tiny little carton of whipping cream. The cream cheese appeared to be more well stocked. I have concluded that the Lord answers culinary prayers!


Anyhow, this tart was really a snap to make and absolutely delicious to eat, as well as a treat for the eyes! I thawed a few strawberries and raspberries and added a couple of fresh peaches I had on hand and the effect was delightful. The filling is creamy, but not too rich, offset by the delightful natural sweetness of the fruit. A pretty and sweet/tart glaze of pineapple juice, lemon juice, sugar and cornstarch keeps the fruit fresh and shiny looking, so if you make your tart ahead of time, it is kept looking beautiful till serving time!


White Chip Fruit Tart
(printable version)
from the Hershey's Cookbook
makes 10-12 (small) servings (more realistically, maybe 8-10)

3/4 cup (1 1/2 sticks) butter, softened
1/2 cup powdered sugar
1 1/2 cups flour
2 cups (12 oz pkg) white chips
1/4 cup whipping cream
1 pkg (8 oz) cream cheese, softened
assorted fresh fruit, sliced

Fruit Topping:
1/4 cup sugar
1 TB cornstarch
1/2 cup pineapple juice
1/2 tsp lemon juice
Stir together sugar and cornstarch in small saucepan; stir in juices. Cook over medium heat, stirring constantly until thickened; cool.

Heat oven to 300. Beat butter and powdered sugar in small bowl until smooth; blend in flour. Press mixture onto bottom and up side of 12 in. round pizza pan. Flute edge if desired.
Bake 20 to 25 min or until lightly browned. Cool completely.
Place white chips and whipping cream in medium microwave safe bowl. Microwave 1 to 1 1/2 min. or until chips are melted and mixture is smooth when stirred. Beat in cream cheese. Spread on cooled crust. Prepare fruit topping. Arrange fruit over chip mixture; carefully pour or brush topping over fruit. Cover; refrigerate assembled tart until just before serving.


Tuesday, July 19, 2011

{Your Favorite Fruit Here} Cobbler


Fruit desserts are the essence of summer. And a cobbler is a list-topper when it comes to fruit desserts. It is simple and oh, so versatile, and the perfect compliment to a summer barbecue. When I was a young girl, I liked to browse through my mom's cookbooks, and especially one intrigued me. It is called Family Favorites, and it is a collection of recipes put together by California home economics teachers! Therefore, the recipes are easy and well-tested. When I got married, I made sure to order a used copy (all you can find) of this special recipe book on Amazon.com for myself! Leafing though this book one day I came across this fruit cobbler recipe and decided tried it with peaches. We also discovered it is amazing with blackberries, which grow rampantly in my parent's Oregon backyard. As they say, the rest is history.
For many summers now, this recipe has been the request of small family dinners (correction: we never have "small" family dinners in my family...) as well as big parties (this is usually what our "small family dinners" turn into)! I remember making several LARGE pans of it when my brother got married almost 8 years ago. Several summers ago, I made two 9x13 pans full for my grandpa's birthday celebration in Florida (where blackberries are scarce- my grandma paid a small fortune for them!). Earlier this summer, my sisters texted me, requesting it. I've made it with fresh, u-picked local peaches, canned Costco peaches, white peaches, fresh Oregon blackberries and frozen blackberries, but it is ALWAYS delicious.


Recently I served it (peach style) for my in-laws after a delicious steak dinner, alongside my mother-in-law's fantastic fresh, homemade vanilla ice cream, and amazingly my father-in-law remarked later that he preferred the cobbler to the ice cream!


Enjoy the recipe with whatever your favorite summer fruit is, and maybe it will become your family's tradition too!


By the way, I apologize, I was so excited to eat the finished cobbler, that I forgot to take a picture! You'll just have to imagine it, steaming...with a scoop of homemade ice cream...summer in a bowl.


Fruit Cobbler
(printable version)
from "Family Favorites"

1 cup sugar
1 cup flour
1 tsp salt
1 scant tsp baking powder
1 stick softened butter
1 egg, beaten
6 cups of fruit (or enough to fill your pan!)
sugar to taste (about 1/2 cup for peaches)
cinnamon/nutmeg as desired

Preheat oven to 350.
Combine the first four ingredients in one bowl. Cut the butter into the dry ingredients. Mix beaten egg well into flour/butter mixture. Fill an 8x8 pan full with fruit. Sugar well. Sprinkle with cinnamon and nutmeg to taste. Pat or sprinkle cobbler dough over top of fruit. Bake for at least 40 minutes or until topping is golden brown and fruit is bubbly. Excellent served warm with ice cream.
Related Posts Plugin for WordPress, Blogger...