Showing posts with label bread. Show all posts

Tuesday, October 1, 2013

Overnight Sourdough Pancakes {+ my first cooking class}

So a couple of weeks ago I went to my very first cooking class! It was in our local kitchen shop and was a great experience! Our instructor, Sue, was very relaxed and methodical, taking time to demonstrate proper technique and answer any questions- and there were many! We not only learned how to bake sourdough bread in the form of sliders and buns, but also got a lesson on how to feed and maintain our very own sourdough starter! I really enjoy sourdough bread, so was excited to get to take home my own sourdough "baby"- and feed it and watch it grow!


Sue informed us that sourdough is infinitely variable- the yeast takes on different flavors depending on the air where you live! So while the sourdough in San Fran is quite sour, ours here in the NW may not be. Rather it will be a very flavorful artisan bread. In the class, we made farmstead sourdough buns (which I'd love to recreate) and they were delicious! Fluffy, soft and- while not particularly sour- bursting with flavor.


After tending and feeding my starter for a little over a week, I decided to try one of the recipes we were sent home with- sourdough pancakes!

Rule of thumb- don't deplete your store of starter! You want to have at least half a cup left to continue to feed!

The pancakes are fantastic! The sourdough gives them a hearty, yeasty flavor and a light, airy texture. They are relatively easy to prepare, too, because you prep the starter the night before (unless you want to have them for dinner, in that case you could prep it in the morning).


If you don't have your own starter, but would like to, check your local kitchen shop or order it online! Your starter should come with instructions on how to reconstitute and care for your starter.


Overnight Sourdough Pancakes
makes about 2 dozen pancakes

1 c. sourdough starter
2 c. warm water
3 1/2 c. flour
3 eggs
4 TB sugar, maple syrup, or honey
1/4 c. oil or melted butter
1 tsp baking soda
1 tsp salt

The night before you want to eat, combine in a large bowl the starter, water, and flour (make sure it has plenty of room to rise). Cover.
In the morning, add the rest of the ingredients and mix until well combined. Add more water if thinner pancakes are desired.
Heat a large pan over medium/high heat and grease with oil or butter. Spoon about 1/4 c. of batter into the pan for each pancake. Cook 1-2 min. per side, or until golden. Keep hot in a warm oven while repeating with the rest of the batter if desired. 
Serve with butter and syrup, berries, or other desired toppings.

Thursday, March 14, 2013

Irish Soda Bread


Top o' the morning to you! Though I can really only lay claim to a wee drop of Irish blood on my mother's side, there's still a part of me that enjoys taking part in the St. Patty's Day celebration of all things Irish. I don't typically do much in the way of traditional Irish cooking, but I am intrigued by it.One recipe I knew I wanted to try was soda bread, which derives its name from the baking soda used as leavening.


I had never tried soda bread, but it is wonderful! A sturdy quick bread, slightly sweet with a hearty whole wheat flavor and studded with juicy raisins, it only took me a few minutes to pop it into the oven. I love the rustic looking craggy crust, the crunchy exterior and the soft and chewy inside. It is delicious warm with butter, and I'm sure it would be great toasted, cold, or as a fantastic accompaniment to some good ol' Irish stew!


Suggested Pairings:
Slow Cooker Sausage and Lentil Soup
Slow Cooker Chicken and Barley Soup
Crock-Pot Beefy Cabbage Soup
Hearty Beef and Cabbage Soup


Irish Soda Bread
makes one round loaf

2 cups white flour
2 cups whole wheat flour
2 TB sugar
1 tsp salt
1 tsp baking soda
4 TB butter
1 cup raisins (or dried cranberries, golden raisins, currants, etc)
1 egg, lightly beaten
1 1/2 cups buttermilk

Preheat oven to 425. Lightly grease cast iron skillet or baking pan.
In a large bowl, mix flours, sugar, salt and baking soda. Cut in butter with a pastry cutter or criss-crossed knives until mixture resembles coarse meal. Stir in raisins.
Make a well in the center of flour mixture. Pour in egg and buttermilk and mix with a wooden spoon until dough becomes too stiff to mix.
Coat hands with flour and knead dough in bowl just until it forms a rough ball.
Transfer dough to pan or skillet and shape into a round loaf. Using a serrated knife, make a deep "X" in the top of the loaf.
Bake 35-40 min. or until loaf is deeply browned and bottom sounds hollow when tapped with a knife.
Serve bread warm, at room temp., or toasted with butter or cream cheese.

Saturday, November 10, 2012

Baked Pumpkin French Toast

When I made this dish, I realized I couldn't even remember the last time I'd had french toast. Isn't that sad? I certainly realized just how sad when I tasted this delectable treat!


Where have you been all my life, baked pumpkin french toast??!!

Seriously. This is so amazing. I'm not sure how to describe it without using cliche words and phrases like "melts in your mouth," "creamy," "to die for," "I want to eat the whole pan right now" and so on. So I guess I will. The eggs, pumpkin, milk and spices transform a loaf of bread (although no ordinary loaf of bread, mind you- I employed my homemade Italian bread...and really, please don't get on my case about using Italian bread for French toast...one bite and you wont' care what nationalities are mixed up in your mouth, I promise) into this amazing soft, creamy sweet treat that (literally, cliches aside, this one's for real) melts in your mouth. Sheesh, it could practically be dessert. For us it was dinner. Then breakfast. But it could really be served as dessert and I would be crazy happy to welcome it as such.


It's also great because you can make it ahead of time (even the day before!) and just pop it in the oven when you're ready to eat!

Oh, and it doesn't really need a drizzle of maple syrup, but go ahead. You know you want to.

Baked Pumpkin French Toast
serves 8-12

1 loaf French bread, cut into cubes
6 large eggs
2 1/2 cups milk
1 cup pumpkin puree
3/4 cup sugar
2 TB vanilla (yes, tablespoons!)
1/2 tsp cinnamon
1/4 tsp nutmeg

Streusel:
1/2 cup flour
1/2 cup brown sugar
1 tsp cinnamon
1/4 tsp nutmeg
1/4 tsp salt
1/2 cup cold butter, cut into small pieces

Spray a 9x13 pan with cooking spray. Place bread chunks evenly in the pan.
In a large bowl, mix together eggs, milk, pumpkin, sugar, vanilla and spices. Pour evenly over bread. Cover pan and store in the refrigerator several hours or overnight.
In a separate bowl, mix together flour, brown sugar and spices. Add butter and cut into dry ingredients using a fork, your hands, or a pastry blender. Combine until mixture resembles sand with a few pea sized chunks. Cover and store in refrigerator.
When you're ready to bake the French toast, preheat oven to 350. Remove French toast from the refrigerator and sprinkle crumb mixture over the top. Bake 45-55 min. or until set and golden brown. Serve warm with syrup if desired.

Saturday, October 27, 2012

Sweet Potato Breakfast Biscuits

Every once in awhile, it's fun to have breakfast for dinner. We don't do big breakfasts a lot- usually only on Mondays when it's Hubby's day off and we have a leisurely morning. Otherwise, it's a bran muffin and greek yogurt for me and cold cereal for him. Aren't we exciting?

So anyway, that's why I've decided Saturdays are now "breakfast for dinner night". There are just too many great breakfast foods to pass up, so they're moving to the night shift!


Our first in the Saturday breakfast series this month is a recipe from one of my favorite blogs, How Sweet It Is- she always cracks me up and leaves me drooling with her quirky humor and drop-dead-gorgeous photos. This recipe was no exception! Stuff a little bit of sweet potato in a fluffy, tender biscuit, top with pristine poached eggs, bacon (of course), cheese and whatever else your little heart desires, and you've got yourself a mighty tasty breakfast sandwich.

Putting the amazing flavor and texture of a sweet potato in a biscuit is pure genius, and of course, I am a little bit obsessed with poached eggs these days so we know that was a major attraction. There is just something so totally irresistible about those pretty little white packages that spill forth golden goodness at the slightest invitation. Sigh.

Sweet Potato Breakfast Biscuits
adapted slightly from How Sweet It Is
makes 10 biscuits

1 medium sweet potato, cooked and mashed
1 1/2 cups flour
1/2 TB sugar
2 tsp baking powder
1/2 tsp baking soda
1/2 tsp salt
6 TB butter, cold and cut into small pieces
1/2 cup milk
To make breakfast biscuits add poached eggs, bacon, cheese and spread of choice

Preheat oven to 425.
In a large bowl, combine flour, sugar, baking powder, baking soda and salt and whisk to combine. Add butter and use a pastry blender to cut in till mixture resembles coarse crumbs. Stir in milk and sweet potato, using your hands if necessary, to blend dough together. 
Roll dough out on a lightly floured surface to 1/2 in. thickness. Cut using a floured glass or biscuit cutter and place onto a baking sheet. Bake 10-12 min. or until biscuits are puffy and golden. While biscuits are baking, prepare your breakfast sandwich ingredients. Assemble and enjoy!

Wednesday, July 11, 2012

Strawberry Shortcake Skewers

I have been away too long! I apologize for leaving you recipe-less for over a week, but Hubby and I had a rather unexpectedly full and emotionally tiring week. I cooked {for us} only a handful of times the whole week (4 potlucks were involved in the craziness) and every time I had time I tried to squeeze in a load of laundry or do something totally mindless.


For the fourth, I did manage to make these skewers and a pot of phenomenal baked beans which I will share with you very soon, I promise! Hint: they got rave reviews at our church barbecue!

But back to the skewers.

These adorable little creations are, of course, Pinterest inspired. I was intrigued by Lady Behind the Curtain's idea to put strawberry shortcake on a stick! Genius! Everything is more fun on a stick. In her recipe, she used Grand's refrigerated biscuits, strawberries and Cool Whip. I decided to go a step or two further and use my favorite biscuit recipe and make my own homemade whipped cream (the perfect use for that carton of whipping cream leftover from the strawberry icebox cake!).

So, in the first attempt, I made a double batch of biscuits and, in the spirit of patriotism, cut them out with a cute little star shaped cookie cutter.


These I stacked with thick slices of strawberries and a dollop of whipped cream. For the red-white-and-blue effect, I topped the whole thing off with a blueberry. They were delicious, and very cute, but I'm sorry, I have no pictures. However, there were several problems with these...

1) Whipped cream is very difficult to "skewer"- I imagine Cool Whip would be the same.

2) Due to the whipped cream, the skewers are almost impossible to stack, which makes presentation and preparation difficult.

3) Not enough strawberry.

Going to a potluck the next day, I still had leftover star biscuits, so I decided to try revising the process. I simply skewered a biscuit, topped it with a whole hulled strawberry (end also removed), followed by another biscuit, another strawberry, and finally, another biscuit. They were stackable, transportable, and I served them with the whipped cream on the side for dipping or smearing or what have you. Definitely easier to handle (and better for preparing in advance!). And- more strawberry!! :) Problem(s) solved.


So, try it either way, but do try it! These little gems are so fun for summer get-togethers- my friends couldn't stop talking about them! They are cute and tasty and so unique!

Strawberry Shortcake Skewers
makes about 3 dozen skewers (cut in half if desired)

wooden skewers
doubled recipe for biscuits (or use you own favorite recipe)
sugar for sprinkling
enough strawberries to allow 2 per skewer
blueberries, if desired
whipped cream or Cool Whip for dipping

Make biscuit dough as directed. Roll out to 1/2 in. thickness. Cut out using a 1 1/2 in. cookie cutter in whatever shaped desired. Place on baking sheet. Sprinkle biscuits with sugar. Bake slightly less than directed (since biscuits are small). Cool completely.
Wash and hull strawberries.
To assemble: Skewer a biscuit and slide it down the stick, leaving room for a "handle". Follow this with a strawberry and repeat once, then end with another biscuit. Top with a blueberry if desired.
Repeat for each skewer.
Serve with whipped cream or Cool Whip for dipping.

Thursday, June 28, 2012

Easy Italian Bread

Ah, there's nothing quite like the smell of fresh baked bread.


And there's nothing quite like how easy this fantastic bread is!

These soft, sturdy, mouth-watering loaves are perfect as a compliment to almost any dinner and would also be a great option for bruschetta or french toast and yet- here's the best part- from start to finish they only take about an hour and half. How great is that? Only six ingredients and two gorgeous loaves of bread in no time flat.


What are you waiting for?


Easy Italian Bread
makes 2 large loaves (approx. 15"x6")

2 pkg. fast rising dry yeast (or 4 1/2 tsp)
2 TB sugar
2 1/2 tsp salt
4 1/4-4 3/4 cups flour, divided
1 3/4 cups warm water (about 130 degrees F)
2 TB vegetable oil

In the large bowl of a mixer, place yeast, sugar, salt and two cups of flour. Mix with regular beater to blend and add the water and oil. Mix on medium speed for 3 minutes. 


Insert dough hook and beat for another 6.5 min., adding flour as needed to keep dough from being sticky.
Place dough on a floured surface, cover with a cloth, and let rest for 10 min.


Punch down dough and form into two long, narrow loaves. 


Place loaves on greased pan, cover and let rise in a warm place for 30 min.
Preheat oven to 375.
Before placing the loaves in the oven, moisten your fingers and gently spread water over the top of the loaves. Cut three slashes in the top of each loaf with a serrated knife.


Place loaves in oven and bake for approx. 25 min. or until risen and golden brown.


Sunday, April 15, 2012

Amish Friendship Bread

If you have never had the privilege of being handed a bag of friendship bread starter from a friend, I encourage you to be the one to begin it!


Amish Friendship Bread is a delicious tradition much like a chain letter (although infinitely more enjoyable) in which a bag of bread starter is passed on, regrown, divided and passed on again...in a never ending cycle (unless of course you are a sourpuss who takes the bag and throws it away!). It does require a commitment- the directions usually take 10 days to complete (although most of those days all you have to do is "mush the bag", as my directions said!). However, the end result is a fun gift to give away to a friend, and a couple of delicious loaves of moist sweet quick bread to enjoy!


I was given a bag of starter by a dear friend of mine, and I gave away my resulting three bags of starter to my dear sister, special sister-in-law and my best friend. The loaves I baked from the remaining starter were enjoyed immensely by friends, neighbors, and of course, my husband and myself! The recipe I received was sort of like a coffee cake/banana bread type of bread, deliciously coated in crunchy cinnamon-sugar.


 The instructions I received did not come with a recipe for starter, just the finished product (part of the mystery?). However, I found a recipe online that looks similar if you think you'd like to be the first link in a new chain representing the sweetness of friendship!


Find a recipe for starter plus instructions to give to your friends here. To make bread with the cinnamon-sugar coating, mix together 1/2 cup of sugar and 1/2 tsp cinnamon. Using half the mixture, coat 2 greased loaf pans. Sprinkle the remaining half evenly over the top of both pans of batter. Bake as directed.

Saturday, April 7, 2012

Blueberry-Honey Crumb Muffins {a Crazy Cooking Challenge}

When the Crazy Cooking Challenge for April was announced, I knew I didn't want to miss out!

Photobucket
Who wants to miss out on an excuse to make some delicious blueberry muffins??!


I found these delicious-looking muffins on a blog called "If You Give a Girl a Cookie"- I love that she uses alternatives to plain white sugar. The original recipe uses honey and brown rice syrup. When I scoured the grocery store shelves, however, I couldn't locate the brown rice syrup, so I searched substitutes and decided to use maple syrup- it was delicious!
These beautiful muffins are moist and filled with plump, juicy berries and the not-too-sweet flavor of the muffin is perfectly complimented by the sweet crunchy topping. 


Along with a smear of sweet butter, they are the perfect compliment to a cup of coffee in the morning, a welcome addition to a weekend breakfast, or a great on-the-go snack!


Blueberry-Honey Crumb Muffins
makes about 18 muffins

7 TB butter, softened
1/4 cup maple syrup, plus 1 TB water
1/3 cup plus 2 TB honey
2 eggs
2 1/4 cups flour
4 tsp baking powder
1 tsp sea salt
scant 1 cup whole milk
2 tsp vanilla
1 1/2 cups fresh or frozen blueberries

Crumbly Topping

4 TB flour
1 TB brown sugar
1 TB white sugar
1/2 tsp cinnamon
4 TB cold butter

Preheat oven to 350. Grease muffin tin or line with paper baking cups.
Beat butter, syrup, honey and eggs in mixing bowl until smooth. In two separate bowls, mix the dry ingredients in one and the milk and vanilla in the other. With the mixer on low speed, alternately add dry ingredients and milk to butter mixture until just combined.
With a rubber spatula, fold in blueberries. Scoop mixture into prepared muffins cups (an ice cream scoop works well), taking care not to fill beyond the rim, as they will rise considerably.
To make crumbly topping, stir together flour, sugars and cinnamon. Add butter and mix with your fingers or a pastry blender until mixture resembles small pebbles. Sprinkle each muffin top with about a tablespoon of crumbly topping.
Bake 20-25 min. or until tops are golden brown and a toothpick inserted in the center comes out with only a few moist crumbs stuck to it. Allow to cool 5 min. in pans before removing to a wire rack.
Serve with butter.

Wednesday, April 4, 2012

Daddy's Old-Time Waffles {with Strawberry Sauce}

My Daddy is the breakfast king. He can do dinners, and he often did lunches when I was a kid, but his specialty (and favorite, I believe) is breakfast. Being a pastor, Mondays are his days off, and, being home-schooled, we had Mondays off too. Thus, it became our tradition to have big, late "Monday-Breakfasts"- and one of those cherished Monday treats is a recipe called "Old  Time Waffles" from one of my mom's favorite cook books, "Family Favorites" (a collection of recipes from California Home-Ec Teachers).


The recipe remarks state that the submitter's mother attained this recipe over the radio before electric waffle irons were even available! When Daddy was fixing breakfast, I would often sit at the counter and watch him, while he explained the special ingredient in these light, fluffy waffles- beaten egg whites. He taught me how to separate the eggs using the egg shell, warning me not to get a single drop of yolk in the whites or they wouldn't beat up properly. He said if there was anything but egg white in there, you could whip it till Doomsday and nothing would happen. But, if you happen to be very careful, and keep the whites pure, they would do a magical thing. As he whipped and whipped with a wire whisk, I saw the jelly-like substance transform into a beautiful cloud of foamy white, standing ever so softly when the whisk was removed.
Fast forward to years later and here I am in my own kitchen, with a fancy-shmancy Kitchen-Aid Mixer. Whipping egg whites would be a cinch. And it was- once I got the whites in the bowl! I went through 3 fragile store bought eggs, each yolk breaking into the white before I could stop it, before deciding to try some farm fresh eggs. These proved to be much sturdier, separating like a dream. The Kitchen-Aid also worked beautiful, transforming the heap of goo to a soft, inviting cloud.


Alas! I was so enthralled by the pretty whites that I mixed them in too soon, resulting in waffles that were a bit less fluffy then I remembered. Oh, well, I can testify to many year's experience that when done right, these waffles simply melt in your mouth, they are so light and delicious! Topped with a freshly made strawberry sauce, they were absolutely irresistible!


Old-Time Waffles
from "Family Favorites" Cookbook
serves 4

2 cups flour
1/2 tsp salt
2 tsp baking powder
3 eggs
3 TB sugar
1 1/2 cups milk
1/3 cup butter, melted

Sift together flour, salt and baking powder; set aside.
Separate eggs. Beat yolks in a large mixing bowl. Add sugar and milk to egg yolks. Beat well. Add flour mixture; mix until smooth. Stir in melted butter.
Beat egg whites until soft peaks form. Fold in beaten eggs whites.
Cook on waffle iron.

Strawberry Sauce
adapted from "Better Homes and Gardens Cookbook"
makes about 2 cups

3 cups fresh or frozen strawberries
1/4 cup sugar
1 tsp cornstarch

Thaw strawberries if frozen. Combine berries, sugar and cornstarch in small saucepan. Cook over medium heat until thickened and bubbly. Cook and stir for 2 min. more. Chill or serve warm.

Friday, November 4, 2011

Copycat Cornbread: {Famous Dave's Sweet Corn Muffins}

Sometimes on chilly afternoons when I've pulled a leftover soup out of the freezer and put it in the crock pot, I feel a bit more adventurous about tackling a side dish. We have soup once a week (Wednesdays) and for a side we usually rotate between cornbread or muffins, rolls, and biscuits. This past Wednesday, we were having chicken tortilla soup (which I will share with you soon!), so corn muffins sounded like just the ticket.


 But, I've been a little bored lately with my standard corn muffin recipe. So, as usual when I'm looking for inspiration, I scoured the internet. I came across one blogger whose corn muffin recipe instantly got my attention. If you've ever been the the barbecue restaurant Famous Dave's, that should give you a clue. If you've never been to one, it is a chain featuring all things barbecue- and it's delicious! The atmosphere is what you would expect of a barbecue place, all about the meat and the hearty sides. One of those hearty sides is their famous corn muffins, slathered in honey butter. They are the perfect mix of sweet and savory, with a bit of corn crunch on the outside, while being absolutely moist inside. There is also just the faintest hint of a trademark "bite" in the aftertaste, owing to the dash of cayenne pepper.


As I looked down the list of ingredients, however, I was surprise by several unusual additions...cake mix? Mayonnaise?


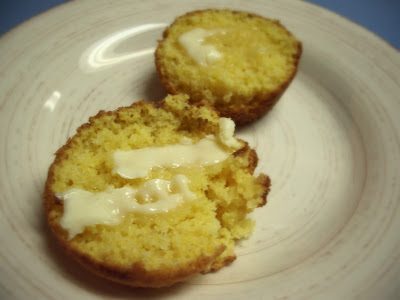
 It intrigued me, so I had to try them. I was a little afraid the muffins would turn out like cupcakes with all that cake mix, but I needn't have worried. They were corn muffins through and through.

See? Very much a corn muffin. :)
And they were delicious (though I suspect, not low in calories...but that's beside the point)! And true to the original. Although I haven't been to Famous Dave's for awhile, I can testify that the flavor and texture stuck with me, and these make for a delicious home version when you're craving that legendary barbecue goodness.


I doubled the recipe (which ended up making about 32 muffins- perfect for freezing convenience!) because it called for a 9 oz. package of cake mix. I do not think such a size exists, the standard size being 18 oz. So, instead of leaving myself with half a box of cake mix to figure out what to do with, I simply doubled all the other ingredients as well.
Adding whole kernel corn to the mix (like Pennies on a Platter suggests) is not necessary- I don't believe they are found in the original, and I did not add it to mine (though I was in indecision about it, as you see the bag of corn in my picture!), but if you like whole corn in your cornbread, by all means, throw some in! I'm sure Famous Dave won't mind...much.

Can you resist me?
Sweet Corn Bread Muffins
(printable version)
adapted from Pennies on a Platter
makes about 32

4 cups yellow corn meal (finely ground- stone ground could result in very crunchy muffins)
1 package yellow cake mix (I used white)
4 tsp. baking powder
2 tsp. salt
1/4 tsp. cayenne pepper
1 cup milk
1 cup buttermilk
1/2 cup vegetable oil
4 eggs, beaten
4 TB brown sugar
4 TB honey
2 TB of Miracle Whip (I hate the stuff, so I just used mayo)
1 can of drained whole kernel corn, if desired

Whisk together first 5 ingredients, set aside. Combine next 6 ingredients in another bowl and mix well. Add to the cornmeal mixture and stir gently- there should be no lumps, but do not over mix. Fold in mayo and corn (if using).
Let rest, covered, in fridge 30 min. or overnight.
Preheat oven to 400. Fill greased muffin cups 2/3 full. Bake 15-20 min (mine were done at 15) or until tops are golden. Let cool in pan a few minutes; remove to wire rack. Serve with butter and honey if desired.
Source: Pennies on a Platter

Wednesday, September 7, 2011

Opa! (Whole Wheat Pita Bread and Chicken Gyros)

I have to say, my husband can be credited with being the first person to introduce me to the concept of a gyro. And the correct pronunciation. When he talked about how great gyros (year-ohs) were, I did not automatically connect it with that place in the mall's food court I had always wondered about that advertised gyros (jye-rohs). Ah. Oops. My first experience eating one was with him and a friend of mine at a bistro in Spokane. It was delicious! Basically, if you haven't gone out on a limb yet and sampled this tasty yet simple Greek fare, it is some spiced meat (chicken or lamb usually, I believe) with veggies and a special sauce (which I refer to as a cucumber dill sauce since I have no idea how to pronounce "tzatziki"), served on pita bread. It seems the meat is usually roasted on some kind of a vertical spit, then shaved onto the gyro, but as I do not possess any vertical spits at present, I had to make ours the very American way- in a frying pan. I believe it would also be fabulous on the grill, but last night that would not have worked for us. I found a simple and seemingly typical recipe online, and added the extra fun of making my own pitas.
I have experimented with pitas before, but it had been so long, I needed a refresher course- also, I wanted to try whole wheat. Snagging a recipe from Annie's Eats, I started making the pita dough early on in the afternoon. This recipe actually goes through about 3 different phases of rising. First, with basic yeast/honey liquid for about 45 min.


Then after the flour has been mixed in and the dough kneaded, for about an hour. Then, once the dough has been shaped into flat little discs, for about 30 min. (I apologize, I forgot to take very many pictures of this process.) The actual cooking was the most trying part, however. The pitas have to be baked on an already preheated surface. I don't have a pizza stone yet, so I took Annie's suggestion to bake them directly on the oven rack. Not the best idea, at least not in my oven. The perfect little circles of dough sagged through the rack and became misshapen.


With this first batch I followed her cooking time suggestion exactly as well, and for some reason in my oven it wasn't quite right either. The pitas didn't really puff up right and they were still a bit doughy inside. However, the second batch turned out perfectly!


I preheated an upside down baking sheet, then placed the pita circles on top of it. After adding an extra minute of baking time to each side, they were perfectly puffed and golden. So, at least I came out with four good pitas! The others are so disfigured, you can't really split them open, but you can pile the goodies on top! It's always trial and error, as everybody's ovens and equipment work a little bit differently. The recipe is great though. The pitas are soft and chewy, with a very pleasing flavor. We piled marinated chicken, tomatoes, lettuce, and the amazingly delicious cucumber dill sauce into them and were delighted.


 The sauce has such a refreshing flavor! I'm not usually a big fan of dill, but it is wonderful paired with all the other flavors in this dish.
You don't have to make your own pita bread, but do give this recipe a try! It will have you mastering words like "tzatziki" and "gyro" in no time! :)


For the pita bread recipe, click here.
For the gyro recipe, click here.

Friday, July 16, 2010

Old Faves, New Craves (Oriental Chicken Salad/Focaccia Bread)


You know how there are some foods that are simply family traditions? Maybe your great-great-great-grandma brought it over from "the old country" quite a few generations ago. Maybe it entered your family more recently. Take my mom's famous Oriental chicken salad. Not so very old, the recipe was given to my mom by her sister, but it has taken its hold on our family. It has attended two of our families' weddings, many potlucks and family get-togethers, and my older brother has even been know to say that it would be his food of choice were he to ever be stranded on a deserted island and had to eat one food for the rest of his life (assuming he had a choice). The uncovering of the salad bowl is usually accompanied by several "ooh"s and lip-licking is sure to follow. Why is it so desirable? Maybe it's because of the pretty blend of colors or the satisfyingly crisp crunch of the cabbage. Maybe it's the lightness of it on a hot summer evening. Or maybe it's the memories we have of the house filled with smells of toasting almonds on a Saturday night. Or the ones I have of sitting at the kitchen counter chopping piles after piles of cabbage while listening to Adventures in Odyssey on the radio or chatting with my dad or a young sibling beside me who is "learning how it's done." Sometimes it seems with family favorites the flavors and aromas are so intertwined with the memories that it is difficult to separate the two.
I had decided today to make my mom's sought-after-salad, since it is a hot summer day and something like a cool, crunchy salad seemed just the thing. My first thought for a side dish was to get out some of my freezer roll dough to make bread sticks, but I only had enough dough for three, which isn't quite enough for my hubby and I! So I thought, well, I'll just have to make my own! And while searching for a bread stick recipe, I stumbled upon a recipe for focaccia bread, which looked absolutely delicious, but not too difficult. So, in-between my usual Friday/Saturday duties of getting the bulletin and the PowerPoint done for church, I mixed, kneaded and let my focaccia bread rise. It is very aromatic, sprinkled through with rosemary!
Later on, as the last of the rising was happening on my stove top, I cooked up a large chicken breast, and began chopping away at a head of cabbage, memories flooding over me. Into the oven went the focaccia bread, along with the sesame seeds and slivered almonds to toast. Needless to say, I cut the recipe in half. This really feeds a crowd, so even halved, my husband and I have leftovers!
When everything was sliced, diced and toasted to perfection and the bread was giving a wonderful scent to my kitchen, it all went together into a pretty salad bowl. When mixing up the dressing, I had to make one substitution...mom always made the dressing with rice vinegar, and since I had none on hand I replaced it with cider vinegar. This resulted in it not tasting just like mom used to make, but pretty close! :)
I tossed the dressing with the salad just as the bread was cooling. Taking a bite of each, I decided that the old held up its reputation with honor and the new made a delightful addition!


Mom's Oriental Chicken Salad
(printable version)
serves about 12

2-3 cups cooked chicken (diced)
1/2 cup sesame seeds
3/4 cup slivered almonds
2 pkgs ramen noodles
1 lg head green cabbage, thinly sliced
1 bunch green onions, sliced

Dressing:
1 cup oil
6 tbsp rice vinegar
2 tbsp sugar
flavor packet from ramen noodles (chicken flavor)
salt and pepper to taste

Toast sesame seeds, slivered almonds, and ramen (broken apart) on cookie sheet in 350 oven for 10-15 min. Let cool. Combine all ingredients (except dressing) and mix well. Pour dressing over all and toss to coat.

Betty Crocker's Focaccia Bread
(printable version)
makes 2 loaves

2 1/2 to 3 cups flour
1 tbsp dried rosemary
1 tbsp sugar
1 tsp salt
1 pkg yeast
3 tbsp olive oil
1 cup very warm water

2 tbsp olive oil
1/4 cup grated Parmesan cheese

Mix 1 cup flour, rosemary, sugar, salt and yeast. Add oil and water. Beat with mixer 3 min. Stir in remaining flour. Knead 5 to 8 minutes. Grease lg bowl, place dough in bowl and turn to coat. Cover loosely and let rise 30 min. Grease two round pizza pans. Deflate dough with fist and divide in half. Shape into 10 in rounds on pans. Cover loosely and let rise 30 min. Make depressions in dough with fingertips 2 in. apart. Brush with olive oil and sprinkle with cheese. Bake in 400 oven 15-20 min.

Wednesday, May 19, 2010

Pita-Licious! (Homemade Pita Bread)

I always enjoy trying new things, but although my taste buds are often adventurous, I usually stay within certain perimeters in my cooking. I love making Mexican and Italian cuisine and of course am very fond of many dishes of American origin. But this month I decided to branch out just a bit, and added a Spicy Peanut Chicken and Chicken Chow Mein to my list of meals. Both required buying a few ingredients I don't normally stock my cupboard with! The Chow Mein is still on the menu for next week, but last night I tried the Spicy Peanut Chicken, which my cookbook recommended serving over couscous with a side of pita bread.
I had come across the Peanut Chicken recipe in my Betty Crocker cookbook in the Slow Cooker section, so while it was adventurous in flavor, it was also safe and easy!
In the morning I lightly browned a few chicken thighs in olive oil while I combined the rest of the ingredients in the slow cooker. The combination of flavors was so foreign! Honey with canned tomatoes and onions? Cumin and cinnamon? And peanut butter to top it off! I tailored the recipe just a bit by substituting one of the cans of "diced tomatoes with green chilies" with a can of regular diced tomatoes, since neither Travis or I are very fond of green chilies. So, it probably didn't turn out as spicy as intended, but that's fine by me. When everything was safely tucked away into the cooker, I went about the rest of my day until late afternoon.
Part of my decision to make my own pita bread was my friend Kate. My best girl friend from Oregon, she came up to visit me last weekend and on our last afternoon together, Travis and I took her to a little sandwich bistro in Spokane. I decided then and there to try gyros for the first time, which, to those of you who haven't tried one yet, it is like a Greek taco on a pita with hummus. I was very pleased! And it got me thinking...I knew that Spicy Peanut Chicken and Couscous were on the menu for the following night...I wondered how difficult it would be to make one's own pita bread. And, since the dinner was of the easy slow cooker variety, and the couscous was the 5 min boxed stuff, I had plenty of time to experiment!
My first step of course, was to go to my cookbooks. Nothing! Recipes including pita bread, yes, but no recipe for pita bread. So, trusty allrecipes.com came in handy. After checking out several, I decided to go with the Traditional Pita Bread (which you can find here: http://allrecipes.com/Recipe/Traditional-Pita-Bread/Detail.aspx). It certainly looked easy enough, though slightly labor intensive. The dough was extremely simple, requiring only 4 common ingredients and almost no preparation. However, if your hands and fingers ever "knead" a workout, pita bread is your ticket! The dough is to be kneaded for about 8 minutes, then each individual pita dough ball is kneaded for a separate minute, which gives you a total of about 14 minutes of folding, pushing, and stretching the slightly sticky but elastic dough!
Then you can let the yeast take over, while you rest your weary little fingers. The dough rises for 45 min-1 hr, then into the very hot oven they go! I don't think I have ever baked anything at 500 degrees before, and my oversensitive smoke alarm was not too pleased with this development! I think I've come to the conclusion that it is more of heat sensor than a smoke alarm. Every time that oven door was opened, the cranky thing went off, till I was about to pull my hair out! You see, when my husband is home, he is tall enough I can just summon him to come and hit the "hush" button (which I like to call the "shut up" button). But when he is away, as he was yesterday afternoon, I keep having to drag out my step stool to shut the thing off. Sometimes, when it truly in an evil mood, it goes off by itself, just as I get my stool set up. Or just as my finger reaches for the button. I tell you, this adds a lot of drama to my cooking experience. Still, I always feel guilty for hating the contraption for its oversensitivity. I know if there was ever a real fire, he'd let us know in a jiffy! But it's almost like the little boy who cried "Wolf!"
Anyway, smoke alarm tension aside, the little pitas baked to perfection, puffing up just like they were supposed to.
And all the comments of the people online were right- there's nothing quite like a pita, hot and fresh out of the oven! And they paired perfectly with the chicken and couscous, whose flavors, though definitely new and somewhat foreign, were delicious!!

Who would have though peanut butter and tomatoes paired so well?
Related Posts Plugin for WordPress, Blogger...