Monday, April 30, 2012

Best Ever Potato Salad

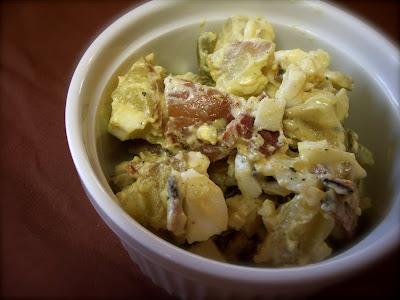
So. Potato salad...it seems like one of those foods where everyone has one that they claim is the best. Grandma's perhaps. Or Aunt So-and-So's. Or your best friend's mother's. Whoever it is that makes the quintessential salad, we're always sure they've got the corner on the market. For me it is a lady in our church- her traditional potato salad is heavenly (and mind you, these comments are coming from a girl who is a very recent potato salad convert!) and I, unfortunately, have never secured the recipe.
However, having given a shout-out to my favorite traditional rendering, I have to tell you about the salad that blew my traditional socks off. I bumped into it on the internet one day while searching for the perfect recipe to co-star with a grilled cheese sandwich (tune-in May 7 to read all about that delicious episode!). I had potato salad on the brain and was on the hunt for the perfect recipe (I think I'd only made it once before and not very well). When I came across this "Best Ever Potato Salad" it had two things in particular going for it:
1) Challenge was calling my name with the "Best Ever" title tacked on there.
2) It came from the Brown Eyed Baker, who has won my respect through one delicious recipe after another.


The main problem confronting me was the fact that it called for red potatoes, which I was sure I had none. After berating myself for not buying some on my last shopping trip and searching a bit more, unsuccessfully trying to rid the "Best Ever" salad from my mind, I decided to take a culinary leap of faith and make the salad using regular old russets. To my great delight and surprise, upon entering the pantry I found not only a stack of russets, but a bag of reds as well- it seems I had not failed myself at the grocery store after all.
After this, the fact that I had no celery or green pepper seemed inconsequential. I boldly chose instead another green item- a pickle. Pickles are often used in potato salad, I thought, so why not? It worked perfectly, in fact, I think I'm going to keep it that way in my version.
The absolute best part of this salad is the inclusion of, yes, you guessed it...BACON. And, even better, the dressing is mixed in the pan with the bacon drippings!!


 I can testify, this step gives the salad a whole new dimension- this bold, bacony flavor pervading all. This recipe truly would not be worthy of the "Best Ever" category without the bacon. On second thought, what recipe would?
So, be brave and skip Mom's (or Grandma's...or whoever's) salad, just for tonight (but be forewarned- it's addicting!). And don't be surprised if your bold and delicious potato salad doesn't go down in the books as the new "Best Ever Potato Salad" on the block.


Best Ever Potato Salad
adapted from Brown Eyed Baker
makes 6-8 servings

4 cups cubed red potatoes
1 TB olive oil
10 slices turkey bacon (if using pork bacon, reserve 2 TB drippings in the pan and omit olive oil)
3/4 cup mayonnaise
1 TB dijon mustard
2 tsp sugar
1 tsp salt
4 hard-boiled eggs, chopped
2 baby dill pickles, chopped

In sauce pan, cover potatoes with water and boil until fork tender, 8 to 10 min.
Fry bacon in olive oil until crisp. Remove and blot with paper towels. Crumble or chop.
Add mayonnaise, mustard, sugar and salt to bacon drippings and oil in pan. Stir until smooth, scraping pan to include bacon bits.
In a large bowl, combine potatoes, eggs, pickles and dressing. Stir to coat. Stir in bacon.
Cover and refrigerate at least 3 hours before serving.

Saturday, April 28, 2012

Easy Taco Casserole

This quick and easy meal is another "Pinterest-inspired" dinner (we've had a lot of those lately, have you?)...but I have to admit, though the concept sounded yummy, the recipe looked a little bit, well...dull. Sooo...I took the liberty of jazzing it up. Just a little. You know, a little sour cream here, a few olives there...that kind of jazz.


And though it isn't a meal that would win any beauty contests, it IS very addictingly yummy AND super easy and fast to put together. And it melds some great flavors. So throw a fiesta- and don't forget to invite Easy Taco Casserole!


As a side note, would there be any objections to calling this a "casser-ole´"? Just thought I'd ask.

Easy Taco Casserole
serves 2-4

1/2 lb. ground turkey, browned
1 cup corn
1 cup salsa
1/2 bag corn tortilla chips (or enough to cover pie pan twice when crushed)
1 cup shredded cheddar cheese
1/2 cup or so sour cream
1 can sliced olives

Preheat oven to 350.
Mix turkey, corn and salsa.
Lightly grease a pie plate or 8 x 8 glass pan. Slightly crush tortilla chips and spread in an even layer, covering bottom of pan. Top with half the meat mixture, followed by half the sour cream, half the cheese and half the olives. Repeat layers. Cover lightly with foil.
Bake 30-40 min. or until bubbly and cheese is melted.

Note: this recipe can also be made ahead and frozen! Simply bake 20 to 30 min. more.

Wednesday, April 25, 2012

Treasure Hunting

Last weekend I went to a big rummage sale with a friend- and scored big! As they say, one man's trash is another man's treasure! To my great delight, I stumbled upon a section of great old kitchen gadgets, all priced very low! Some of them I couldn't identify right off the bat, most of which my dear elderly friend helped me with. Here are my bargain finds, with the descriptions of what I think they are...please feel free to correct me if I'm wrong- or if the device has multiple uses!


1. Hand-held Juicer ($1)


2. Flour Sifter ($2)


3. Pie Crust Crimper (10 cents)


4. (front) Pampered Chef Cut-N-Seal- for sandwiches or hand pies? ($2 I think)


4. (back) Pampered Chef Cut-N-Seal


5. Good Season's Salad Dressing Bottle- has marks for oil, water and vinegar for easy measuring! ($2 I think)


6. Cool Large Glass Pitcher/Vase ($4?)


7. Fancy Pie Crust Cutout Thingy- I assure you, that's the scientific term! ($1?)


8. Awesome Picnic Basket! ($4?)


9. Egg slicer? Avocado Slicer? I need help with this one please! It has little teeth on the cutting blades that you can't see in the picture. ($1)

Monday, April 23, 2012

Butterscotch Oatmeal Cookies

Okay, now that I have fulfilled my promise and taken a break from the sweet by posting about French fries (I know, I KNOW! Something healthy soon- I promise!), I can now in good conscience write about these fabulous, irresistible butterscotch oatmeal cookies. Someone in your life (if not you) needs these cookies. If you need help coming up with an excuse, let me know.


I'm sure I can find one for you. Because surely all of these ingredients (except maybe the butterscotch chips- but, note to self! You really should keep those on hand!) are sitting in your pantry right now begging to be made into something yummy...like cookies.


And besides, they are oatmeal cookies! Oatmeal is healthy. The Quaker oat guy says so, I'm sure of it. And if you can't trust him, who can you trust?
Okay? Go make these. You'll be glad you did.

Butterscotch Oatmeal Cookies
adapted from An Edible Mosaic
makes about 2 doz.

1/3 cup butter, room temperature
1/3 cup shortening, room temperature
1 cup lightly packed brown sugar
1 large egg
1 tsp vanilla
1 cup + 2 TB flour
1/2 tsp cinnamon
1/2 tsp baking soda
1/4 tsp salt
1 1/2 cups rolled oats
1 cup butterscotch chips

Preheat oven to 375.
Cream butter and shortening. Add sugar. Stir in egg and vanilla. In separate bowl, mix flour, cinnamon, soda and salt. Gradually stir dry ingredients into the wet, then mix in oats and chips. If necessary, chill dough 10 to 15 min. in the freezer so it's easy to handle.
Scoop dough by the rounded tablespoon onto cookie sheets about 2 to 3 in. apart. Bake 10 to 12 min. or until light golden brown on the edges, rotating sheet halfway through baking. Centers will look slightly doughy. Cool 5 min. on sheets, then transfer to wire rack to cool completely. Enjoy!

Saturday, April 21, 2012

Baked French Fries

I know the trend of "baked, not fried"potatoes (not to mention other vegetables, chicken and donuts!) has been going on for quite some time now, but just in case you're like me and have valiantly given it your all and still struggle with the crispiness factor, this french fry recipe is for you. It packs all the natural deliciousness of a potato without the added fat and mess of frying in oil BUT...here's the great part! The fries are actually crispy! I was fortunate enough to stumble upon a blog called Lukas Volger's Veggie Madness that made the claim that these are the "perfect" baked french fries. He goes on to share his secrets to crispiness, and after trying it, I can attest to the fact- this is what my baked fries have been lacking!


The first tip is to soak the fries (potato sticks, at this point) in water prior to cooking. Supposedly this washes off some of the potato's natural starch, resulting in a crispier outside.

Ready to be soaked!

Coated with oil

The second tip is to preheat the baking sheet before loading it with fries- thus the fries instantly begin to cook when they hit the hot sheet.
With these tips duly followed, my result was delicious, crisp, crunchy french fries! I am so pleased to have a great go-to recipe for fries that tastes great and doesn't involve hot oil!!


Perfect Baked French Fries

4 medium russet potatoes, scrubbed
3 TB oil (canola, vegetable or peanut recommended for best results)
salt

Preheat oven to 450.
Meanwhile, cut potatoes into 1/4 in. matchsticks. Place the cut fries into a bowl and cover with cold water. Let stand 15 minutes as the oven preheats.
Drain the potatoes, then cover with water once more and drain thoroughly. Spread potatoes on a tea towel or paper towels and pat dry, soaking up as much water as possible.
Dry out the mixing bowl the fries had been in and return them to it. Toss with oil and salt.
Place the baking sheet in the oven for about 5 minutes to preheat it.
With an oven mitt, remove baking sheet and splash with oil, tilting to coat. Add the fries (watch out! It will sizzle!) and quickly arrange in a single layer.
Bake about 40 min. until browned, checking every 15 min. or so to toss with a spatula. When done, sprinkle with more salt and serve with favorite dipping sauce.

Thursday, April 19, 2012

My 100th Post...Reflections of a Changed Cook

This marks my 100th post in the world of blogging- I can hardly believe it!


It all began with the movie "Julie and Julia" and a little inspiration from my sister-in-law over at Catz in the Kitchen. Just over 2 years has come and gone since I first put my "pen to the page" so to speak as The Rookie Cookie and began my journey of adventurous cooking, pledging to share my experiences with you. Some of you have been with me since the beginning and remember the great triumphs (ex: filleting a salmon for the first time) and the great failures (ex: that horrid crock-pot orange chicken). I have had more "firsts" in the kitchen than I can count since then and have been thrilled to discover new loves (ex: risotto- YUM!) and dispel old notions (ex: that squash is yucky- now I know better!!) as I have become immensely more comfortable in my kitchen. I have changed my name (KitchenJoy now, which seems to better suit me) and acquired new accompaniments as well, the most notable being my beautiful blue KitchenAid mixer, a Christmas present from Hubby.
Speaking of my husband, he is my greatest inspiration when I cook- all along he has encouraged me and is always appreciative of my cooking. He has been more than willing to try new things and never complains- for that I feel so blessed!
To those of you who read and comment faithfully, thank you so much for your encouragement! You have inspired me as I have combined two of my favorite loves (writing and cooking) and I have been surprised over and over again at your willingness to read my ramblings and try new recipes. Thanks for joining me and here's to the next 100 posts!

Wednesday, April 18, 2012

Monthly Menu- April-May

Here's the proposed menu for April-May- hope it inspires you! Happy cooking!


April 17-21

Tuesday
Entree: Turkey Burgers
Side: Coleslaw and fresh fruit
Wednesday
Side: Corn Muffins
Thursday
Entree: Easy Taco Casserole
Side: Fresh Fruit
Friday
Entree: Pizza (half pepperoni, half fresh tomato and basil)
Side: Fresh veggies
Saturday
Side: Roasted Red Potatoes

April 24-28

Tuesday
Side: Rice
Wednesday


Side: Rolls
Thursday


Side: Crusty French Bread
Friday
Entree: Pizza (Hawaiian)
Side: Fresh veggies
Saturday
Entree: Grilled Cheese and Tomato Soup
Side: None

May 1-5

Tuesday
Side: Baked Potatoes and Green Salad
Wednesday
Entree: Chicken and Dumpling Soup
Side: Rolls
Thursday
Entree: Turkey Tacos
Side: Fresh Fruit
Friday
Entree: Pizza (Pepperoni & Olives)
Side: Fresh veggies
Saturday
Entree: Grilled Steak Fajitas
Side: Roasted Red Potatoes and Fruit

May 8-12

Tuesday
Side: French Bread
Wednesday
Side: Corn Muffins
Thursday
Side: Risotto?


Friday
Entree: Pizza (Pepperoni & Olives)
Side: Fresh veggies
Saturday
Entree: Ham Omelets
Side: Fruit

Tuesday, April 17, 2012

Best Ever Cream Cheese Cookies

I know, I know!! Another recipe for something sweet. I apologize! I promise my next post will be something non-dessert related (note: I did not promise "healthy").
Anyway.
Now that I've apologized for tempting you to gain 5 lbs., allow me to introduce you to adorable, soft, crackly, oh-so-easy Cream Cheese Cookies.


These cookies were born, once again, of my lack of ingredients (and my ingeniously creative mind, of course! ;). I did have one outstanding ingredient, however. Cream cheese. And in my search on Google for cookies containing cream cheese, I stumbled upon this recipe by The Girl Creative. And she was right. These cookies are as good as they look.


Soft and almost creamy on the inside, pretty and crackly on the outside.
Sometimes when I see recipes title "The Best Ever...", it feels like a challenge. "Just try me!" it shouts to me- "See if I'm as good as I say I am!" So I do. And generally, it is. These are. 'Nough said.


Best Ever Cream Cheese Cookies
makes about 2 dozen

1/2 cup butter, room temperature
3 oz. cream cheese, room temperature
1 1/2 cups powdered sugar
1/2 tsp baking powder
1 egg, room temperature
1/2 tsp vanilla
1 3/4 cups flour

Cream butter and cream cheese in mixer about 1 min. Beat in sugar and baking powder. Add egg and vanilla and beat until fluffy. Mix in flour.
Chill 30 min. or until easy to handle.
Preheat oven to 375.
Scoop dough by rounded teaspoons and roll into balls. Dip balls in sugar and place on baking sheet.
Bake about 7 min. or until bottoms are lightly browned.
Variation: You can also rolls this dough out for cut-outs (1/4 in. thick) or simply drop the dough onto the sheet. Cooking time remains the same.

Sunday, April 15, 2012

Amish Friendship Bread

If you have never had the privilege of being handed a bag of friendship bread starter from a friend, I encourage you to be the one to begin it!


Amish Friendship Bread is a delicious tradition much like a chain letter (although infinitely more enjoyable) in which a bag of bread starter is passed on, regrown, divided and passed on again...in a never ending cycle (unless of course you are a sourpuss who takes the bag and throws it away!). It does require a commitment- the directions usually take 10 days to complete (although most of those days all you have to do is "mush the bag", as my directions said!). However, the end result is a fun gift to give away to a friend, and a couple of delicious loaves of moist sweet quick bread to enjoy!


I was given a bag of starter by a dear friend of mine, and I gave away my resulting three bags of starter to my dear sister, special sister-in-law and my best friend. The loaves I baked from the remaining starter were enjoyed immensely by friends, neighbors, and of course, my husband and myself! The recipe I received was sort of like a coffee cake/banana bread type of bread, deliciously coated in crunchy cinnamon-sugar.


 The instructions I received did not come with a recipe for starter, just the finished product (part of the mystery?). However, I found a recipe online that looks similar if you think you'd like to be the first link in a new chain representing the sweetness of friendship!


Find a recipe for starter plus instructions to give to your friends here. To make bread with the cinnamon-sugar coating, mix together 1/2 cup of sugar and 1/2 tsp cinnamon. Using half the mixture, coat 2 greased loaf pans. Sprinkle the remaining half evenly over the top of both pans of batter. Bake as directed.

Friday, April 13, 2012

Baked Spiced Cake Donuts {Baking with Sisters, Part 3}

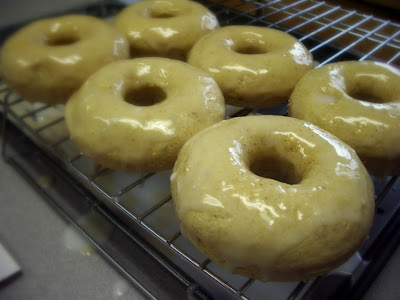
The third and final treat my sisters and I baked during their visit was a batch of baked donuts. I foolishly ordered a donut pan right at a time when I was trying to start losing weight (I know, what was I thinking?) so, mustering all my self control, when it came I stashed it away and didn't look at it again. However, when the girls came, I thought it would be fun to give it a try (we'd already indulged in cinnamon rolls and scones, what could a donut hurt? And besides, they're baked so they're...less unhealthy...). We decided the safest route to go would be to try the simple recipe for spiced cake donuts on the back that had come attached to the pan. They proved to be super easy and delicious! And, the donut pan worked like a dream! The donuts came out looking absolutely perfect and round.


We whipped up the batter in no time and piped it into the pan. The recipe notes that a pastry bag or plastic bag with a corner cut off works best to fill the pan- and they were right. A Ziploc bag with the corner cut out worked perfectly!
Once the donuts were baked and cooled (and after the mishap we won't talk about where a certain chef dumped the second pan of donuts into the bottom of the oven), we decorated them. Half the batch was appointed to be coated with the recommended glaze from the donut pan recipe (and some leftover scone glaze), the other half we decided to split evenly between being dipped in melted butter, cinnamon and sugar and  the others being "frosted" with Nutella and finished up with sprinkles. All the donuts were delicious and beautiful, and were certainly a hit with the rest of the family who came up to visit that evening! They were spongy and soft and the toppings were yummy!


And now that this chapter is closed, I look forward to the next opportunity I'll have to bake with my beautiful sisters!


Baked Spiced Cake Donuts with Glaze
(printable version)
from a NORPRO pan
makes 12 donuts

2 cups flour
3/4 cup white sugar
2 tsp baking powder
1/4 tsp nutmeg
1/4 tsp cinnamon
1 tsp salt
3/4 cup milk
2 eggs, beaten
2 tsp vanilla
1 TB shortening

Preheat oven to 325.
Lightly grease donut pan. In a large bowl, mix flour, sugar, baking powder, nutmeg, cinnamon and salt. Stir in milk, eggs, vanilla and shortening.
Pour batter into pastry bag or plastic bag with the corner cut off. Fill each donut cup approx. 3/4 full.
 Bake 8 to 10 min. or until donuts spring back when touched. Allow to cool slightly before removing from pan.
When donuts are cooled, frost, glaze or dip in melted butter followed by a cinnamon-sugar mixture (or other topping of your choice- get creative!).

To make glaze: mix 1 cup powdered sugar with 2 TB hot water until smooth. Pour over cooled donuts or serve on the side for dipping.

Wednesday, April 11, 2012

{Slow Cooker} Chicken and Barley Soup

Another delicious and hearty soup for your slow cooker! This soup is packed full of healthy and tasty ingredients: tender chicken breast, vegetables, barley and soothing, flavorful broth. I adapted the original recipe for the crock-pot as usual and it turned out absolutely fantastic! It is a simple, yet satisfying meal- and so easy to make! If you haven't experimented with barley much, it is a great alternative to rice in many dishes! Next time you have a chilly evening or you want to come home to a delicious aroma and a hot meal, try a pot of warm, comforting chicken and barley soup!


{Slow Cooker} Chicken and Barley Soup
adapted from Kayln's Kitchen
serves about 6

2-4 boneless, skinless chicken breasts (depending on size) or 2 cups leftover chicken
8 cups chicken broth
1 tsp dried thyme
1 tsp poultry seasoning (or seasoning of your choice)
1 TB dried parsley
1 onion, diced
1 cup chopped celery (2-3 stalks)
1 cup sliced or diced carrots (or more!)
1 can diced tomatoes (or 1-2 chopped fresh tomatoes)
1/2 cup pearl barley
pepper and salt to taste

Place all ingredients in slow cooker. Cook on low heat 6-8 hrs. or on high 4-6 hrs. About halfway through cooking time (or when chicken is done), remove chicken from slow cooker and cut into chunks. Return to slow cooker for the remaining cook time.

Monday, April 9, 2012

Petite Vanilla Scones {Baking with Sisters- Part 2}

Another recipe my sisters and I tackled while they were visiting was a Pinterest find- Petite Vanilla Bean Scones. I cross the "Bean" out because we were not in possession of a vanilla bean at the time, unfortunately. So, these are the non-bean adaptation. If you'd like the original bean-included version, follow the link to the recipe on the Baking Bites blog! These tiny scones are soft and cakey, infused with vanilla flavor and delicately drizzled with a sweet glaze. If you are fortunate enough to have ever snagged a few at your local Starbucks, you are likely drooling about now and are eager to discover if they are easy enough to make at home. Well, get to the kitchen, because they are incredibly simple and fast to make and you probably have all the ingredients on hand! Between the three of us, we whipped these darling treats out in no time flat and were ready to move onto the next treat (which you'll read about in Part 3)! They baked up beautifully and looked even more adorable when coated with the shiny, vanilla colored glaze. They are a perfect portion size, too- a fantastic compliment to a cup of coffee or tea, and they would be equally at home on a breakfast tray or as an after dinner treat.


Petite Vanilla Scones
makes 20 small scones
adapted from Baking Bites

2 cups flour
1 1/2 tsp baking powder
1/2 tsp salt
1/2 cup butter, room temperature
1/3 cup sugar
2 tsp vanilla extract
1/2 cup milk

Preheat oven to 400.
Line a baking sheet with parchment paper. In a medium bowl, whisk together flour, baking powder and salt.
In a large bowl, cream together butter and sugar until light. Add vanilla and beat to incorporate. Add in half of flour mixture, followed by the milk. Stir in remaining flour mixture until dough comes together in a firm, slightly sticky mass.
Divide dough into 5 equal pieces and roll into tennis ball sized rounds. On lightly floured surface, press each ball into a disk about 1/2 in. thick. Cut each disk into quarters and place on prepared baking sheet.
Bake 11-15 min. or until lightly browned. Cool before glazing.

Vanilla Glaze
2 cups powdered sugar
4 TB milk
2 tsp vanilla extract

Beat together all glaze ingredients until very smooth and of pour-able consistency. Add extra sugar if too thin, extra milk if too thick. Pour over cooled scones.

Saturday, April 7, 2012

Blueberry-Honey Crumb Muffins {a Crazy Cooking Challenge}

When the Crazy Cooking Challenge for April was announced, I knew I didn't want to miss out!

Photobucket
Who wants to miss out on an excuse to make some delicious blueberry muffins??!


I found these delicious-looking muffins on a blog called "If You Give a Girl a Cookie"- I love that she uses alternatives to plain white sugar. The original recipe uses honey and brown rice syrup. When I scoured the grocery store shelves, however, I couldn't locate the brown rice syrup, so I searched substitutes and decided to use maple syrup- it was delicious!
These beautiful muffins are moist and filled with plump, juicy berries and the not-too-sweet flavor of the muffin is perfectly complimented by the sweet crunchy topping. 


Along with a smear of sweet butter, they are the perfect compliment to a cup of coffee in the morning, a welcome addition to a weekend breakfast, or a great on-the-go snack!


Blueberry-Honey Crumb Muffins
makes about 18 muffins

7 TB butter, softened
1/4 cup maple syrup, plus 1 TB water
1/3 cup plus 2 TB honey
2 eggs
2 1/4 cups flour
4 tsp baking powder
1 tsp sea salt
scant 1 cup whole milk
2 tsp vanilla
1 1/2 cups fresh or frozen blueberries

Crumbly Topping

4 TB flour
1 TB brown sugar
1 TB white sugar
1/2 tsp cinnamon
4 TB cold butter

Preheat oven to 350. Grease muffin tin or line with paper baking cups.
Beat butter, syrup, honey and eggs in mixing bowl until smooth. In two separate bowls, mix the dry ingredients in one and the milk and vanilla in the other. With the mixer on low speed, alternately add dry ingredients and milk to butter mixture until just combined.
With a rubber spatula, fold in blueberries. Scoop mixture into prepared muffins cups (an ice cream scoop works well), taking care not to fill beyond the rim, as they will rise considerably.
To make crumbly topping, stir together flour, sugars and cinnamon. Add butter and mix with your fingers or a pastry blender until mixture resembles small pebbles. Sprinkle each muffin top with about a tablespoon of crumbly topping.
Bake 20-25 min. or until tops are golden brown and a toothpick inserted in the center comes out with only a few moist crumbs stuck to it. Allow to cool 5 min. in pans before removing to a wire rack.
Serve with butter.

Friday, April 6, 2012

Nutella Cinnamon Rolls {Baking with Sisters, Part 1}

Last week, two of my three younger sisters came for a visit- we had such a fun time laughing, playing games, and doing one of our favorite things: baking. So...I threw my "diet" out the window and we had a blast in the kitchen, baking up a storm of sweet things. The first of those was a delectable batch of Nutella Cinnamon Rolls. I had been hankering for a pan of cinnamon rolls, needed something to take to our Ladies Bible Study, and had inadvertently picked up a container of Nutella. I first googled the idea of Nutella cinnamon rolls to see if they even existed. Of course, they did. It seems the cooks of this world have come up with any and every possible use for the irresistible hazelnut spread! (As a side note, this was my first experience with Nutella- if you have not yet enjoyed the wonder that is chocolate hazelnut spread, I invite you to do so without delay! I am hooked!) The particular blog I found this recipe on, Adventures in Food, has many of her own delicious looking Nutella creations.The rolls were much like other cinnamon rolls, a yeasty dough, rolled out and slathered with butter and sprinkled with cinnamon and sugar...but the addition of a rich layer of Nutella in the middle and a creamy Nutella-infused frosting generously drizzled on top truly transformed them into a thing of beauty. Beauty of taste anyway.


Anyhow, the unusually filled cinnamon rolls were a hit with our Bible study group (and also my husband, who enjoys any departure from my "diet" which brings him baked goods)- and we girls devoured a few extra ourselves while watching "Emma" and feeling incredibly girly and indulgent. Nothing brings out the silliness like baking, a jar of Nutella, and sisters.


Nutella Cinnamon Rolls
makes approx. 16 cinnamon rolls

1 pkg. quick rise yeast (2 1/2 tsp)
1/4 cup warm water
1/4 cup milk
1/4 cup butter, melted
2 tsp vanilla
1/2 tsp salt
1/4 cup sugar
1 egg, beaten
3 3/4 cups flour

2 TB butter
2/3 cup Nutella
3 TB brown sugar
1/2 tsp cinnamon

In the bowl of your mixer, combine yeast and water, allow to rest 5 min. Add milk, butter, vanilla, salt, sugar and egg and mix well.
Add 3 1/2 cups flour and mix until dough comes together, adding remaining flour a tablespoon at a time until dough forms a slightly sticky ball. Knead on a floured surface or using the dough hook of your mixer until dough is smooth and elastic.
Grease a large bowl and place dough inside, turning once to coat. Cover and allow to rise in a warm place 1-2 hours. Dough is ready when doubled in size and indentations remain when you press your fingers into it.
Preheat oven to 350.
Roll dough out onto a lightly floured surface into a 9x18 in. rectangle. Brush with the 2 TB melted butter. Spread Nutella evenly across the surface of the dough. Combine brown sugar and cinnamon and sprinkle over Nutella.
Starting at a long side, tightly roll up the dough, pinching the ends to seal. Using a serrated knife, slice dough into 1 1/2 in. rounds. Place into two greased pie pans. Let rolls rise in pans 15 min.
Bake 12 min. or until lightly browned. Allow to cool slightly while you prepare the icing.

Nutella Icing

2 cups powdered sugar
2 TB Nutella
2 TB butter, melted
3 TB milk

Whisk all ingredients together in a small bowl until smooth, then pour over cinnamon rolls while still warm.

Wednesday, April 4, 2012

Daddy's Old-Time Waffles {with Strawberry Sauce}

My Daddy is the breakfast king. He can do dinners, and he often did lunches when I was a kid, but his specialty (and favorite, I believe) is breakfast. Being a pastor, Mondays are his days off, and, being home-schooled, we had Mondays off too. Thus, it became our tradition to have big, late "Monday-Breakfasts"- and one of those cherished Monday treats is a recipe called "Old  Time Waffles" from one of my mom's favorite cook books, "Family Favorites" (a collection of recipes from California Home-Ec Teachers).


The recipe remarks state that the submitter's mother attained this recipe over the radio before electric waffle irons were even available! When Daddy was fixing breakfast, I would often sit at the counter and watch him, while he explained the special ingredient in these light, fluffy waffles- beaten egg whites. He taught me how to separate the eggs using the egg shell, warning me not to get a single drop of yolk in the whites or they wouldn't beat up properly. He said if there was anything but egg white in there, you could whip it till Doomsday and nothing would happen. But, if you happen to be very careful, and keep the whites pure, they would do a magical thing. As he whipped and whipped with a wire whisk, I saw the jelly-like substance transform into a beautiful cloud of foamy white, standing ever so softly when the whisk was removed.
Fast forward to years later and here I am in my own kitchen, with a fancy-shmancy Kitchen-Aid Mixer. Whipping egg whites would be a cinch. And it was- once I got the whites in the bowl! I went through 3 fragile store bought eggs, each yolk breaking into the white before I could stop it, before deciding to try some farm fresh eggs. These proved to be much sturdier, separating like a dream. The Kitchen-Aid also worked beautiful, transforming the heap of goo to a soft, inviting cloud.


Alas! I was so enthralled by the pretty whites that I mixed them in too soon, resulting in waffles that were a bit less fluffy then I remembered. Oh, well, I can testify to many year's experience that when done right, these waffles simply melt in your mouth, they are so light and delicious! Topped with a freshly made strawberry sauce, they were absolutely irresistible!


Old-Time Waffles
from "Family Favorites" Cookbook
serves 4

2 cups flour
1/2 tsp salt
2 tsp baking powder
3 eggs
3 TB sugar
1 1/2 cups milk
1/3 cup butter, melted

Sift together flour, salt and baking powder; set aside.
Separate eggs. Beat yolks in a large mixing bowl. Add sugar and milk to egg yolks. Beat well. Add flour mixture; mix until smooth. Stir in melted butter.
Beat egg whites until soft peaks form. Fold in beaten eggs whites.
Cook on waffle iron.

Strawberry Sauce
adapted from "Better Homes and Gardens Cookbook"
makes about 2 cups

3 cups fresh or frozen strawberries
1/4 cup sugar
1 tsp cornstarch

Thaw strawberries if frozen. Combine berries, sugar and cornstarch in small saucepan. Cook over medium heat until thickened and bubbly. Cook and stir for 2 min. more. Chill or serve warm.
Related Posts Plugin for WordPress, Blogger...