Showing posts with label lunch. Show all posts

Wednesday, October 16, 2013

{Slow Cooker} Butternut Squash & Sweet Potato Soup


One of my absolute favorite fall food items is the butternut squash.

I was only introduced to it a couple of years ago and it changed my world forever! It's creamy texture and delicate, nutty flavor incorporate well into a variety of dishes, but it especially lends itself well to soups. Its bright color is cheery, and pureed into a dreamy smoothness, it banishes the chill of a crisp fall evening in no time!

This recipe makes a huge batch-we had some for dinner, froze enough for another dinner, and had enough leftover for several lunches!

Pro tip: to make your squash easier to cut (these things are notorious for being difficult to get into!), microwave it for 2-3 min. The rind should be somewhat softened so you can slice it in half without cutting off your hand in the process.
Also, before freezing, be sure to let the soup cool completely!


Slow Cooker Butternut Squash & Sweet Potato Soup
(printable version)
adapted from Hamilton Beach
serves 8-10

1 medium onion, chopped
2 TB butter
2 cloves garlic, chopped
1 large butternut squash, peeled, seeded and cut into 2 in. chunks
1 large or 2 medium sweet potatoes, peeled and cut into 2 in. chunks
5 cups chicken broth
1 1/2 tsp. dried sage
1/2 tsp salt
1/4 tsp pepper
1/2 cup half and half or heavy cream

In a skillet, cook onion in butter over medium heat, stirring occasionally, until tender but not browned. Add the garlic and cook 1-2 min. more. Spoon into slow cooker.
Add squash, sweet potatoes, broth and seasonings.
Cover and cook on high 4 hours or on low 6-7 hours.
Let cool slightly, then puree in a blender or using an immersion blender (stick blender) until smooth. Stir in cream.

Wednesday, February 20, 2013

The Ultimate Fried Egg Sandwich {a Guide}


I don't know about your family, but in mine the fried egg sandwich was the quintessential "go-to" lazy day comfort food dinner. I don't know what it is about a fried egg and a slab of cheddar slapped between two pieces of toasted bread, but it almost always sounds good. You can make it in about five minutes and I can just about guarantee you'll have the ingredients on hand.

The other thing that's awesome about this sandwich is that, much like any other sandwich, it's infinitely customizable. The only thing that must remain is the egg. Switch out everything else, but as long as you keep that egg you can label it a "fried egg sandwich".

Unless of course you scramble the egg. Then it would have to be a "scrambled egg sandwich" wouldn't it?

But, as my brother would say, I digress.

Hubby and I have been enjoying traditional fried egg sandwiches every Sunday night now for awhile. It is so nice to have a few routines thrown into your weekly menu- not only does it make it a little easier to plan meals, it gives us something sure to look forward to! For instance, our week looks like this:

Monday- who knows. This is Travis' day off, so we don't plan anything. Usually we eat out or make something easy at home.
Tuesday- normal, but I can plan something a little more complicated or time-intensive because I don't have afternoon or evening activities.
Wednesday- Soup of some kind in the winter, salads in the summer
Thursday- normal
Friday- pizza
Saturday- breakfast for dinner
Sunday- Fried egg sandwiches and smoothies

See? Just a little structure.

So back to Sunday. We usually aren't super hungry on Sundays because we have a late lunch and just spend the afternoon napping or doing lazy things, so a light supper of sandwiches and smoothies (I'll have to share my staple smoothie guidelines with you soon!) is just perfect.

The other day, though, we decided to go a little crazy on our sandwiches. You know, break out of the order and make some chaos in the kitchen? It was fun and the end result was amazing. Best fried egg sandwich ever.

I want to share it with you, not because it's an amazing recipe you need to follow step by step, but because I want to give your imagination a springboard to create your own fried egg masterpiece!

But seriously, if you wanted to recreate this sandwich exactly as we made it, you really would be making a wise move.

Because it is incredibly yummy. Yum-tastic. Even.

But you knew that when scrolled down and peeked at the ingredient list, didn't you?

And you thought I wouldn't notice.

Yes, as we all know, bacon makes everything more amazing. So does fresh, ripe avocado. And cheese. Especially Tillamook Vintage White Cheddar cheese (as previously established). Oh, and bagels! Bagels are, of course, also on the amazing list.

So make your list, check it twice, and make some new traditions in your house!


The Ultimate Fried Egg Sandwich (a guide)
You don't really need to print it, but if you want to... (printable version)
a KitchenJoy Original "recipe"
makes 2

2 onion bagels (Safeway artisan bagels are amazing)
2 eggs
4 slices bacon (we used turkey bacon)
2 slices Tillamook Vintage White Cheddar cheese
1 ripe avocado, coarsely mashed

Fry eggs to your desired doneness, seasoning with salt and pepper or Lawry's seasoned salt. Meanwhile, fry bacon and toast bagels. If desired, butter bagels lightly. Spread one half of each bagel with half of mashed avocado. Assemble: place two bacon slices on top of avocado, top with cheese, egg, and other half of bagel. Enjoy!

Monday, November 19, 2012

Slow Cooker Chicken Caesar Sandwiches

I don't know about you, but I loooove chicken caesar salads.

I don't care if there are anchovies in the dressing!

Who brought that up anyway??! Back to the salad.

A Caesar salad is such a simple thing. Romaine lettuce, Parm, croutons. Occasionally chicken. And the dressing. Mmm, the dressing. My current favorite is Ken's Lite Creamy Caesar. It really doesn't taste light. It is yummmy.

So you know what is just a crazy genius idea? Putting all that Caesar salad goodness into a sandwich! And even more awesome? Let's use the crock pot! Or this would also be amazingly simple with leftover shredded chicken.

It is really amazing just how much these sandwiches taste like a classic Caesar salad. There's chicken, totally soaked in your favorite Caesar dressing. Then there's Parm- mixed in to the chicken and sprinkled on top. There's a good helping of crispy green romaine. And even the buns, golden toasted, pose pretty convincingly as croutons.

Wow, seriously. If you're having a Caesar salad craving, try one of these sandwiches. So good and incredibly simple!!


Slow Cooker Chicken Caesar Sandwiches
slightly adapted from Chef in Training
makes about 6 large sandwiches

2 lbs. chicken breast (or leftover shredded cooked chicken)
1/2 to 1 cup of your favorite Caesar dressing
1/2 cup shredded Parmesan cheese
1/4 cup chopped fresh parsley or 2 tsp dried parsley
1/2 tsp pepper
2 cups shredded or chopped romaine lettuce
6 hamburger buns (you could also do sliders!)

Place chicken in slow cooker. Cover with 1-2 cups water, cover and cook on low 4-6 hours. 
Remove chicken and shred. Pour water from the slow cooker. 
Return chicken to slow cooker and add dressing, Parmesan cheese, parsley and pepper. Stir until combined. Cover and cook on high 30 min. or until hot.
Toast hamburger buns until broiler until just browned.
To assemble, put some chicken mixture on each bun, top with extra Parmesan cheese and lettuce and serve!

Wednesday, August 22, 2012

Chicken {or Tuna} Noodle Salad

There is one point on which my husband and I do not agree (okay, so there's a couple, but really, not very many!). 

Tuna. 

He hates it. I enjoy it. 

I grew up on tuna- my mom LOVES it! She eats it almost every day, on crackers, on sandwiches, in salads...her mom also loves it, so I guess it's hereditary. 

However, even though my husband grew up eating tuna casserole (and I did not...hmmm...maybe we've got something there), he does NOT like tuna. So, like a good wife (haha) I do not force him to eat it. 

However, this summer I've had a craving for my mom's tuna noodle salad. The perfect summer meal, it doesn't require an oven, requires minimal preparation and uses simple ingredients you probably already have. The only point my mom and I disagree on is the temperature. She likes to serve it while the noodles are still warm- I like to make it ahead of time so it will be chilled. 

Anyhow, back to the problem. Tuna. I decided to make a compromise. I'd make the salad, but substitute canned chicken for the tuna! Hardly anybody can tell the difference between chicken salad and tuna salad anyway, so why not? Hubby will be happy not to have to eat tuna and smell that fishy smell in the house and I can have my salad. :) Yum!


Chicken (or Tuna) Noodle Salad
serves 4-6

1 pkg. spiral noodles (or shape of your choice)
1 large can of chicken (or tuna), drained
about 1/2 cup chopped celery
about 1/2 cup diced cheddar cheese
1/4 cup mayonnaise, or more to taste
2 TB mustard, or more to taste
salt and pepper

Cook noodles according to package directions. Drain and rinse with cold water. Place in a large serving bowl.
Add remaining ingredients to noodles and mix thoroughly to combine. Salt and pepper to taste. If desired, cover and chill.

Monday, July 2, 2012

Thai Crunch Chicken Salad


I've been on a bit of a Thai food kick.

I think it began with the delicious chicken satay...

then was encouraged by the amazing stir fry I made using the leftover peanut sauce...

and continued by the great little Thai restaurant my friends and I found in Mukilteo on our reunion...

and now, even as I bring to you this scrumptious salad, a Thai pizza recipe has gotten awfully cozy with next Friday night.

I'll confess. I'm not a huge fan of curry. I'm allergic to coconut. I don't even like spicy food. So what is it that draws me to Thai food?

What do you think?

If you guessed "peanuts" or "peanut butter" you would have hit the nail on the proverbial head. Let's be honest. That's all I'm really in it for. The excuse to spread peanut butter all over salads, pizza, noodles, chicken, whatever.

This salad lives up to its name. Crunch. Just about every ingredient in here gives that satisfying feeling. Starting with my new friend.

Readers, meet napa cabbage.

Napa Cabbage, meet readers.

I had never had the privilege of acquaintance with such a cabbage before, in fact, I did not even know such a variety existed until I looked for it at our local supermarket! It is very pretty, chops up nicely, and looks more like iceberg lettuce than its more well known comrade, green cabbage.

Next on the crunch list are carrots and cucumbers. I don't need to tell you about them, do I?

Then we have edamame. Oh, elusive edamame. I could not find these green soybeans anywhere, so what did I do? I subbed in another crunchy lookalike. Sugar snap peas! They worked like a charm with their fresh taste and signature snap. Oh, and I also substituted chives from my garden for the green onion. Yum.

Last on the crunchy lineup are, of course, peanuts. Yay peanuts!


And what is poured on top of all the crunchy goodness? This fabulous tangy-sweet dressing.


Can you guess what's in here? PEANUT BUTTER.

Oh, and other things.


Thai Crunch Chicken Salad
slightly adapted from How Sweet It Is
serves about 6

1 napa cabbage, chopped
1 red cabbage, chopped
6 green onions (or a bunch of chives)
1 large cucumber, peeled, sliced and quartered
2/3 cup chopped or sliced carrots
2/3 cup chopped sugar snap peas (or edamame)
2/3 cup torn fresh cilantro
2/3 cup chopped peanuts
3 boneless, skinless chicken breasts (grilled is delicious!)
1/2 tsp salt
1/2 tsp pepper

Dressing and Marinade
1 cup sweet chili sauce
1/2 cup rice vinegar
1/2 cup lite canned coconut milk (or regular skim milk if you're allergic like me!)
6 TB brown sugar
4 garlic cloves, pressed or finely minced
2 TB creamy peanut butter
2 tsp sized knobs of fresh ginger, grated
2 limes, juiced
1 TB soy sauce

Preheat oven to 375 degrees. Spray baking pan with nonstick spray. Season chicken with salt and pepper, then place in the baking dish.
Combine all sauce ingredients in a saucepan, whisking to combine. Bring to a boil, then reduce to a simmer and cook for 3-4 min. until slightly thickened. Remove from heat and pour half of the sauce over the chicken, turning chicken to coat completely. Set remaining sauce aside to dress salad.
Bake chicken 25-30 min. or until cooked through.
While chicken is cooking, combine all salad ingredients (except for peanuts) in a large bowl and toss. When chicken is done, let cool a few minutes, then shred or chop.
Serve salad, top with chicken, peanuts and dressing.

Monday, May 7, 2012

Garlic-Rubbed Grilled Cheese with Bacon & Tomatoes {a Crazy Cooking Challenge}

Photobucket

 I don't think I've met anyone yet who doesn't like grilled cheese.

Even regular white bread and a slice of cheddar (sorry, I will NOT concede that it is ok to make grilled cheese with Kraft singles American "cheese"...really, there ARE limits) is delicious when "grilled" to ooey gooey crispy perfection.

And who can deny that a hot cheesy sandwich is the perfect compliment to a steaming bowl of tomato soup? In our house growing up the two were inseparable.

That said, what if you upped the ante to include a few simple yet outstanding ingredients?

Such as...a special cheese (Gruyere)?

Such as...juicy ripe tomatoes?

Such as...BACON?

And...wait for it...garlic???!!

What would you have then??

Needless to say (but I'll say it anyway for the fun of it), you would hold in your hands the most amazing, grown-up, flavor-packed, blow-the-socks-off-your-white-and-cheddar grilled cheese sandwich to ever walk the planet (okay, so that's a little weird, but really, if any sandwich were to ever get up and walk, trust me, it would be this one...a little cayenne pepper goes a long way).

Tracey over at Tracey's Culinary Adventures is a genius.


So, for the method.

Start with some great crusty bread (you know, the kind that comes in the brown paper)- Italian, French, whatever smells heavenly and looks thick enough to support a load of amazingness.

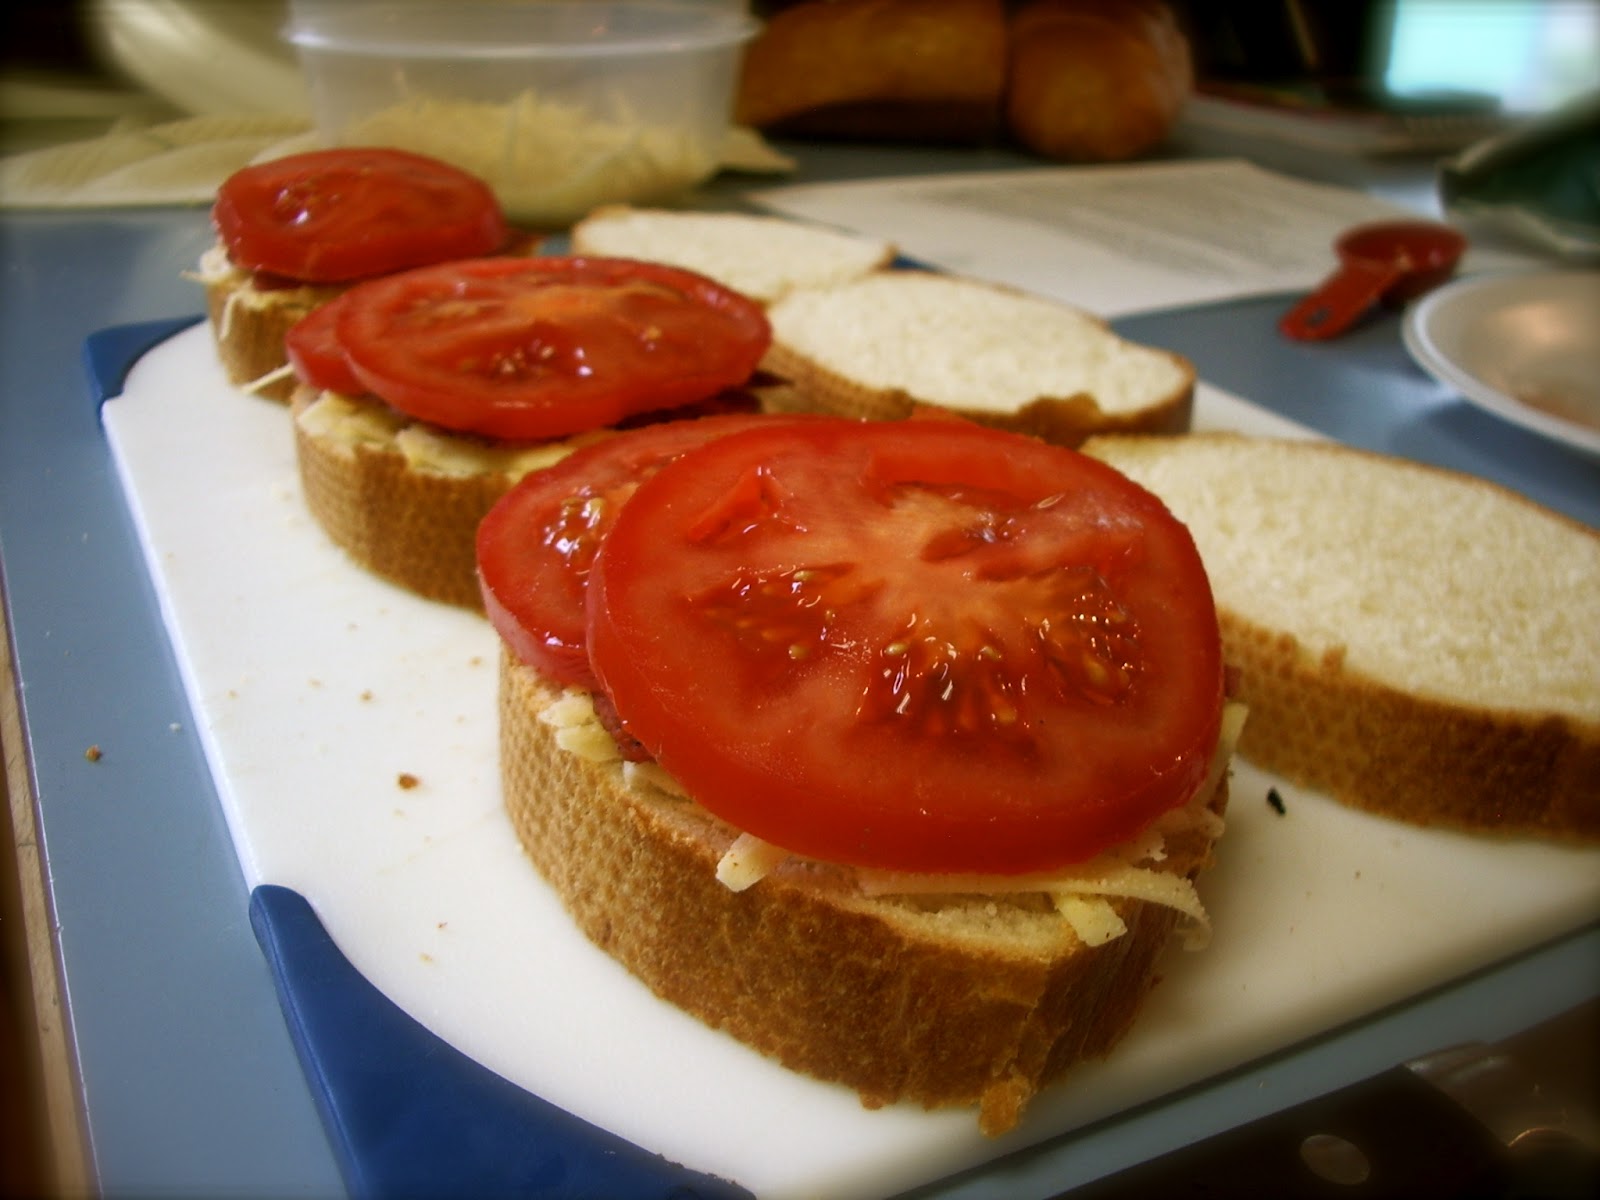
Generously (and when I say generously, I do mean generously) sprinkle one side of each sandwich with cheeses (which you have mixed with the aforesaid cayenne pepper). The original recipe called for Gruyere, fontina and Parmesan. However, I couldn't locate fontina in my grocery store, so I doubled the Gruyere. It was great, but next time I might try mixing in another cheese just for the heck of it.

White cheddar would be awesome.


Top the cheeses of choice with BACON.

Yes, BACON is one of those words that is always deserving of capitals.


With the cheese duly shielded by the BACON, layer a couple of thick and juicy tomato slices.


Top this with MORE cheese!


The grilling part, obviously follows the construction, then THIS important detail. So simple, so easy, and yet it makes a fantastic flavor difference. Immediately after grilling, rub each side of each sandwich with a fresh halved garlic clove.

Oh wow.

What this does to the sandwich is not within my powers to describe.

You must simply make it for yourself.


Now all that's left is to find a side that is worthy of this incredible creation. If you're not in the tomato soup mood, try what I chose, a perfect BACONY compliment, the Best Ever Potato Salad.

Garlic-Rubbed Grilled Cheese with Bacon and Tomatoes
makes 4 sandwiches

8 slices bacon, cooked crisp
3 oz. (about 1 1/4 cups) grated Gruyere cheese
3 oz. (about 1 cup) grated fontina (or other cheese- I used more Gruyere)
2 TB finely grated Parmigiano-Reggiano
1/4 tsp (or to taste) crushed red pepper flakes (cayenne)
8 1/2-in.-thick slices Italian bread
2 med. ripe tomatoes, sliced into 1/4-thick slices
2 TB butter, room temperature
1 to 2 large cloves garlic, peeled and halved

Combine cheeses and red pepper flakes. Lay 4 slices of the bread on your work surface and distribute half the cheese mixture evenly among the bread. Top with 2 slices of bacon per sandwich, followed by 2 or 3 slices of tomato (enough to cover the cheese and bacon). Evenly distribute the remaining cheese among the four sandwiches. Lightly butter one side of each of the remaining 4 slices of bread and put them on top of the sandwiches, butter side up.
Heat skillet over med. heat. Place sandwiches butter side down in the pan and cook on the first side until the bread is golden brown and toasted. Meanwhile, butter the top slice of bread on each sandwich. Flip sandwiches using a spatula and continue to cook on second side until bread is golden brown and the cheese is melted. You can use the spatula to compress the sandwich as it cooks on the second side.
Remove the sandwiches from the pan and immediately rub both sides with the cut side of a garlic clove. Cut sandwiches in half and serve.

Saturday, February 4, 2012

Pepperoni Pizza Pinwheels

Looking for a quick snack to take to a game day party? Need something to feed to hungry kids or teenagers? Or just a platter of something tasty to fill up the potluck crowd at church? If the last, I can sympathize. This is the "end of the month" grocery-wise for Travis and I, so I was trying to figure out what I could bring to our church potluck that could materialize out of the limited supply left in my cupboards. From somewhere, suddenly it hit me! A genius idea. Pizza pinwheels! I have seen this idea before and I think it originates with Pillsbury, using their crescent dough or pre-made pizza dough- which would work great! But I decided to use my own favorite pizza crust recipe and experiment a little. Wow. These little guys are fantastic- and I if I can keep hubby from eating them all tonight, I think they will disappear tomorrow!


Start with a basic pizza crust recipe. I doubled mine, which you can find here. I opted to leave out the whole wheat flour and did all white instead, but I'm sure it would be great either way. Allow it to rest about 5 minutes, which gives the yeast time to make the dough stretchy. Roll it out on a floured surface into as large a rectangle as you can without it breaking.

Yes, this is a rectangle...ish.

Spread your favorite pizza sauce on top and sprinkle with cheese and any other toppings you like. I just used pepperoni, but anything would really be fantastic.


Starting at one of the long ends, roll tightly, cinnamon roll style.


Slice into 1/2 in. rounds (I used a serrated knife, and it worked pretty well). Arrange on a greased cookie sheet and bake.


Voila! Cheesy, bubbly, pizza filled swirls of yummyness! 


Pepperoni Pizza Pinwheels
(printable version)
A KitchenJoy original recipe
makes about 36 pinwheels

Doubled recipe pizza crust dough
pizza sauce
shredded cheese
pepperoni (or other toppings)

Preheat oven to 425.
Roll out dough very thin into a large rectangle.
Spread sauce on top, sprinkle with cheese. Top with pepperoni.
Starting at a long edge, roll cinnamon roll style.
Slice into 1/2 in. rounds. Place several inches apart on greased baking sheet.
Bake 10-12 min. Let cool 1-2 min, then remove to wire racks to cool completely.

Wednesday, September 7, 2011

Opa! (Whole Wheat Pita Bread and Chicken Gyros)

I have to say, my husband can be credited with being the first person to introduce me to the concept of a gyro. And the correct pronunciation. When he talked about how great gyros (year-ohs) were, I did not automatically connect it with that place in the mall's food court I had always wondered about that advertised gyros (jye-rohs). Ah. Oops. My first experience eating one was with him and a friend of mine at a bistro in Spokane. It was delicious! Basically, if you haven't gone out on a limb yet and sampled this tasty yet simple Greek fare, it is some spiced meat (chicken or lamb usually, I believe) with veggies and a special sauce (which I refer to as a cucumber dill sauce since I have no idea how to pronounce "tzatziki"), served on pita bread. It seems the meat is usually roasted on some kind of a vertical spit, then shaved onto the gyro, but as I do not possess any vertical spits at present, I had to make ours the very American way- in a frying pan. I believe it would also be fabulous on the grill, but last night that would not have worked for us. I found a simple and seemingly typical recipe online, and added the extra fun of making my own pitas.
I have experimented with pitas before, but it had been so long, I needed a refresher course- also, I wanted to try whole wheat. Snagging a recipe from Annie's Eats, I started making the pita dough early on in the afternoon. This recipe actually goes through about 3 different phases of rising. First, with basic yeast/honey liquid for about 45 min.


Then after the flour has been mixed in and the dough kneaded, for about an hour. Then, once the dough has been shaped into flat little discs, for about 30 min. (I apologize, I forgot to take very many pictures of this process.) The actual cooking was the most trying part, however. The pitas have to be baked on an already preheated surface. I don't have a pizza stone yet, so I took Annie's suggestion to bake them directly on the oven rack. Not the best idea, at least not in my oven. The perfect little circles of dough sagged through the rack and became misshapen.


With this first batch I followed her cooking time suggestion exactly as well, and for some reason in my oven it wasn't quite right either. The pitas didn't really puff up right and they were still a bit doughy inside. However, the second batch turned out perfectly!


I preheated an upside down baking sheet, then placed the pita circles on top of it. After adding an extra minute of baking time to each side, they were perfectly puffed and golden. So, at least I came out with four good pitas! The others are so disfigured, you can't really split them open, but you can pile the goodies on top! It's always trial and error, as everybody's ovens and equipment work a little bit differently. The recipe is great though. The pitas are soft and chewy, with a very pleasing flavor. We piled marinated chicken, tomatoes, lettuce, and the amazingly delicious cucumber dill sauce into them and were delighted.


 The sauce has such a refreshing flavor! I'm not usually a big fan of dill, but it is wonderful paired with all the other flavors in this dish.
You don't have to make your own pita bread, but do give this recipe a try! It will have you mastering words like "tzatziki" and "gyro" in no time! :)


For the pita bread recipe, click here.
For the gyro recipe, click here.

Friday, July 16, 2010

Old Faves, New Craves (Oriental Chicken Salad/Focaccia Bread)


You know how there are some foods that are simply family traditions? Maybe your great-great-great-grandma brought it over from "the old country" quite a few generations ago. Maybe it entered your family more recently. Take my mom's famous Oriental chicken salad. Not so very old, the recipe was given to my mom by her sister, but it has taken its hold on our family. It has attended two of our families' weddings, many potlucks and family get-togethers, and my older brother has even been know to say that it would be his food of choice were he to ever be stranded on a deserted island and had to eat one food for the rest of his life (assuming he had a choice). The uncovering of the salad bowl is usually accompanied by several "ooh"s and lip-licking is sure to follow. Why is it so desirable? Maybe it's because of the pretty blend of colors or the satisfyingly crisp crunch of the cabbage. Maybe it's the lightness of it on a hot summer evening. Or maybe it's the memories we have of the house filled with smells of toasting almonds on a Saturday night. Or the ones I have of sitting at the kitchen counter chopping piles after piles of cabbage while listening to Adventures in Odyssey on the radio or chatting with my dad or a young sibling beside me who is "learning how it's done." Sometimes it seems with family favorites the flavors and aromas are so intertwined with the memories that it is difficult to separate the two.
I had decided today to make my mom's sought-after-salad, since it is a hot summer day and something like a cool, crunchy salad seemed just the thing. My first thought for a side dish was to get out some of my freezer roll dough to make bread sticks, but I only had enough dough for three, which isn't quite enough for my hubby and I! So I thought, well, I'll just have to make my own! And while searching for a bread stick recipe, I stumbled upon a recipe for focaccia bread, which looked absolutely delicious, but not too difficult. So, in-between my usual Friday/Saturday duties of getting the bulletin and the PowerPoint done for church, I mixed, kneaded and let my focaccia bread rise. It is very aromatic, sprinkled through with rosemary!
Later on, as the last of the rising was happening on my stove top, I cooked up a large chicken breast, and began chopping away at a head of cabbage, memories flooding over me. Into the oven went the focaccia bread, along with the sesame seeds and slivered almonds to toast. Needless to say, I cut the recipe in half. This really feeds a crowd, so even halved, my husband and I have leftovers!
When everything was sliced, diced and toasted to perfection and the bread was giving a wonderful scent to my kitchen, it all went together into a pretty salad bowl. When mixing up the dressing, I had to make one substitution...mom always made the dressing with rice vinegar, and since I had none on hand I replaced it with cider vinegar. This resulted in it not tasting just like mom used to make, but pretty close! :)
I tossed the dressing with the salad just as the bread was cooling. Taking a bite of each, I decided that the old held up its reputation with honor and the new made a delightful addition!


Mom's Oriental Chicken Salad
(printable version)
serves about 12

2-3 cups cooked chicken (diced)
1/2 cup sesame seeds
3/4 cup slivered almonds
2 pkgs ramen noodles
1 lg head green cabbage, thinly sliced
1 bunch green onions, sliced

Dressing:
1 cup oil
6 tbsp rice vinegar
2 tbsp sugar
flavor packet from ramen noodles (chicken flavor)
salt and pepper to taste

Toast sesame seeds, slivered almonds, and ramen (broken apart) on cookie sheet in 350 oven for 10-15 min. Let cool. Combine all ingredients (except dressing) and mix well. Pour dressing over all and toss to coat.

Betty Crocker's Focaccia Bread
(printable version)
makes 2 loaves

2 1/2 to 3 cups flour
1 tbsp dried rosemary
1 tbsp sugar
1 tsp salt
1 pkg yeast
3 tbsp olive oil
1 cup very warm water

2 tbsp olive oil
1/4 cup grated Parmesan cheese

Mix 1 cup flour, rosemary, sugar, salt and yeast. Add oil and water. Beat with mixer 3 min. Stir in remaining flour. Knead 5 to 8 minutes. Grease lg bowl, place dough in bowl and turn to coat. Cover loosely and let rise 30 min. Grease two round pizza pans. Deflate dough with fist and divide in half. Shape into 10 in rounds on pans. Cover loosely and let rise 30 min. Make depressions in dough with fingertips 2 in. apart. Brush with olive oil and sprinkle with cheese. Bake in 400 oven 15-20 min.
Related Posts Plugin for WordPress, Blogger...