Showing posts with label cheese. Show all posts

Thursday, June 20, 2013

Bacon, Cheddar & Kale Frittata


So a couple of months ago I discovered the frittata. Oh, and what a delicious discovery it was!

It also opened the door of my imagination to a whole world of possible frittatas. How easy would it be to swap out the asparagus for some other vegetable? The Gruyere for a different delectable cheese?

Then I woke up one morning fantasizing about the combination of quality bacon with some sauteed kale (both of which happened to be hanging around in our fridge). Let me tell you, it was a winning idea.

I mean really, how can you possibly err when you saute kale and onions in bacon fat? And toss in some unbelievably bright farm fresh eggs. And Tillamook cheddar. I mean, really.


Bacon, Cheddar & Kale Frittata
serves 6

12 large eggs
3 TB half & half
1/2 tsp salt
1/4 tsp black pepper
4 slices bacon
1/2 medium onion, diced
4 cups chopped kale
1/2-1 cup shredded cheddar cheese, depending on preference

Preheat oven to 400.
In a medium bowl, whisk together eggs, half & half, salt and pepper until combined.
In a non-stick, oven safe skillet, cook bacon over medium heat until crisp. Remove and drain on paper towels. Reserve about 1 TB of bacon grease in pan. When drained, chop or crumble bacon and set aside.
Add onions and saute 1-2 min. Add kale and continue sauteing until kale is wilted, about 3-4 min.
Stir cheese and bacon into egg mixture. Pour egg mixture into the skillet with the onions and kale and cook, using a rubber spatula to stir and scrape the bottom. Large curds will begin to form after about 2 min. but the eggs should still be quite wet. Shake the skillet to distribute eggs evenly then allow to cook for 30 seconds without stirring- this will set the bottom.
Transfer the skillet to the oven and bake about 10 min. If the frittata is set but just slightly wet and runny when you cut into it, it is done. 
Remove from oven and let stand 5 min. Loosen edges with spatula, then slide it out of the pan, cut into wedges and serve.

Tuesday, March 26, 2013

Asparagus, Bacon & Gruyere Frittata

I had an amazing revelation this past week.

There is an egg pie sort of thingy that is fantastically delicious that you don't have to make a crust for and comes together in a matter of minutes!


Maybe to you this is old news, but I just made my first frittata and am basking in the enjoyment of it!

I absolutely love quiche, but I rarely make them because not only are they fattening (hello, pie crust!) but they are somewhat labor intensive (hello again, pie crust!) and they take a long time to bake! Beautiful and delicious for special occasions, but not really an every day or even every week kind of thing, you know?

I trust you do.

So, all that to say- frittata is quiche's low maintenance cousin!


On a side note, my spell check is at it again. This time it wants to change "frittata" to "irritation". Oh, yes, let's serve up a little irritation for breakfast! Sounds delightful, doesn't it?

"What's on the menu, honey?"

"Oh, just a little asparagus, bacon and Gruyere irritation, dear!"

Way to get my man to the table, spell check.

But...back to the FRITTATA...

Not only is it pleasing to your nostrils as you saute the asparagus, bacon and shallots, but also to your eyes- vibrant yellow eggs dotted with spring green asparagus and crisp bacon. Oh! and don't forget your taste buds! One of the most delightful things about this bright dish is the way the Gruyere stays in little gooey pockets, spilling forth melty goodness in each bite!

Whether you choose to serve your frittata for a holiday, a weekend brunch or a quick weeknight dinner, let's just say that it will get your man, or your family, or your company, or the president of the United States to your table much quicker than any "irritation" would.


Asparagus, Bacon & Gruyere Frittata
adapted from Tracy's Culinary Adventures
serves about 6

12 lg. eggs
3 TB half and half
1/2 tsp salt
1/4 tsp pepper
2 tsp olive oil
1/2 lb. asparagus, trimmed and cut on the bias into 1/4 in. pieces
6 slices bacon, chopped
1 shallot, minced
3 oz. Gruyere cheese, cut into 1/4 in. cubes

Preheat your oven to 400.

In a medium bowl, whisk together the egg, half and half, salt and pepper until completely combined.

Set a 12 in. nonstick, oven safe skillet over medium heat. Add the oil and when hot, throw in the asparagus and bacon. Cook, stirring occasionally, until the asparagus has lightly browned and is nearly tender, about 3 minutes. Add the shallot and cook just until slightly softened, about 2 minutes.

Add the cubes of cheese to the egg mixture and stir. Pour egg mixture into the skillet with the asparagus, bacon and shallot and cook, using a rubber spatula to stir and scrape the bottom. Large curds will begin to form after about 2 minutes, but the eggs should still be quite wet. Shake the skillet to distribute the eggs evenly and allow to cook for 30 sec. without stirring- this will set the bottom.

Transfer the skillet to the oven and cook until the frittata puffs and the surface browns slightly, 10-12 min. Check for done-ness by cutting into the frittata with a paring knife. If the eggs are firm, but just slightly wet, it's ready. Pull the skillet from the oven and let stand for 5 min. Loosen edges with the rubber spatula, then slide the frittata out of the pan and onto a serving plate. Cut into wedges and serve.

Wednesday, February 20, 2013

The Ultimate Fried Egg Sandwich {a Guide}


I don't know about your family, but in mine the fried egg sandwich was the quintessential "go-to" lazy day comfort food dinner. I don't know what it is about a fried egg and a slab of cheddar slapped between two pieces of toasted bread, but it almost always sounds good. You can make it in about five minutes and I can just about guarantee you'll have the ingredients on hand.

The other thing that's awesome about this sandwich is that, much like any other sandwich, it's infinitely customizable. The only thing that must remain is the egg. Switch out everything else, but as long as you keep that egg you can label it a "fried egg sandwich".

Unless of course you scramble the egg. Then it would have to be a "scrambled egg sandwich" wouldn't it?

But, as my brother would say, I digress.

Hubby and I have been enjoying traditional fried egg sandwiches every Sunday night now for awhile. It is so nice to have a few routines thrown into your weekly menu- not only does it make it a little easier to plan meals, it gives us something sure to look forward to! For instance, our week looks like this:

Monday- who knows. This is Travis' day off, so we don't plan anything. Usually we eat out or make something easy at home.
Tuesday- normal, but I can plan something a little more complicated or time-intensive because I don't have afternoon or evening activities.
Wednesday- Soup of some kind in the winter, salads in the summer
Thursday- normal
Friday- pizza
Saturday- breakfast for dinner
Sunday- Fried egg sandwiches and smoothies

See? Just a little structure.

So back to Sunday. We usually aren't super hungry on Sundays because we have a late lunch and just spend the afternoon napping or doing lazy things, so a light supper of sandwiches and smoothies (I'll have to share my staple smoothie guidelines with you soon!) is just perfect.

The other day, though, we decided to go a little crazy on our sandwiches. You know, break out of the order and make some chaos in the kitchen? It was fun and the end result was amazing. Best fried egg sandwich ever.

I want to share it with you, not because it's an amazing recipe you need to follow step by step, but because I want to give your imagination a springboard to create your own fried egg masterpiece!

But seriously, if you wanted to recreate this sandwich exactly as we made it, you really would be making a wise move.

Because it is incredibly yummy. Yum-tastic. Even.

But you knew that when scrolled down and peeked at the ingredient list, didn't you?

And you thought I wouldn't notice.

Yes, as we all know, bacon makes everything more amazing. So does fresh, ripe avocado. And cheese. Especially Tillamook Vintage White Cheddar cheese (as previously established). Oh, and bagels! Bagels are, of course, also on the amazing list.

So make your list, check it twice, and make some new traditions in your house!


The Ultimate Fried Egg Sandwich (a guide)
You don't really need to print it, but if you want to... (printable version)
a KitchenJoy Original "recipe"
makes 2

2 onion bagels (Safeway artisan bagels are amazing)
2 eggs
4 slices bacon (we used turkey bacon)
2 slices Tillamook Vintage White Cheddar cheese
1 ripe avocado, coarsely mashed

Fry eggs to your desired doneness, seasoning with salt and pepper or Lawry's seasoned salt. Meanwhile, fry bacon and toast bagels. If desired, butter bagels lightly. Spread one half of each bagel with half of mashed avocado. Assemble: place two bacon slices on top of avocado, top with cheese, egg, and other half of bagel. Enjoy!

Friday, February 1, 2013

Bacon Ranch Cheese Ball

Wow, I can't believe it's been almost a month since I last posted! Sorry about that...life's been a little crazy since the holidays. But, I'm back now, and hopefully will be able to swing right back into the routine of regular writing again.

This treat, which I actually made back in December for my Christmas party, comes to you now just in time for Sunday's big game.

However, if you don't happen to be interested in football (like myself), throw a party anyway.


Yep, this ball of cheese is THAT good.

You knew it was when you saw bacon in the title, didn't you?

This appetizer was such a big hit at my Christmas party (especially with the men, mind you, who aren't necessarily the world's biggest cheese ball fans) that it even overshadowed what I thought would be the bigger hit- a sweet take on the cheese ball that tastes like cookie dough! Hopefully I'll get that recipe posted on here one day too, but seriously. Bacon trumped cookie dough. This is a serious matter.

It couldn't be easier to roll up one of these crowd-pleasers, so you really don't have an excuse. Break out the Ritz (Wheat Thins are also awesome) and have a party!


Bacon Ranch Cheese Ball
slightly adapted from The Recipe Critic
makes one large cheese ball

2 (8 oz.) packages cream cheese
1 (1 oz.) packet dry buttermilk ranch dressing mix
1/2 cup grated cheddar cheese
1 (3 oz) jar real bacon bits (or use a few slices fried and crumbled real bacon!)
pecans or almonds, finely chopped for coating
crackers

Mix together cream cheese and dry ranch mix (this is really easy if you do it in your stand mixer).
Add cheese and bacon and mix thoroughly. Shape into a ball (it helps to use a piece of plastic wrap to form it) and roll in nuts to coat. Store in the refrigerator. Serve with crackers.

Thursday, November 29, 2012

Penne Gorgonzola with Chicken


I have recently discovered another love. Can you guess what it is?

I suppose "cheese" would always be a safe guess. And if that's what you said, you'd be darn right! No, I haven't recently discovered a love for cheese in general. I have loved cheese since...well, probably since I could eat cheese! But for many, many years, my knowledge of cheese was limited to varying shades of cheddar. Which is amazing, by the way. But along the way of my cooking journey, I have discovered SO MANY kinds of cheeses! Amazing cheeses!! Soft cheese, hard cheese, crumbly cheese. Who knew there were so many kinds to love??

Among the many textures, flavors, and colors, there is one in particular that I have recently been over the moon about. Gorgonzola. OH. MY. GOODNESS. This cheese is so incredible. I think it started on our anniversary this summer when we ate an appetizer of Gorgonzola Waffle Fries with a Gorgonzola dipping sauce. I could have eaten that alone for dinner. Every once in a while, I daydream about it. Wish I could find a way to replicate it. *sigh*

Anyways, this cheese, with its contrasting sharpness and sweetness, has captured my heart and my taste buds, which is why I cannot wait to share this fabulous pasta recipe with you! It is creamy and flavorful and laced with the pleasant flavors and aroma of fresh herbs and a quality cheese.


Penne Gorgonzola with Chicken
slightly adapted from Taste of Home
serves 8

1 package (16 oz) whole wheat penne pasta
1 lb. boneless, skinless chicken breasts, cut into 1/2 in. pieces
1 TB olive oil
1 lg. garlic clove, minced
1/4 cup white wine
1 cup heavy whipping cream
1/4 cup chicken broth
2 cups (8 oz.) crumbled Gorgonzola cheese
6 to 8 fresh sage leaves, thinly sliced
salt and pepper to taste
extra Gorgonzola and fresh parsley for garnish

Cook pasta according to package directions. Meanwhile, in a large skillet, over med. heat, brown chicken in oil on all sides. Add garlic, cook 1 min. longer. Add wine, stirring to loosen browned bits from pan.
Add cream and broth; cook until sauce is slightly thickened and chicken is no longer pink. Stir in the Gorgonzola cheese, sage, salt and pepper. Cook just until cheese is melted.
Drain pasta; toss with sauce. Sprinkle with additional cheese and parsley.

Thursday, November 8, 2012

Easy Butternut Squash Shells and Cheese

Do you remember last year when that one amazing soup totally sent me on butternut squash kick for awhile?


Welllll...I think it's started again. There is just something so irresistible to me about that creamy orange, mildly flavored squash. And when you pair it with ooey gooey cheese? Don't even get me started.

This recipe is no exception. It is very similar in flavor and texture to the awesomely delicious pumpkin macaroni and cheese and fairly easy to prepare. Tackling the squash is, as always, the most difficult part. You'll need a good sharp knife and some elbow grease to slice your way through the tough skin and firm flesh- but it's definitely worth it!


Easy Butternut Squash Shells and Cheese
serves about 6

3 cups uncooked whole wheat pasta shells
4 cups cubed uncooked butternut squash (about 1 medium)- peeled and seeds removed
2 TB olive oil
1/2 tsp salt
1/2 tsp pepper
1/4 tsp nutmeg
3/4 cup chicken or vegetable stock
1 1/2 cups milk
6 oz. shredded cheese (I used Gruyere- fontina was recommended)
4 oz. shredded Parmesan cheese
2 TB brown butter (for "how-to" click here)
2 TB fine bread crumbs
chopped fresh herbs for garnish (I used sage)

Preheat oven to 375. Prepare water for pasta and cook according to package directions. Drain.
While pasta is cooking, heat a large skillet over med-low heat. Add oil, then toss in squash with salt, pepper and nutmeg. Add stock and cover skillet, cooking for 15-20 min., stirring occasionally, until squash is soft and can be easily mashed. Remove cover and reduce heat to low. Mash squash with a potato masher or fork, smoothing it out with a spoon to remove all the chunks.
Add in milk, 4 oz. of the Gruyere or fontina and all of the Parmesan, stirring until melted and smooth, about 5 min. If needed, add more milk a little at a time, stirring until smooth. Stir in brown butter, again mixing for a minute or so until incorporated. Taste and add more seasoning, if desired.
Fold shells into the sauce, coating completely. If not using an oven safe skillet, transfer shells to a casserole dish. Top with remaining cheese and breadcrumbs and bake for 15 min. If a bubbly, golden topping is desired, broil 1-2 min. after cooking. Sprinkle with fresh herbs and serve!

Saturday, October 6, 2012

Roasted Cauliflower and Aged White Cheddar Soup

Three important words.

Aged.

White.

Cheddar.


Oh, and Tillamook.

I guess that's four. Oops.

I highly recommend Tillamook Vintage White Extra Sharp Cheddar in this recipe (or in any other possible way you may want to use cheese)! It has long been a favorite of mine...in fact, if the truth be told, when hubby and I were engaged, he gave me a 2 lb. block of Tillamook Vintage White Extra Sharp Cheddar (would TVWESC be a good acronym?) for our first Valentine's Day! Now before you cleverly protest that that's awfully cheesy let it be known that I was extremely pleased to find that my man already knew me so well. I was ecstatic to have a whole 2 lb. of that incredibly sharp goodness to myself and he knew it!!

So anyway, back to the soup. Were we ever talking about soup? Oh, well, we should have been. This soup is amazing.

Almost unreal. Especially since it contains a vegetable I never eat! Again, like the broccoli incident, I think that roasting worked it's magic on the cauliflower. Along with the aforementioned cheese of course.


In any case, hubby (who is not in the broccoli-lover's club by any means) loved it as much as I did- we pretty much slurped up the whole pot of it. Yes, all four servings. Hey, it's veggies, right?


Oh, and also! I got these adorable new soup mugs on our recent trip to Wallowa Lake- one of the gift shops there carried my dining set brand in a beautiful variety of colors. I fell in love with the blue soup mugs and I think they go beautifully with my cream colored plates, don't you?


Roasted Cauliflower and Aged White Cheddar Soup
adapted slightly from Closet Cooking
serves 4

1 head of cauliflower, cut into small florets
2 TB olive oil
salt and pepper

1 TB oil
1 med. onion, diced
2 cloves garlic, chopped
1 tsp thyme
3 cups chicken broth (or veggie broth, if you prefer)
1 1/2 cups aged white cheddar (Tillamook recommended)
1 cup milk or cream (I used a combination of both)
salt and pepper
6-8 slices bacon

Preheat oven to 400. Toss cauliflower florets in oil along with salt and pepper to taste. Arrange in a single layer on baking sheet. Roast 20-30 min., stirring halfway through, or until cauliflower is browning.
Heat the 1 TB oil in a large saucepan on med. heat. Saute onion 5-7 min. or until tender. Add garlic and thyme and saute until fragrant, about 1 min.
Add broth and cauliflower, bring to a boil, reduce heat and simmer, covered, about 20 min. (Slow cooker option: at this point, move onion/garlic mixture to slow cooker. Stir in broth and cauliflower, cook on low 4 hours or until cauliflower is tender...continue to follow regular directions). Meanwhile, cook bacon until crisp, if desired, and crumble.
Puree with a stick blender until soup reaches desired consistency. Mix in cheese and let it melt, adding salt and pepper to taste.
Stir in milk or cream and cook until hot if necessary. Stir in about half the bacon.
Garnish with reserved bacon.

Friday, August 10, 2012

Cheesy Zucchini Rice

Is your garden overflowing with summer squash yet? We didn't plant any this year, but I have bought some zucchini at the store and find myself wishing we had! Zucchini is such a wonderful vegetable and can be used in a variety of ways- it soaks up flavor so well! The latest way I tried zucchini was to put in rice!


Grated into thin strips, the squash practically melts into the rice, and combined with cheese and flavored with broth, this perfect summer side bears a strong resemblance to creamy risotto. It is also an eye-pleaser, being a delightfully bright green!


Cheesy Zucchini Rice
adapted slightly from Buns in My Oven
serves about 4

1/2 TB olive oil
1/2 cup white rice
1 cup chicken broth
1 TB butter
1 med. zucchini, grated
1/2 cup cheddar cheese, grated
1/4 tsp garlic powder
salt and pepper to taste
splash of milk, if desired

Heat olive oil in a saucepan over med. heat. Add rice and stir to coat. Toast the rice, stirring often, until it just begins to turn golden.
Pour in chicken broth, bring to a boil and reduce heat to low. Simmer 15-20 min or until most of the liquid is absorbed.
Remove from heat and add butter, zucchini, cheese, garlic powder and salt and pepper. Stir well to combine. Cover and let sit 5 min.
Stir again and add milk if desired.

Monday, May 7, 2012

Garlic-Rubbed Grilled Cheese with Bacon & Tomatoes {a Crazy Cooking Challenge}

Photobucket

 I don't think I've met anyone yet who doesn't like grilled cheese.

Even regular white bread and a slice of cheddar (sorry, I will NOT concede that it is ok to make grilled cheese with Kraft singles American "cheese"...really, there ARE limits) is delicious when "grilled" to ooey gooey crispy perfection.

And who can deny that a hot cheesy sandwich is the perfect compliment to a steaming bowl of tomato soup? In our house growing up the two were inseparable.

That said, what if you upped the ante to include a few simple yet outstanding ingredients?

Such as...a special cheese (Gruyere)?

Such as...juicy ripe tomatoes?

Such as...BACON?

And...wait for it...garlic???!!

What would you have then??

Needless to say (but I'll say it anyway for the fun of it), you would hold in your hands the most amazing, grown-up, flavor-packed, blow-the-socks-off-your-white-and-cheddar grilled cheese sandwich to ever walk the planet (okay, so that's a little weird, but really, if any sandwich were to ever get up and walk, trust me, it would be this one...a little cayenne pepper goes a long way).

Tracey over at Tracey's Culinary Adventures is a genius.


So, for the method.

Start with some great crusty bread (you know, the kind that comes in the brown paper)- Italian, French, whatever smells heavenly and looks thick enough to support a load of amazingness.

Generously (and when I say generously, I do mean generously) sprinkle one side of each sandwich with cheeses (which you have mixed with the aforesaid cayenne pepper). The original recipe called for Gruyere, fontina and Parmesan. However, I couldn't locate fontina in my grocery store, so I doubled the Gruyere. It was great, but next time I might try mixing in another cheese just for the heck of it.

White cheddar would be awesome.


Top the cheeses of choice with BACON.

Yes, BACON is one of those words that is always deserving of capitals.


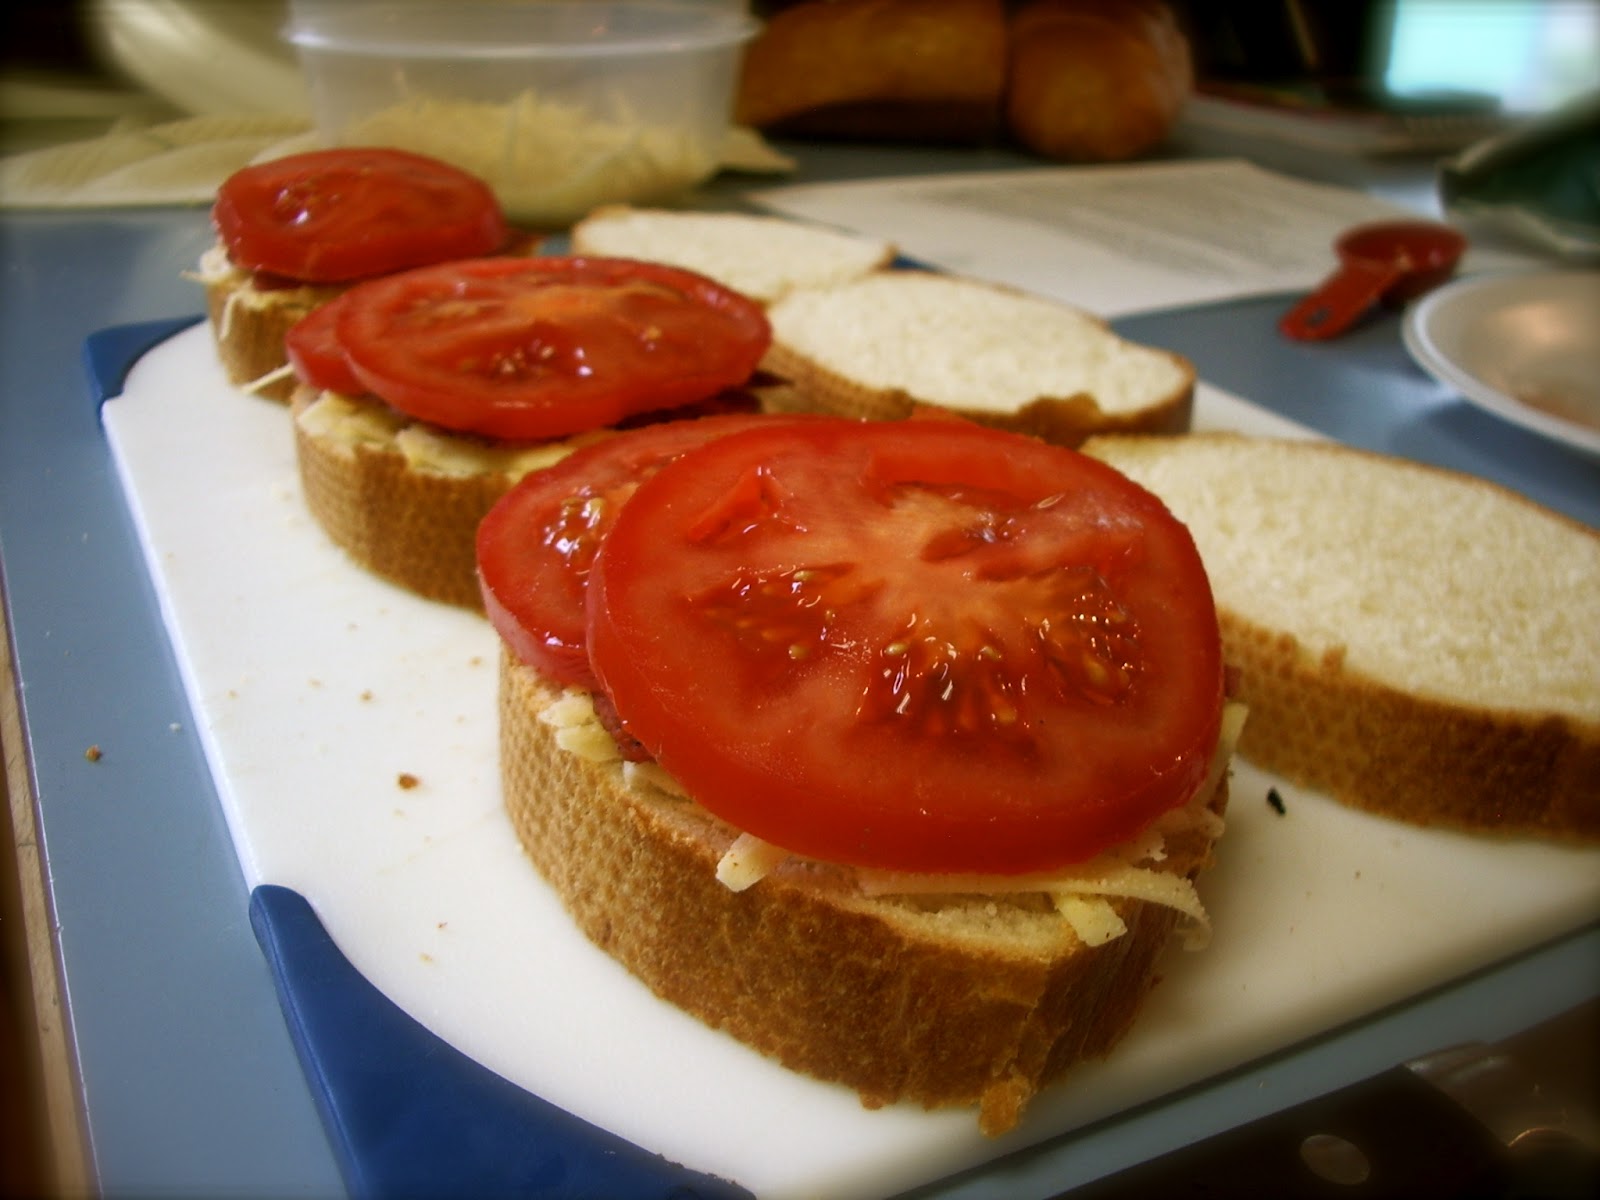
With the cheese duly shielded by the BACON, layer a couple of thick and juicy tomato slices.


Top this with MORE cheese!


The grilling part, obviously follows the construction, then THIS important detail. So simple, so easy, and yet it makes a fantastic flavor difference. Immediately after grilling, rub each side of each sandwich with a fresh halved garlic clove.

Oh wow.

What this does to the sandwich is not within my powers to describe.

You must simply make it for yourself.


Now all that's left is to find a side that is worthy of this incredible creation. If you're not in the tomato soup mood, try what I chose, a perfect BACONY compliment, the Best Ever Potato Salad.

Garlic-Rubbed Grilled Cheese with Bacon and Tomatoes
makes 4 sandwiches

8 slices bacon, cooked crisp
3 oz. (about 1 1/4 cups) grated Gruyere cheese
3 oz. (about 1 cup) grated fontina (or other cheese- I used more Gruyere)
2 TB finely grated Parmigiano-Reggiano
1/4 tsp (or to taste) crushed red pepper flakes (cayenne)
8 1/2-in.-thick slices Italian bread
2 med. ripe tomatoes, sliced into 1/4-thick slices
2 TB butter, room temperature
1 to 2 large cloves garlic, peeled and halved

Combine cheeses and red pepper flakes. Lay 4 slices of the bread on your work surface and distribute half the cheese mixture evenly among the bread. Top with 2 slices of bacon per sandwich, followed by 2 or 3 slices of tomato (enough to cover the cheese and bacon). Evenly distribute the remaining cheese among the four sandwiches. Lightly butter one side of each of the remaining 4 slices of bread and put them on top of the sandwiches, butter side up.
Heat skillet over med. heat. Place sandwiches butter side down in the pan and cook on the first side until the bread is golden brown and toasted. Meanwhile, butter the top slice of bread on each sandwich. Flip sandwiches using a spatula and continue to cook on second side until bread is golden brown and the cheese is melted. You can use the spatula to compress the sandwich as it cooks on the second side.
Remove the sandwiches from the pan and immediately rub both sides with the cut side of a garlic clove. Cut sandwiches in half and serve.

Wednesday, March 24, 2010

Just When I Thought it Was Safe... (Pumpkin Macaroni and Cheese)

Macaroni and cheese. What comes to mind when you read those words? If you're like me, you probably suddenly felt oddly calm and warm just picturing the familiar cheesy, steaming noodles. A sense of safety and comfort, maybe even some soft childhood memories surface. I love tradition. I grew up in a happy, big family with LOTS of traditions. Traditions for birthdays, Mother's Day, Valentines, Thanksgiving, 4th of July, Sunday nights, bedtime, weddings, and of course, Christmas. I love our traditions, and, like all good traditions, they have to be done right. Macaroni and cheese is like a good tradition. Comfortable, warm, gooey, cheesy, and you can count on it to always be the same. At least that's what I thought.

A few months ago, I encountered a recipe that challenged my beliefs about good ol' Mac. Pumpkin Macaroni and Cheese. Just the title tells you something is terribly wrong. Someone put pumpkin in my mac?! And looking further down the list of ingredients I was appalled to find no mention of that favorite and familiar cheese...cheddar! It just wasn't there, and in its place was the frighteningly foreign "Gouda." I did have some leftover pumpkin in the freezer though...I saved the recipe to my computer, hoping that someday I might be courageous enough to try it, though a nagging voice kept telling me I'd be betraying the standby.

A few weeks ago, however, when making out my meal list, before I could change my mind, I quickly wrote "Gouda" on my shopping list. And, at the store, I hesitated again. Gouda wasn't so expensive, but still my hand hovered over the cold case...I'd never bought a round cheese encased in red wax before. My husband encouraged me to go for it, and it was done.

Yesterday afternoon, on the way home from a friend's house, I stopped at our general store for some milk. My mac n' cheese recipe also called for Red Cayenne Pepper, which I did not have and intended to leave out, seeing as I don't like spicy things and there was only 1/8 of a tsp anyway. But, I decided to check the spice aisle just in case. Now, mind you, my husband and I live in a very rural area, and our little general store really just carries the basics. The closest real grocery store is about 17 miles away. I highly doubted Cayenne pepper would be in much demand here. Lo and behold, however, two dusty little canisters sat neglected on the shelf, not even priced. I inquired about this, and the shopkeeper couldn't find the price either, so he sold it to me at $1.99, which I have no doubt was quite a steal! It was meant to be! :)

I decided to make the dish in the afternoon, ahead of time, so I could have plenty of time and room for my experiment. I love trying new things, so my mood was almost giddy! It makes me so happy just to be in the kitchen, creating!
The first step was to whirl chunks of bread in the blender. Sounded funny to me, but what I got were beautiful fine crumbs, so perfect that I had to laugh- I never would have thought to use the blender for that! These I mixed with Parmesan cheese. I was a little wary of the bread crumb idea, having had only one experience with crumb-topped macaroni. The dish I had ordered that way had seemed dry and crunchy- not at all my idea of perfect mac n' cheese! But, setting aside the crumbs for later, I also decided to set aside my misgivings. Then I began to multi-task. Those of you who cook know that you can hardly escape multi-tasking. Cooking perfects your ability to do so! This simmering here that broiling there, chopping up something for the next step, washing a vegetable, and watching the clock all the while! So, while the pumpkin puree and chicken broth simmered on the back of the stove, I chopped onions and got them bubbling in some butter...grating the Gouda in between stirs.


Now, Gouda is a little more difficult to grate that cheddar, as it is a softer cheese. I couldn't resist nibbling a bit- my first taste of Gouda! I have been trying since yesterday to describe the flavor. It is entirely different than cheddar- mild, yet strikingly rich, with maybe just a slight tang. It is a lovely mellow orange color. The aroma of the onions, butter, flour and milk simmering away was heavenly!

While the pasta boiled on the back burner, I mixed in the cheeses, spices (a seemingly odd combination of nutmeg and the cayenne pepper...) and the pumpkin mixture to create a delightful orange sauce. After draining the macaroni, I poured it into a 11x7 glass dish, pouring the sauce over all. After mixing enough to coat, more grated Gouda went on top, then, in true Italian style, I finished it off by sprinkling the pasta with bread crumbs. It looked beautiful.
I popped it into the fridge for later. And promptly forgot to take my frozen roll dough out of the freezer to rise. So, in lieu of lovely fresh-baked rolls we had toast with our adventurous dinner. Oh, well. Guess sometimes you just can't do it all! :)

The macaroni smelled wonderful as it was cooking, and because I refrigerated it, it took about twice the prescribed 20 minutes. But when I set it on the table, it looked wonderful!

The crumbs had turned a perfect golden brown and I was starving! It was delicious! My first bite was fabulous, but subsequent bites were even better as I sorted out the flavors and savored them. Travis doesn't share my same passion for macaroni and cheese in general, so I don't think it had quite the same bewitching effect on him, though he did pronounce it very good. I usually take the second helping as a good sign... ;)
The pumpkin flavor was not strong, in fact my first few bites, I didn't taste it at all. But then every now and then I could catch it. The flavor in general was very mild, not having quite the sharpness that we're used to when we stand by the old familiar cheddar, but possessing something of a mellowed spiciness. The pasta was deliciously moist and I surprised myself by absolutely loving the fine crumb topping!
I have a new respect for macaroni and cheese...one that is not wrapped in tradition, but in new and unique flavors! I've always had a weakness for homemade mac, and this one was-or I should say, is (yay for leftovers!)- a pleasure. Thank you, macaroni, for lending yourself to adventure!


Pumpkin Macaroni and Cheese
(printable version)

Serves 4 to 6

1 slice sturdy white bread,crusts removed
1/2 cup grated Parmesan cheese, divided
1 can (15 ounces) pumpkin purée
1 cup chicken broth
12 ounces pasta shells
1 1/2 tablespoons butter
1/2 cup minced onion
1 1/2 tablespoons all-purpose flour
1 cup whole milk
2 cups shredded Gouda cheese, divided
1/2 teaspoon salt
1/8 teaspoon ground nutmeg
1/8 teaspoon cayenne pepper

1. Preheat the oven to 350°F. Tear the bread into chunks and whirl in a blender until fine crumbs form. Mix with half of the Parmesan cheese and set aside.

2. In a small saucepan, over medium heat stir the pumpkin purée and broth together. Bring to a simmer, stirring occasionally. Cover and keep warm.

3. Bring a large pot of lightly salted water to a boil. Add the pasta and cook until
al dente, 8 to 10 minutes. Drain well and pour into a 2-quart baking dish.

4. Melt the butter in a large pot or Dutch oven over medium heat. Add the onion and cook, stirring frequently, until softened but not browned, about 5 minutes. Stir in the flour and cook for another minute. Slowly whisk in the milk and bring the mixture to a simmer; cook, whisking frequently, until the sauce thickens, about 3 minutes. Remove from the heat.

5. Stir in half of the Gouda, the remaining Parmesan, and the salt, nutmeg, and
cayenne, and whisk vigorously until melted and smooth. Slowly pour in the
pumpkin mixture, whisking until well blended.

6. Pour the pumpkin-cheese sauce over the pasta and stir gently to coat. Sprinkle with the remaining Gouda and then the breadcrumb mixture. Bake until the crumbs are golden, about 20 minutes.
Related Posts Plugin for WordPress, Blogger...